> ## Documentation Index
> Fetch the complete documentation index at: https://docs.dfns.co/llms.txt
> Use this file to discover all available pages before exploring further.
# Manage wallets
> Create wallets, add networks, organize with tags, and manage balances from the DFNS dashboard with role-based access controls and audit trails.
export const Youtube = props => {
return ;
};
This guide covers how to create and manage wallets using the DFNS dashboard, including adding networks, using tags, and viewing wallet details.
Need managed custody with segregated balances, compliance holds, and an audit trail instead of direct wallet control? See [Manage vaults](/guides/manage-vaults), and compare the two models in [Vaults, wallets & keys](/core-concepts/vaults-wallets-and-keys#wallet-vs-vault).
## Creating a wallet
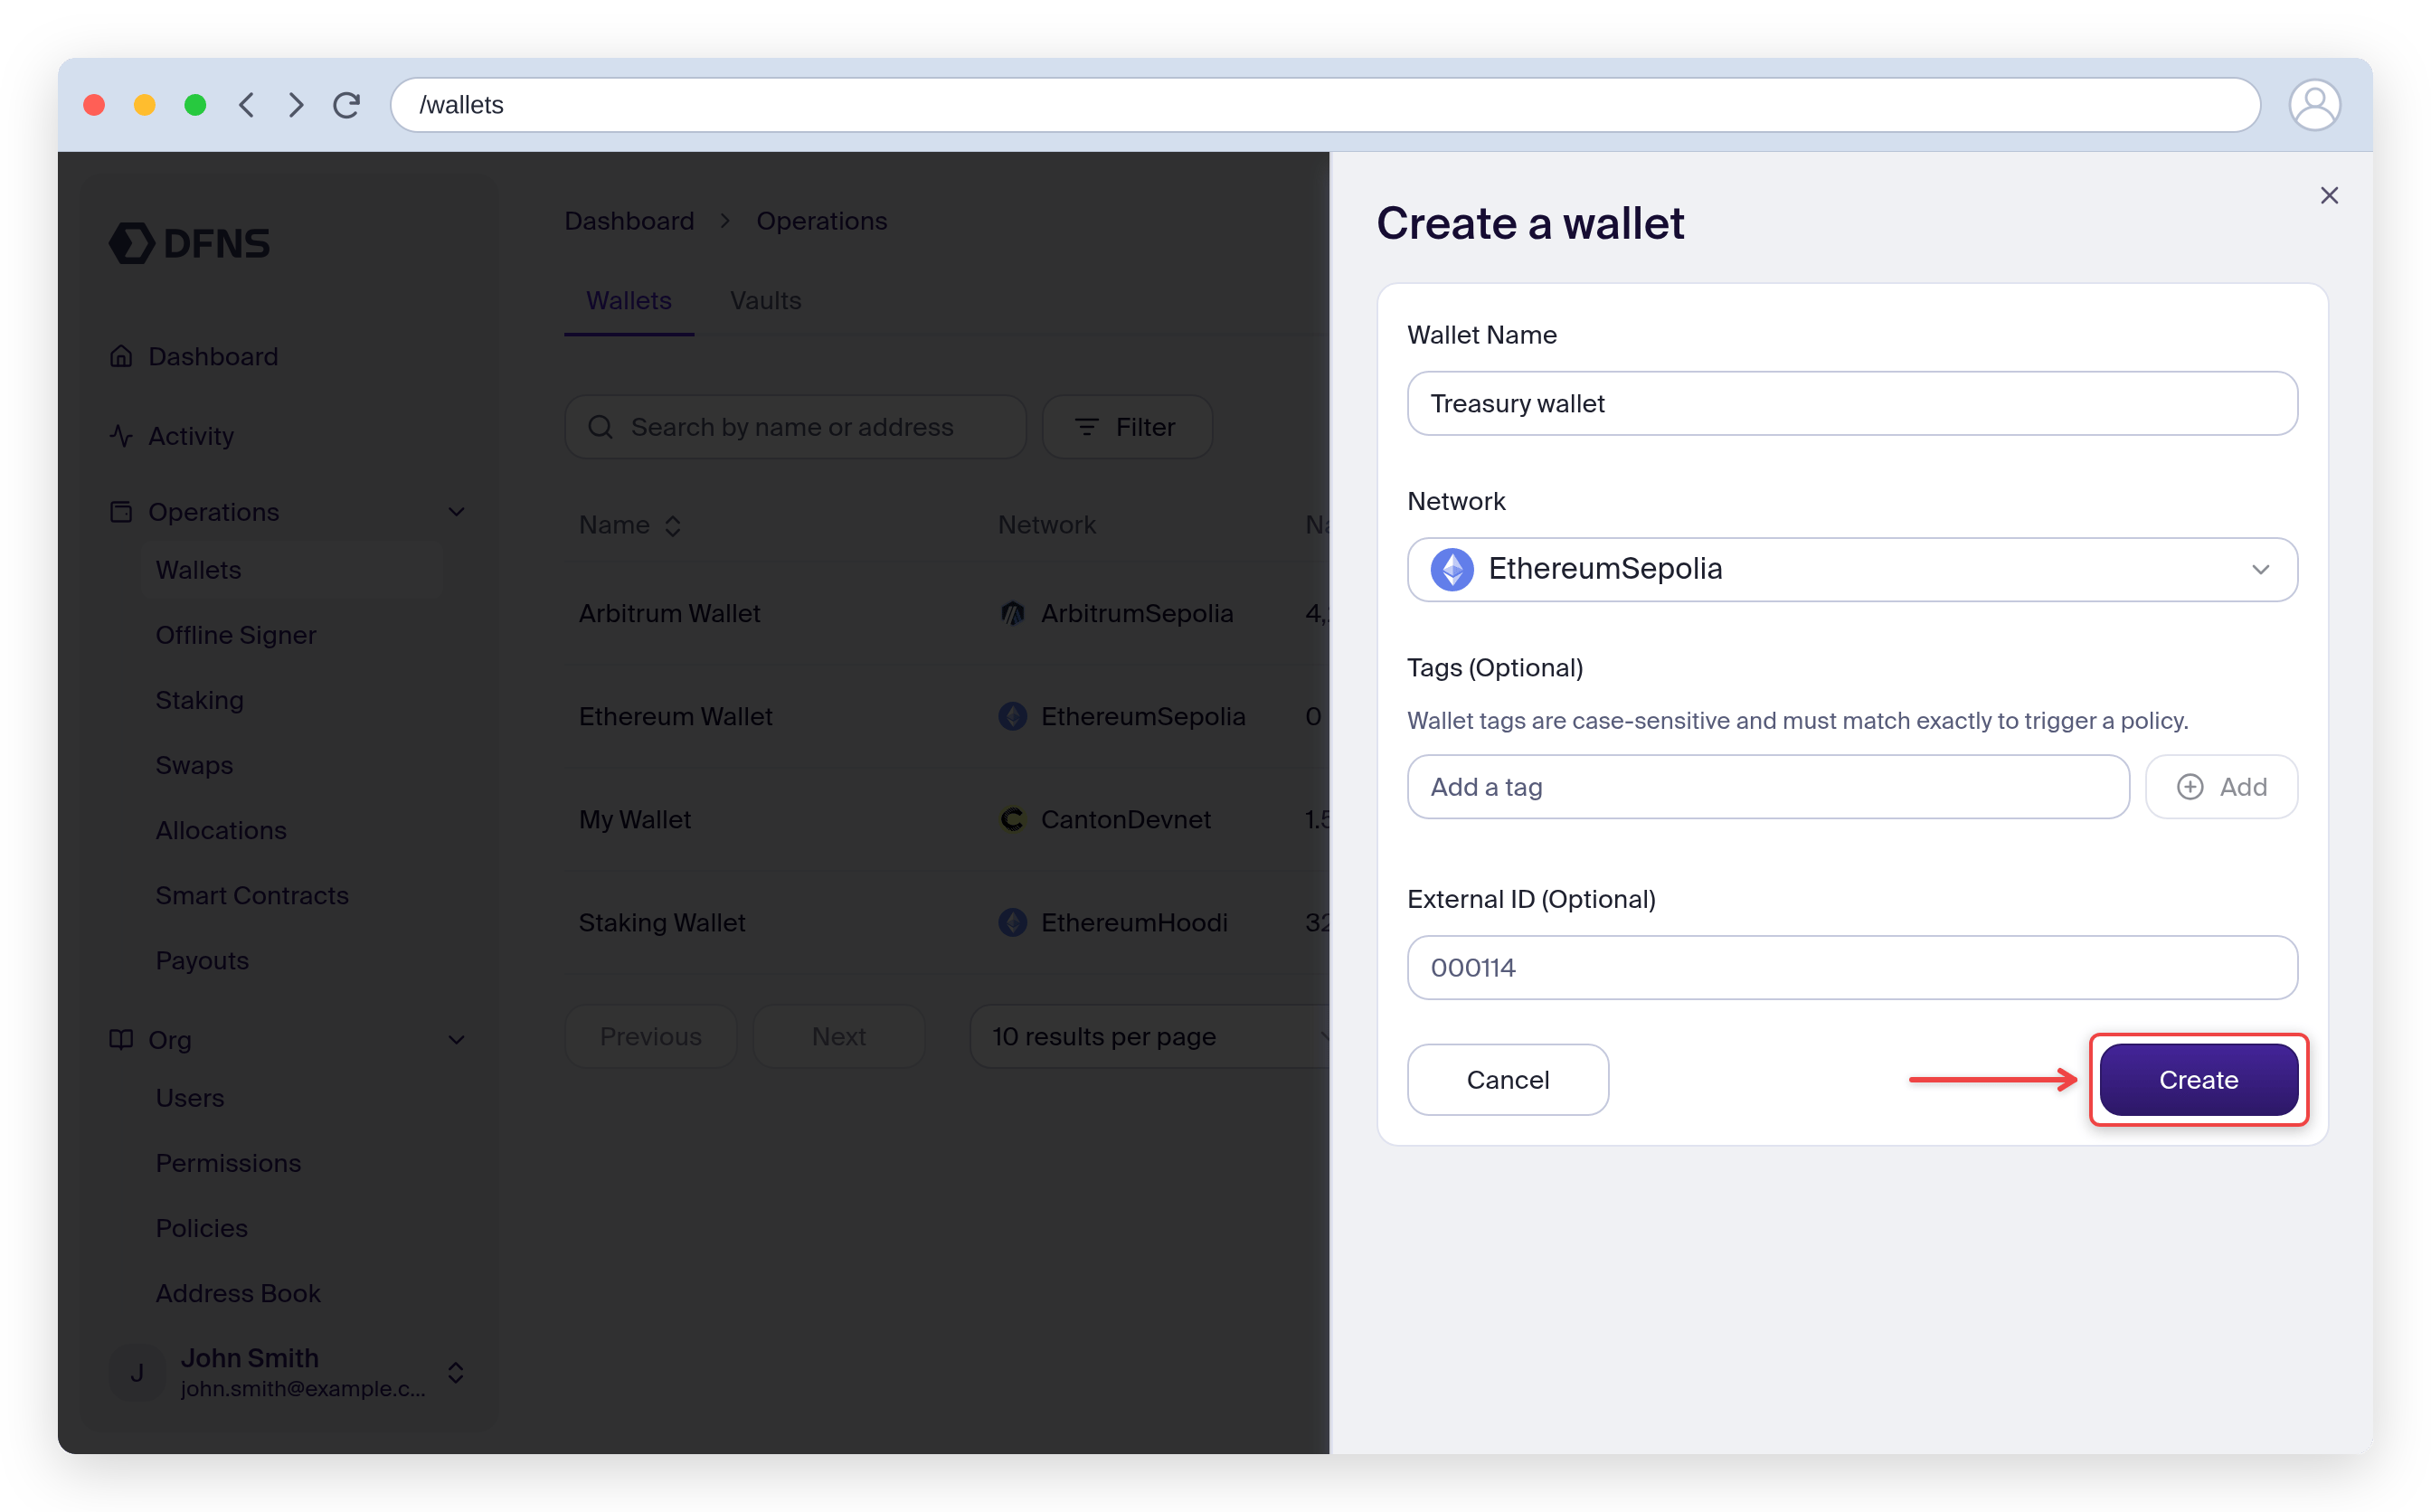
1. Navigate to **Wallets** in the sidebar
2. Click **Create Wallet**
3. Enter a name for the wallet
4. Select the network for your wallet (e.g., Ethereum, Polygon, Bitcoin)
5. (Optional) Add tags or an external ID
6. Click **Create**
The wallet is created and you'll see its address and details.
DFNS uses MPC (Multi-Party Computation) to secure your wallets. There's no single private key - the signing capability is distributed across multiple secure nodes.
## Adding a network to an existing wallet
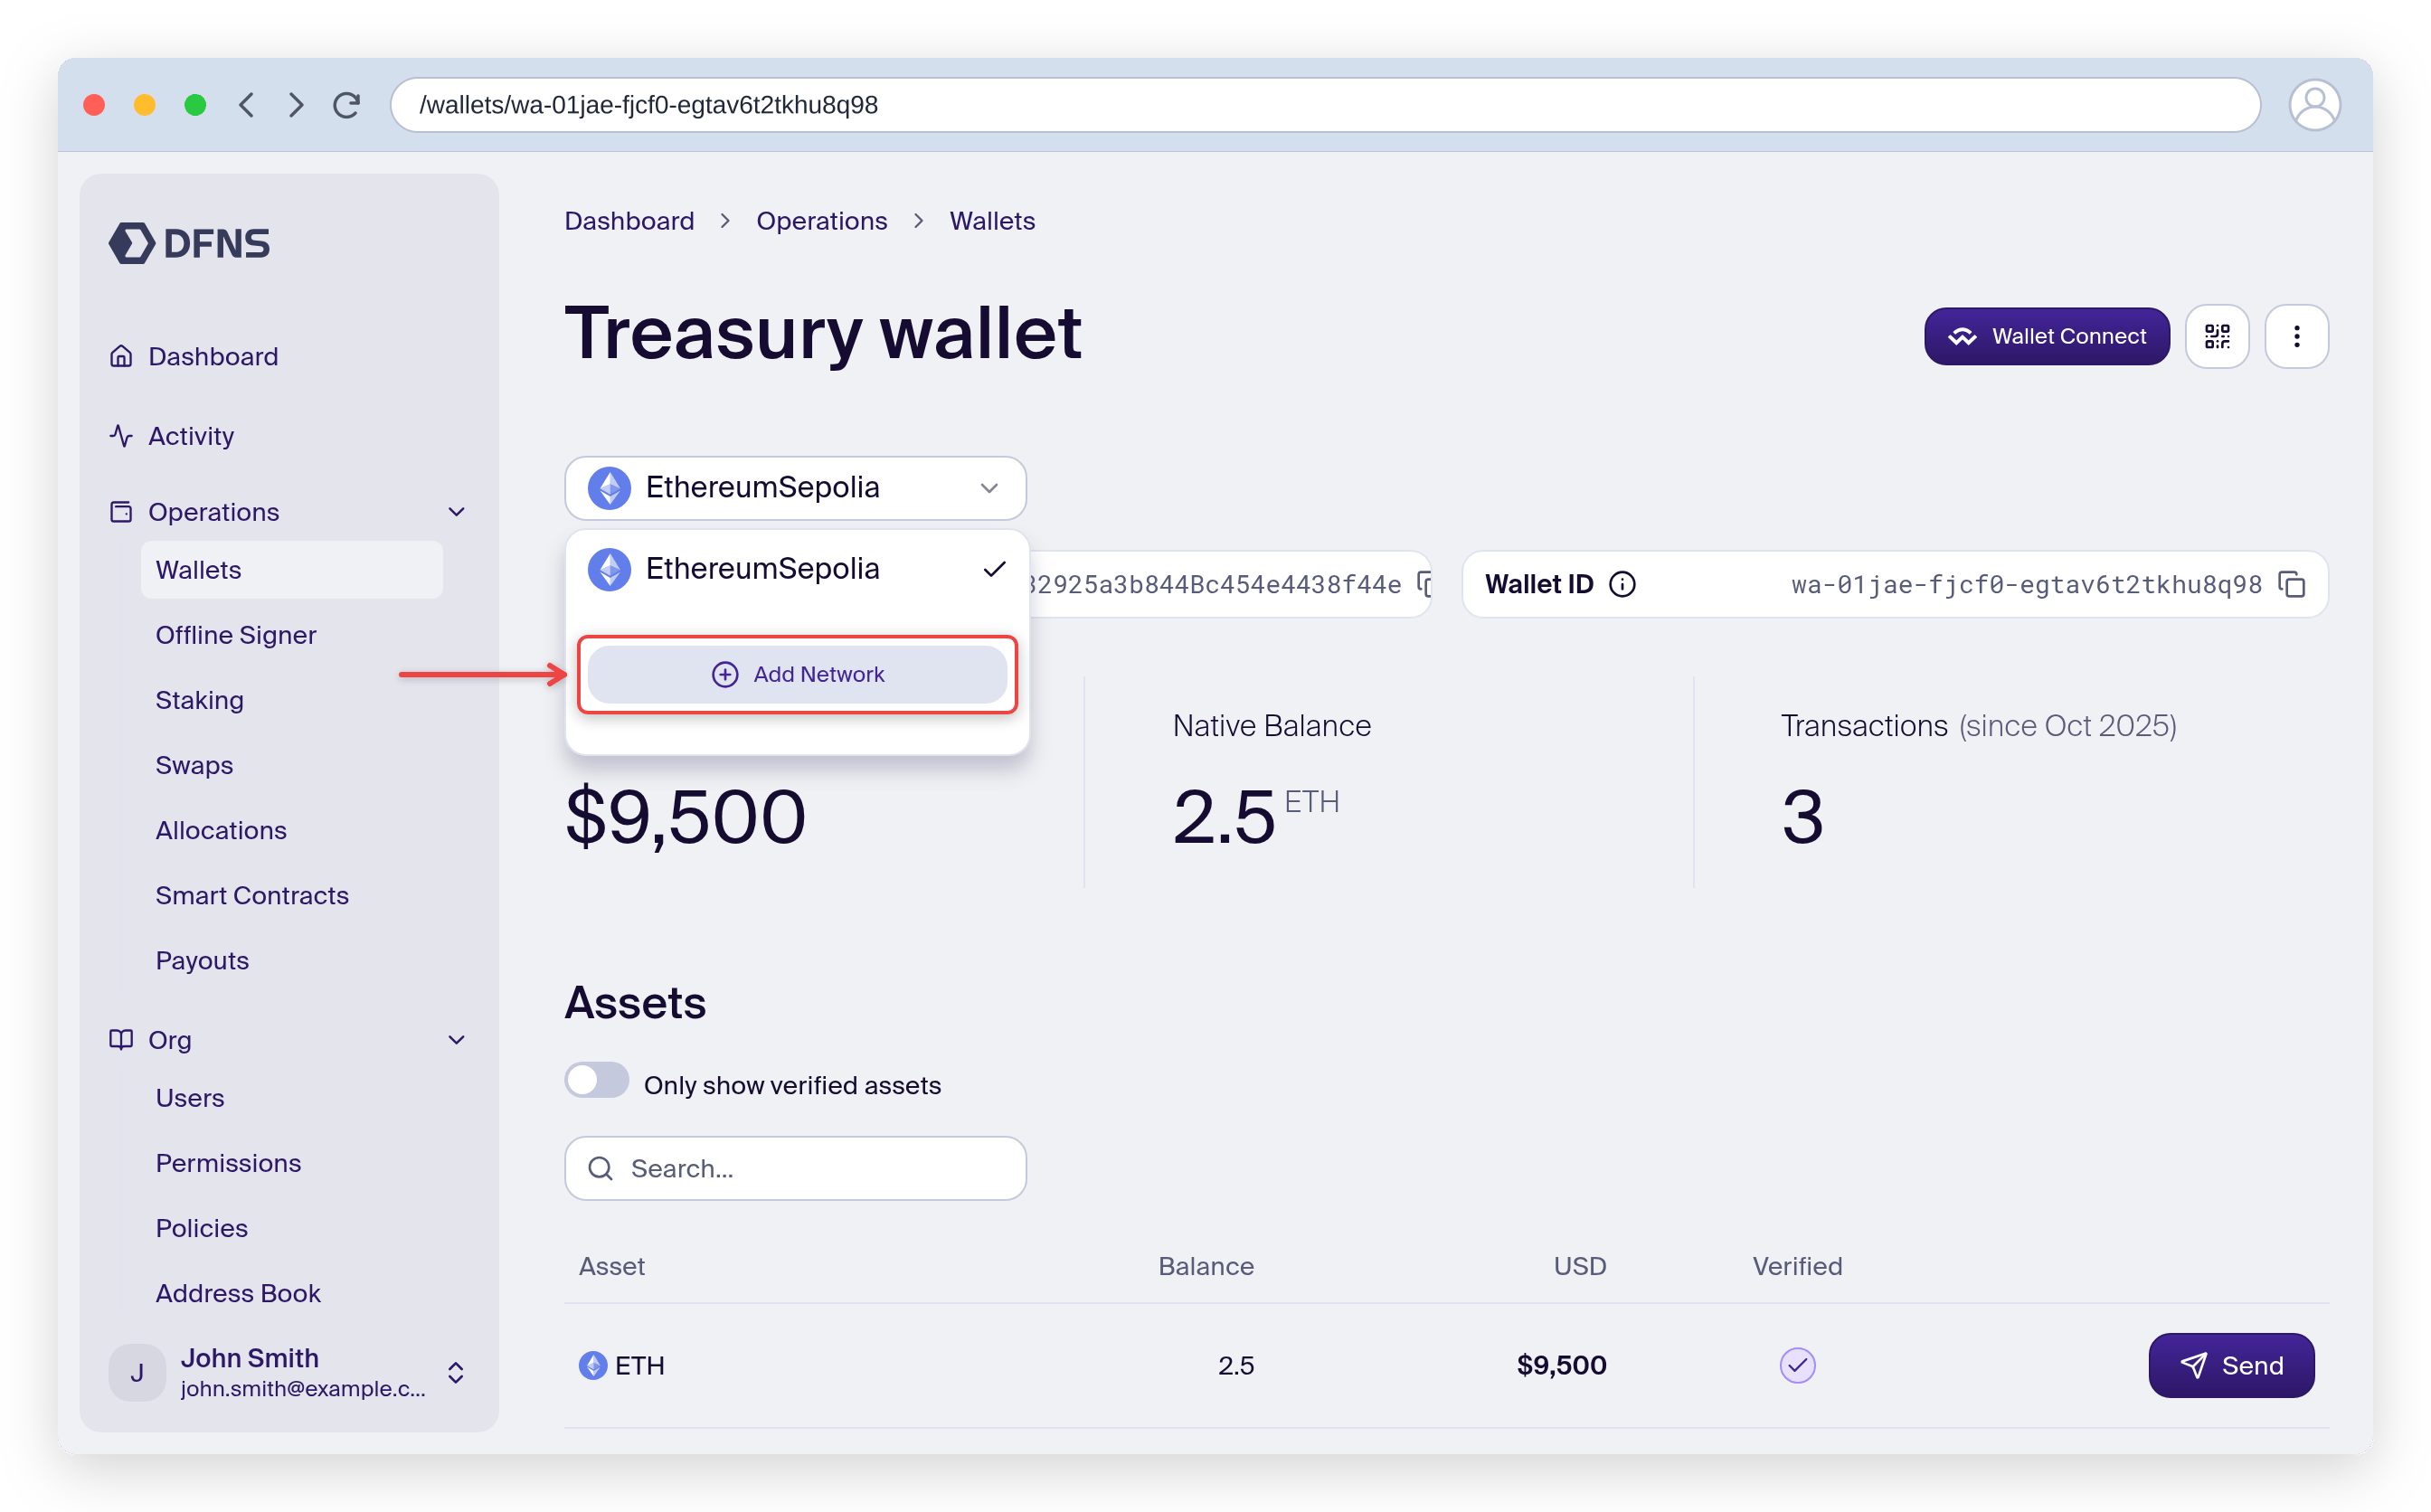
If your wallet's key supports multiple networks (e.g., EVM chains share the same key type), you can add additional networks:
1. Navigate to **Wallets** and select the wallet
2. Open the network selector at the top and click **Add Network**
3. Select the network to add
4. Confirm the addition
The wallet will have a new address on the selected network, derived from the same underlying key.
Not all networks are compatible with all key types. The dashboard only shows networks that are compatible with your wallet's key.
## Naming and tagging wallets
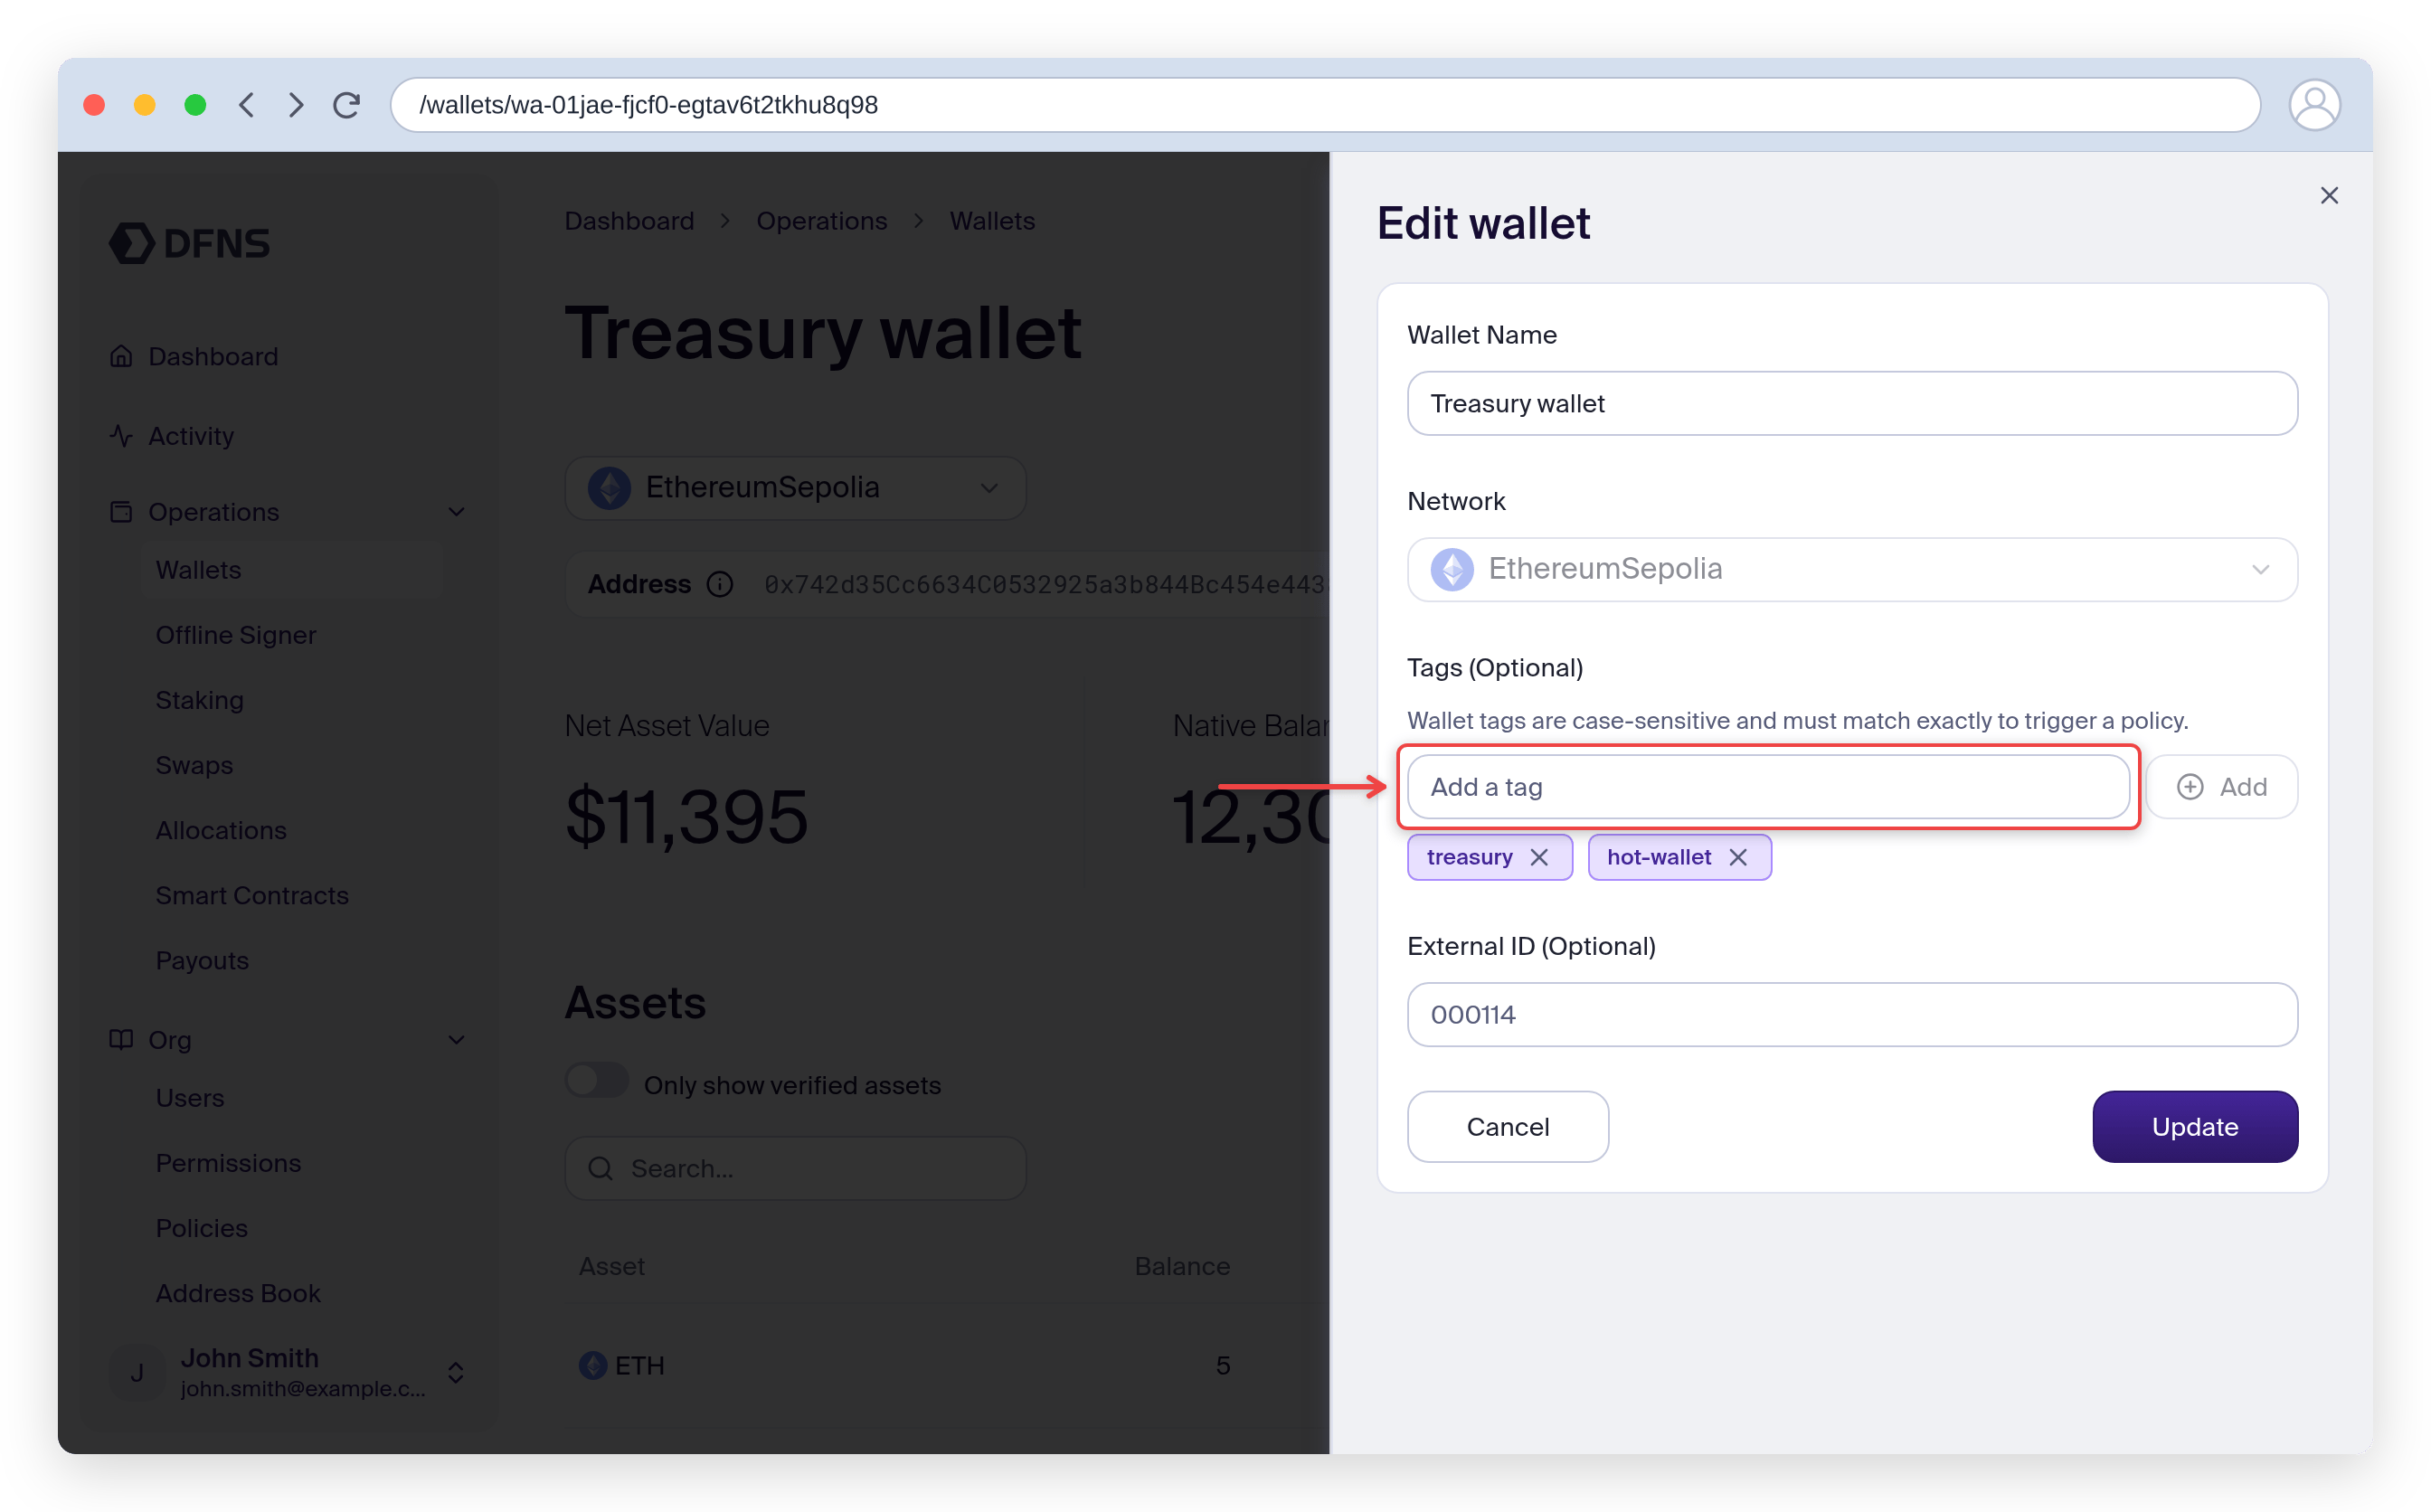
Open a wallet, click the actions menu (**⋯**) in the top-right, and select **Edit** to open the edit panel. From there you can rename the wallet and manage its tags.
### Renaming a wallet
In the edit panel, change the **Wallet Name** and click **Update**.
### Adding tags
Tags help you organize wallets and target them with [policies](/core-concepts/policies). In the edit panel, type a tag in the **Tags** field and click **Add**, then **Update**. Tags are case-sensitive and must match exactly to trigger a policy.
Use consistent tag naming across your organization. Common patterns include:
* By function: `treasury`, `operations`, `payroll`
* By risk level: `cold-storage`, `warm-wallet`, `hot-wallet`
* By network: `eth-mainnet`, `polygon`, `testnet`
## Finding wallets
Use the **Search** box above the wallet list to find wallets by name, address, or tag.
## Viewing wallet details
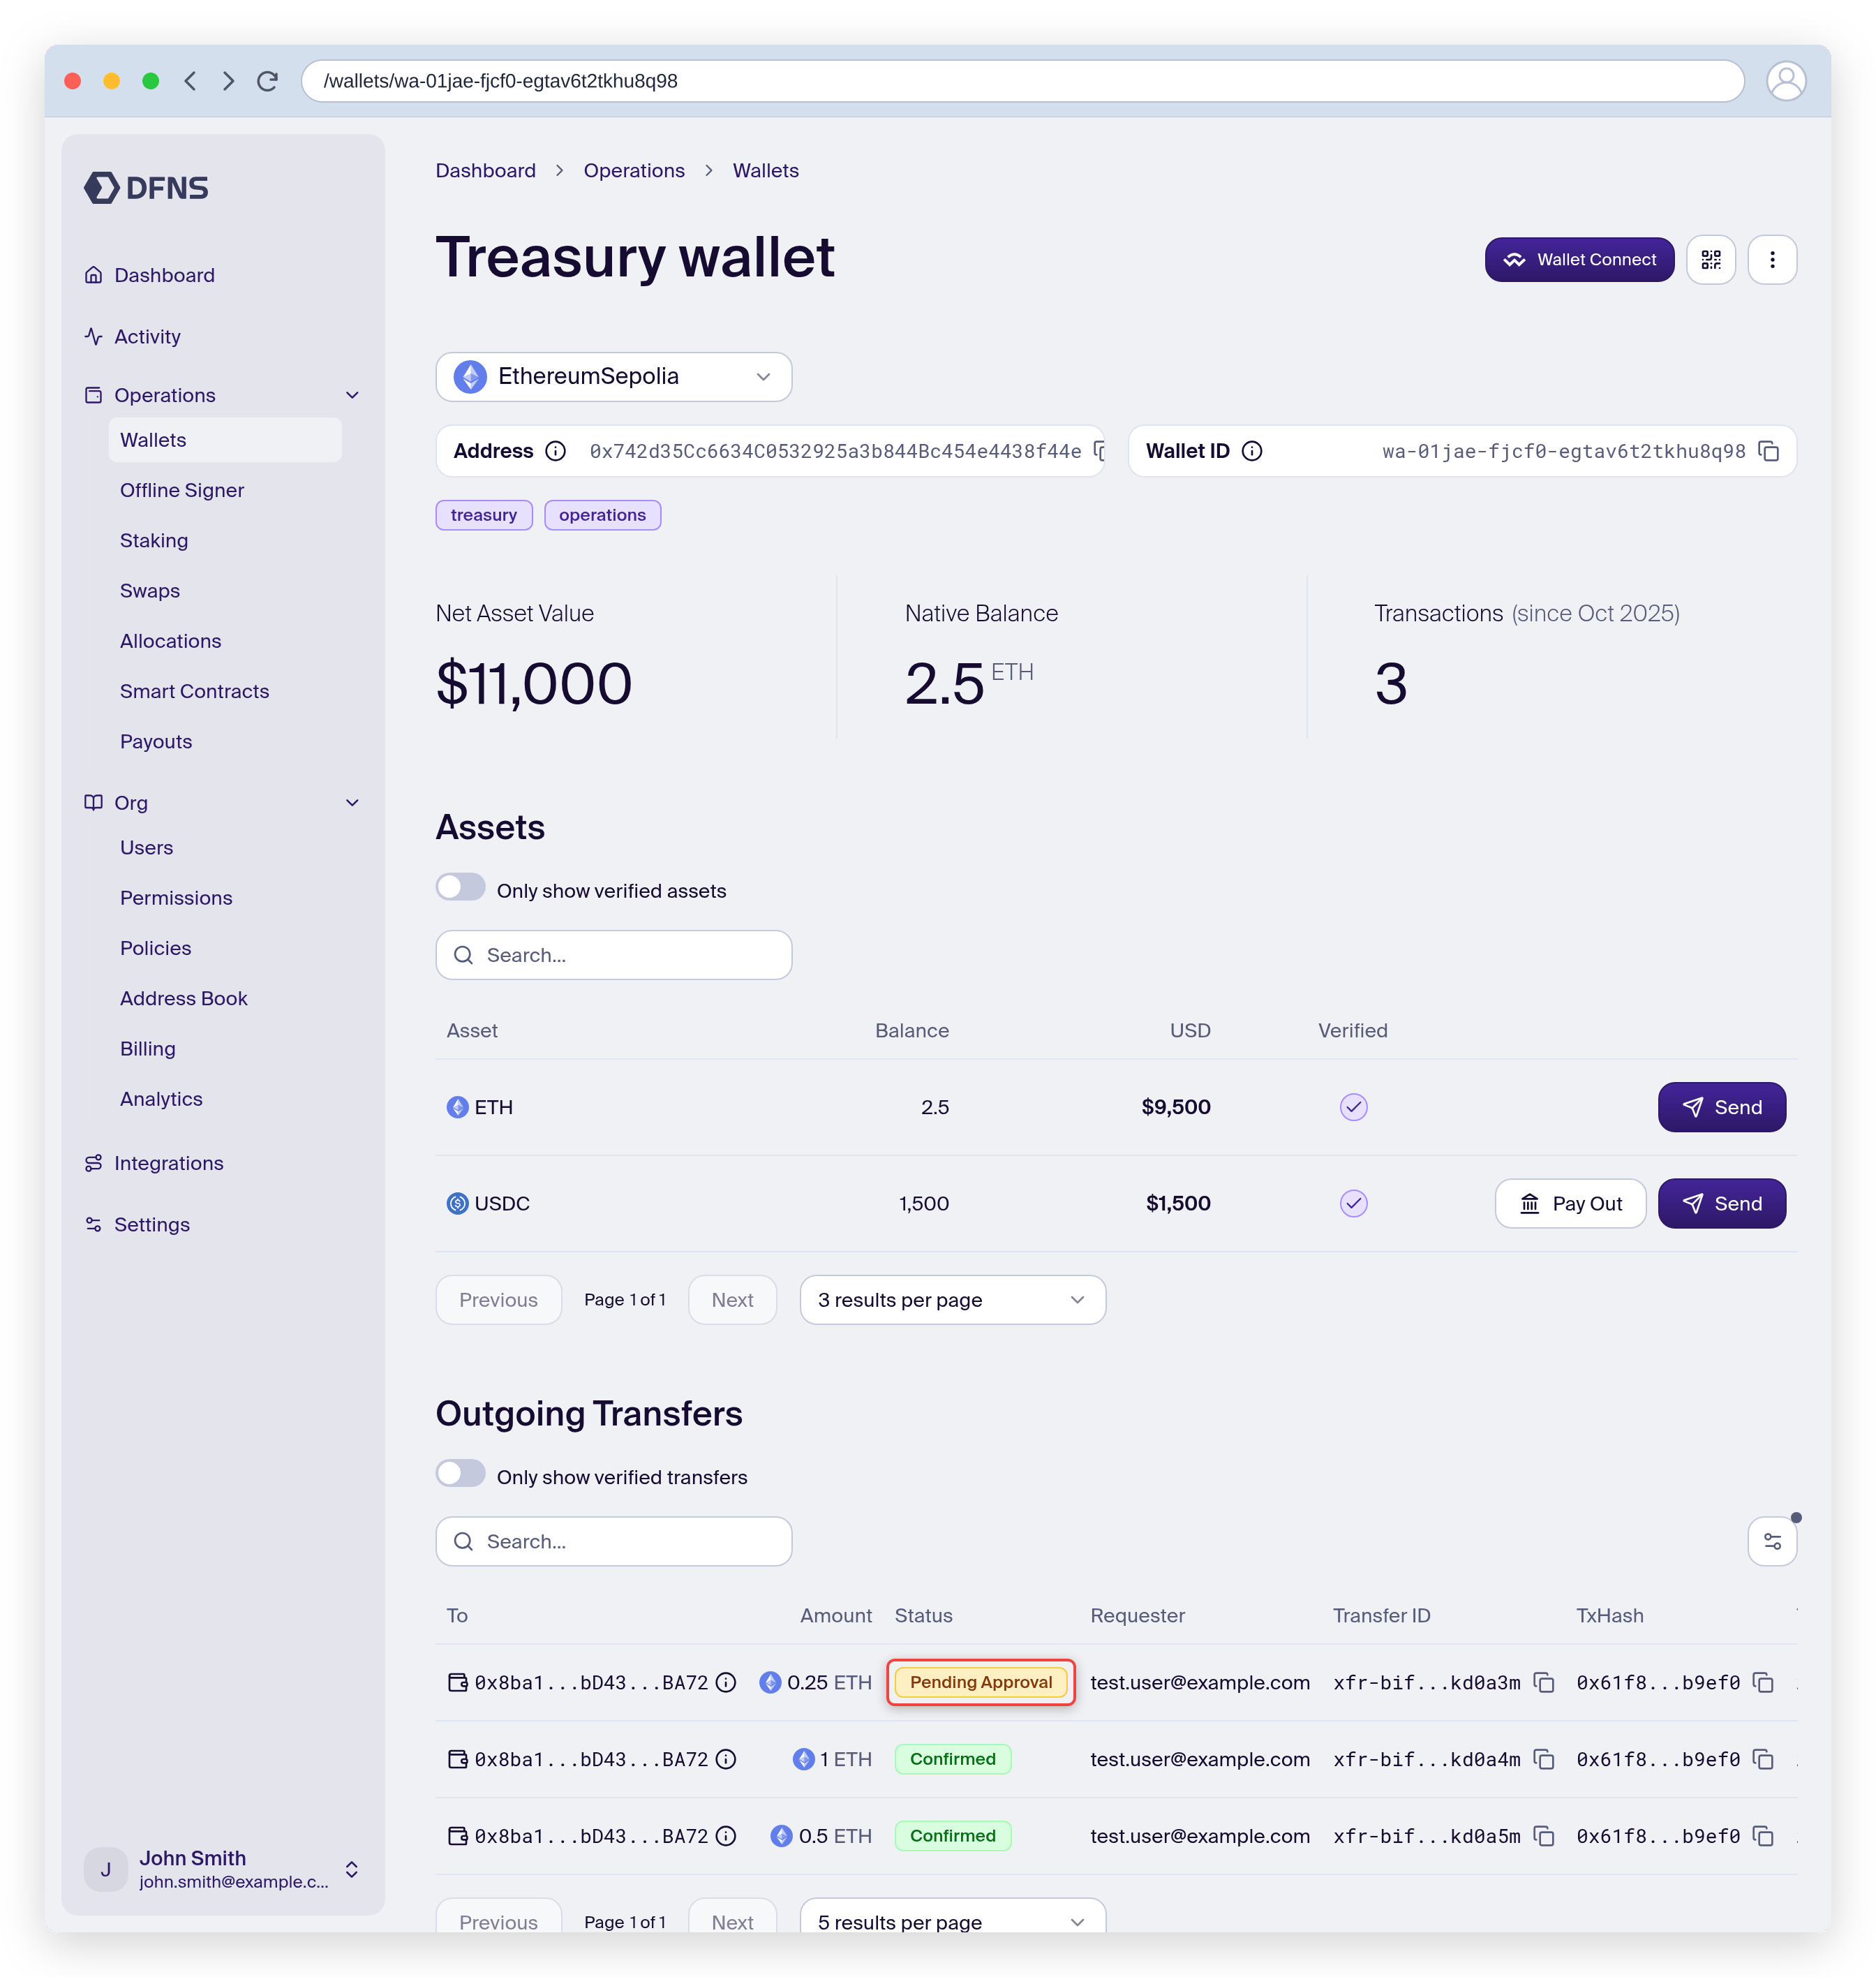
Click on any wallet to open its detail page, which shows:
* **Address** - The wallet's blockchain address
* **Networks** - Switch networks from the selector at the top
* **Assets** - Token balances on the selected network
* **Outgoing Transfers** and **History** - Transaction activity
* **Tags** - Tags assigned to this wallet
### Viewing balances
The **Assets** section shows:
* Native token balance (ETH, MATIC, etc.)
* ERC-20 token balances
* NFTs (on supported networks)
Balances reflect the latest state recorded by the DFNS indexer, so a new deposit may take a moment to appear. See [Balance freshness](/guides/developers/displaying-balances#balance-freshness) for details.
### Viewing transaction history
The **History** section lists incoming and outgoing transactions, each with a direction (In/Out), status (pending, confirmed, failed), timestamp, and a link to the block explorer. Toggle **Only show verified transactions** to hide activity involving unverified assets.
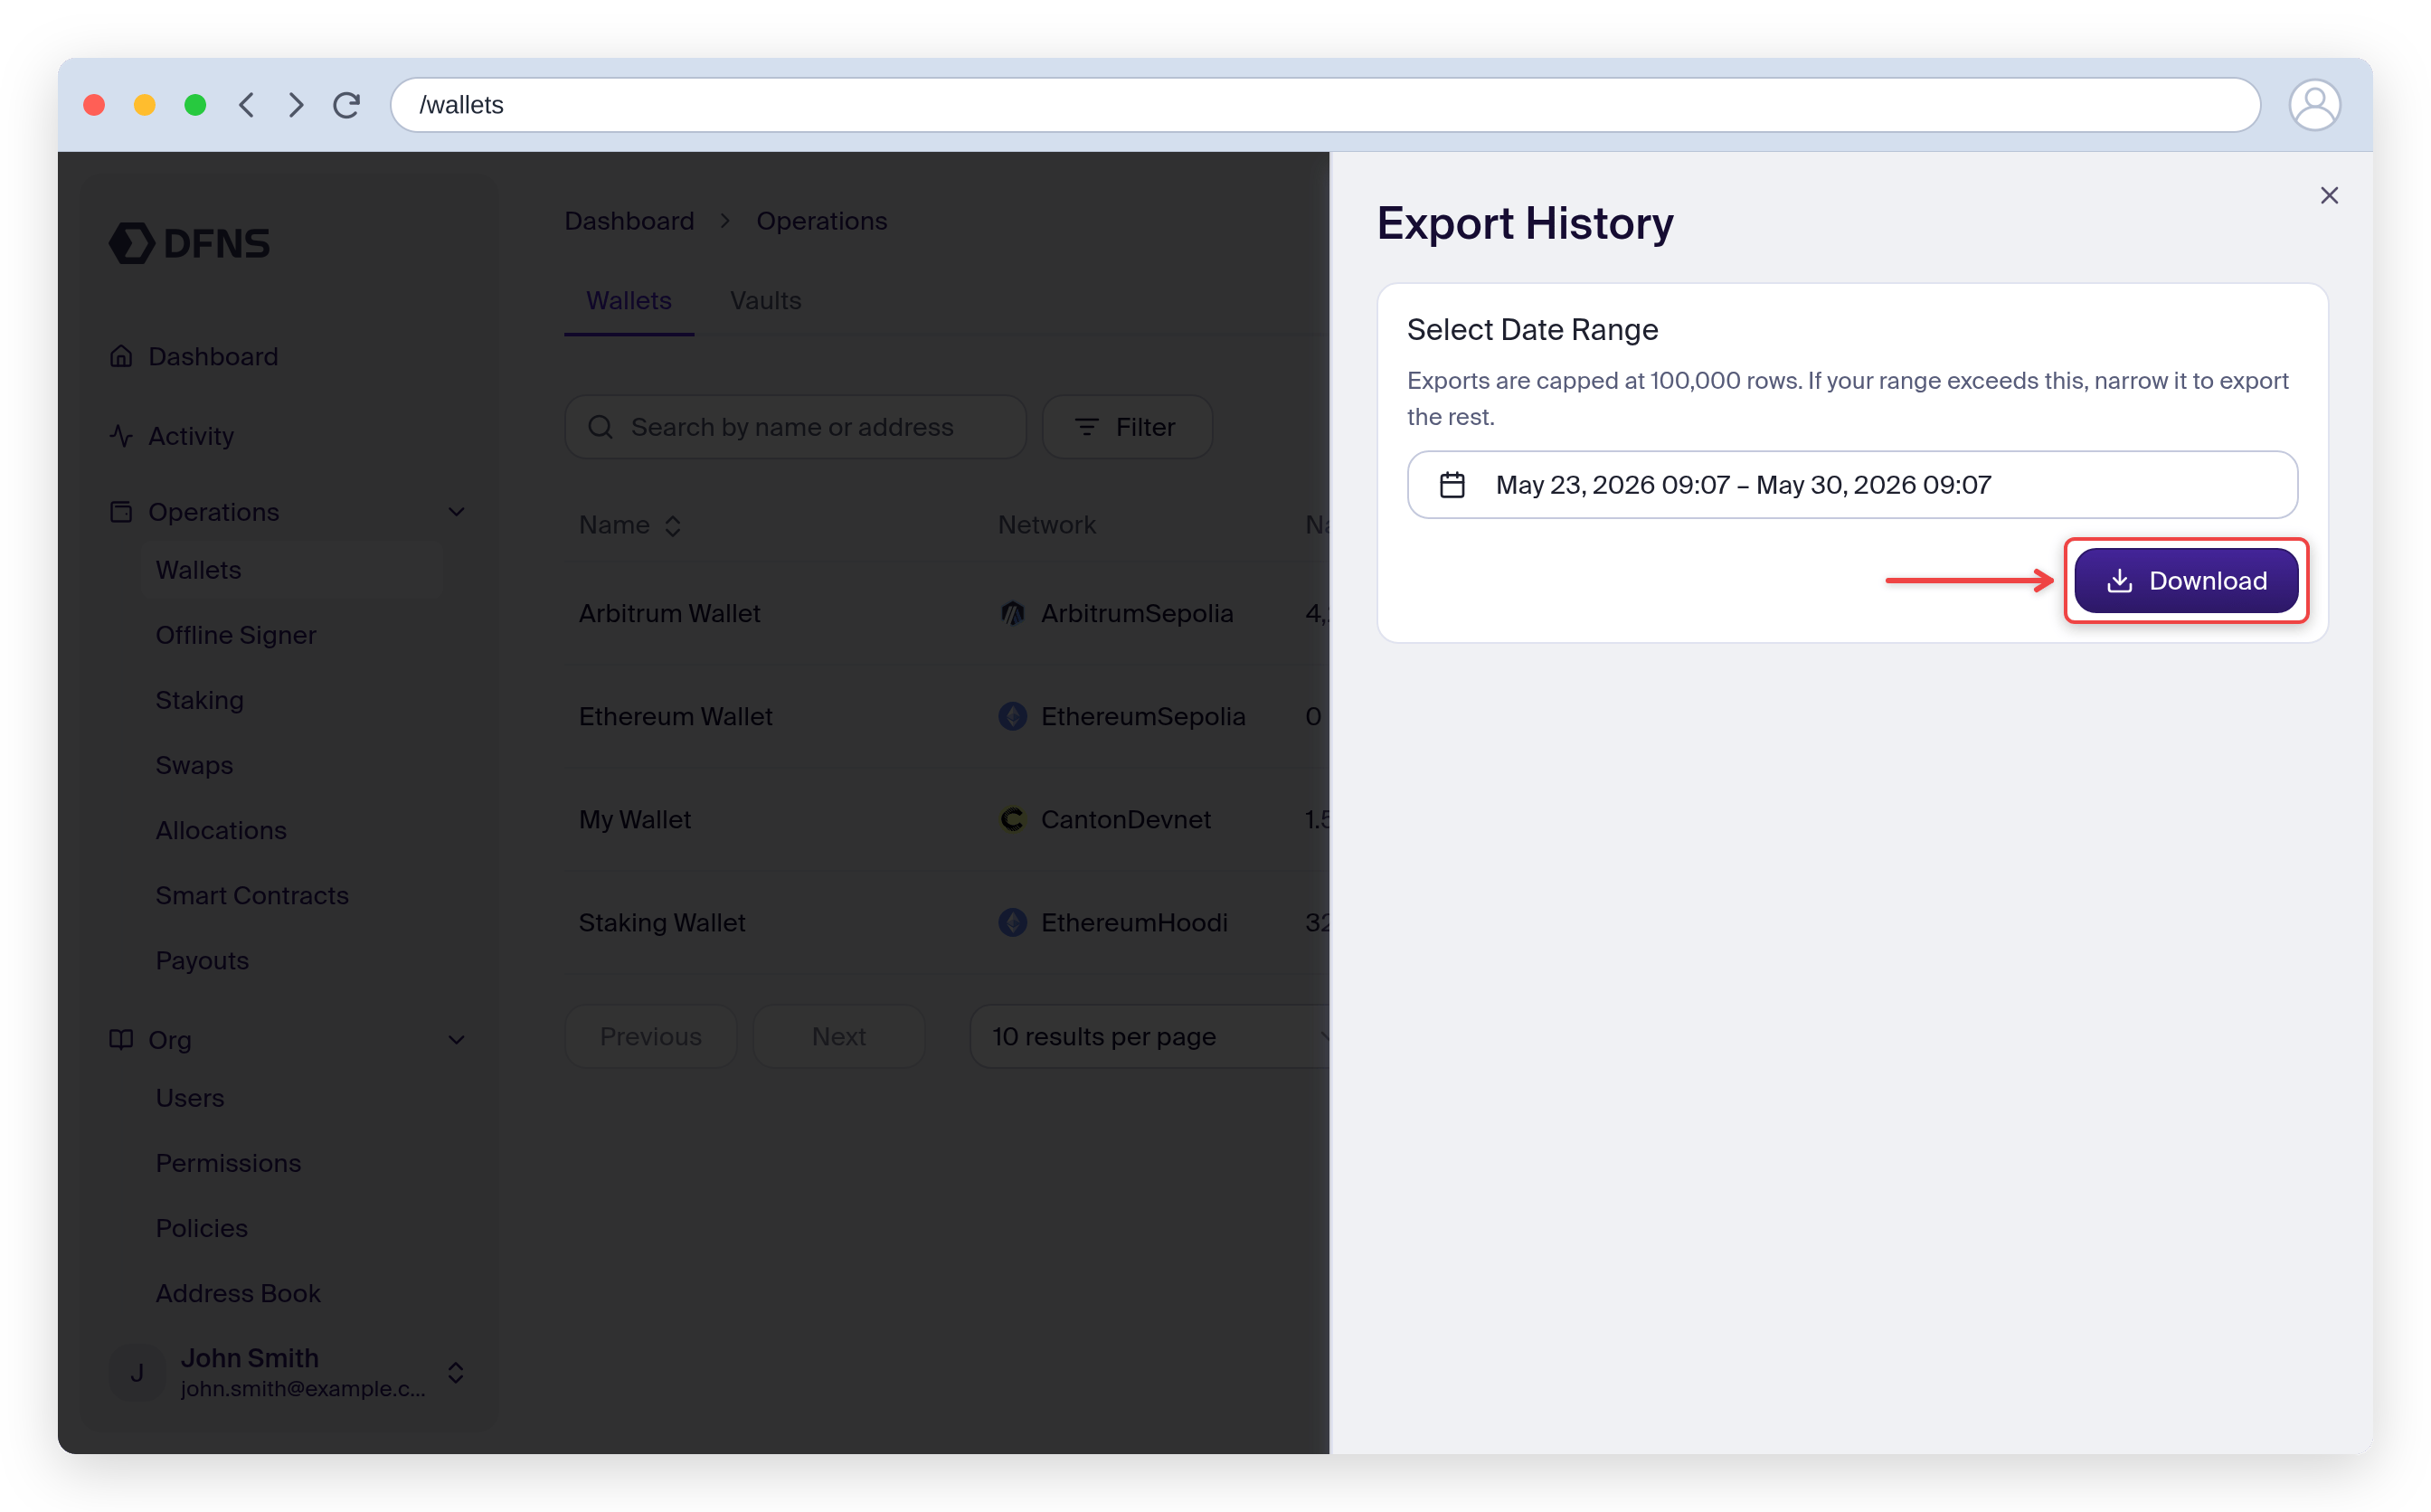
## Exporting transaction history
To export transaction history as a CSV:
1. Navigate to **Wallets**
2. Open the actions menu (**⋯**) next to **Create Wallet** and select **Export History**
3. Choose a date range (up to 7 days)
4. Click **Download**
The export covers transaction history across your organization's wallets for the selected date range.
## For developers
To manage wallets programmatically, see:
Wallet creation and management
Complete API reference
## Related guides
Send transfers from your wallets
Save and manage recipient addresses
Apply policies to your wallets
 The wallet is created and you'll see its address and details.
 The wallet will have a new address on the selected network, derived from the same underlying key.
 ### Renaming a wallet
In the edit panel, change the **Wallet Name** and click **Update**.
### Adding tags
Tags help you organize wallets and target them with [policies](/core-concepts/policies). In the edit panel, type a tag in the **Tags** field and click **Add**, then **Update**. Tags are case-sensitive and must match exactly to trigger a policy.
### Renaming a wallet
In the edit panel, change the **Wallet Name** and click **Update**.
### Adding tags
Tags help you organize wallets and target them with [policies](/core-concepts/policies). In the edit panel, type a tag in the **Tags** field and click **Add**, then **Update**. Tags are case-sensitive and must match exactly to trigger a policy.
 ### Viewing balances
The **Assets** section shows:
* Native token balance (ETH, MATIC, etc.)
* ERC-20 token balances
* NFTs (on supported networks)
Balances reflect the latest state recorded by the DFNS indexer, so a new deposit may take a moment to appear. See [Balance freshness](/guides/developers/displaying-balances#balance-freshness) for details.
### Viewing transaction history
The **History** section lists incoming and outgoing transactions, each with a direction (In/Out), status (pending, confirmed, failed), timestamp, and a link to the block explorer. Toggle **Only show verified transactions** to hide activity involving unverified assets.
## Exporting transaction history
To export transaction history as a CSV:
1. Navigate to **Wallets**
2. Open the actions menu (**⋯**) next to **Create Wallet** and select **Export History**
3. Choose a date range (up to 7 days)
4. Click **Download**
### Viewing balances
The **Assets** section shows:
* Native token balance (ETH, MATIC, etc.)
* ERC-20 token balances
* NFTs (on supported networks)
Balances reflect the latest state recorded by the DFNS indexer, so a new deposit may take a moment to appear. See [Balance freshness](/guides/developers/displaying-balances#balance-freshness) for details.
### Viewing transaction history
The **History** section lists incoming and outgoing transactions, each with a direction (In/Out), status (pending, confirmed, failed), timestamp, and a link to the block explorer. Toggle **Only show verified transactions** to hide activity involving unverified assets.
## Exporting transaction history
To export transaction history as a CSV:
1. Navigate to **Wallets**
2. Open the actions menu (**⋯**) next to **Create Wallet** and select **Export History**
3. Choose a date range (up to 7 days)
4. Click **Download**
 The export covers transaction history across your organization's wallets for the selected date range.
## For developers
To manage wallets programmatically, see:
The export covers transaction history across your organization's wallets for the selected date range.
## For developers
To manage wallets programmatically, see: