> ## Documentation Index
> Fetch the complete documentation index at: https://docs.dfns.co/llms.txt
> Use this file to discover all available pages before exploring further.
# Notify approvers with Zapier
> Automate notifications to policy approvers using Zapier or other automation tools to send emails, Slack messages, or webhook events on approvals.
export const Loom = props => {
return ;
};
DFNS offers webhooks to notify your systems when events occur on your wallets. The `policy.approval.pending` event fires when an approval is requested. This guide uses it to trigger a Zapier (or similar) automation that emails the approver.
A video walkthrough of the first steps is available at the end of this page.
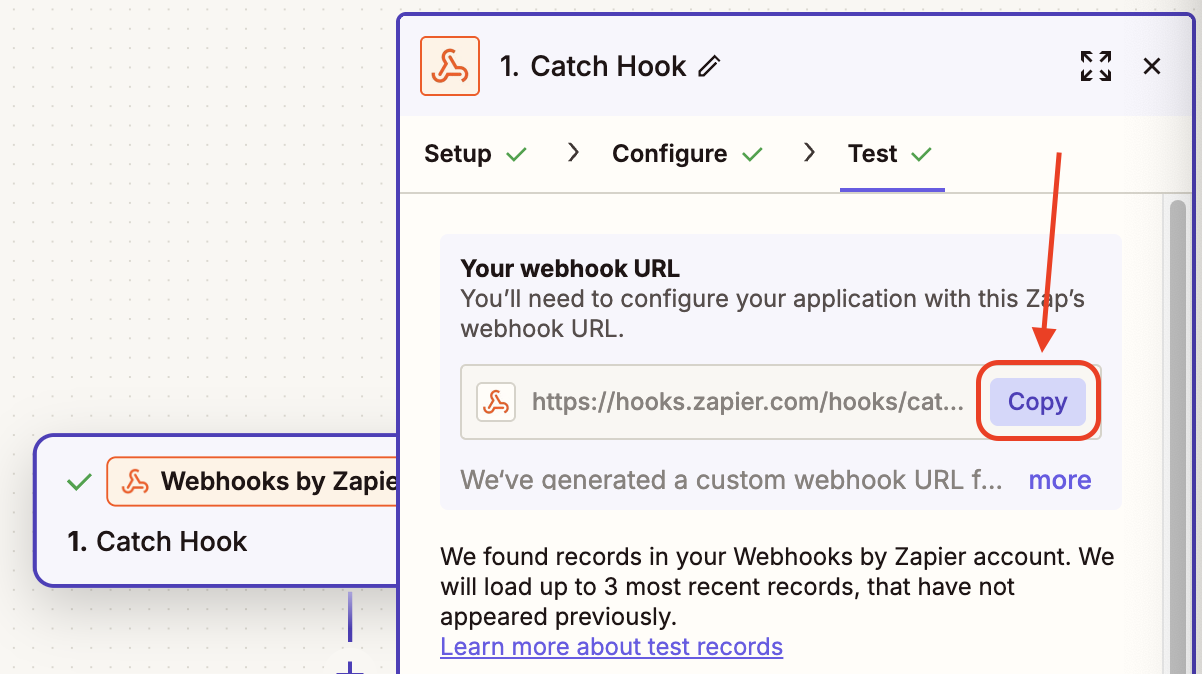
On Zapier, configure the trigger: "Webhooks by Zapier: Catch Hook"
Get the **webhook url** from that first block: in "Test" and copy the address. It should be an `https://` address.
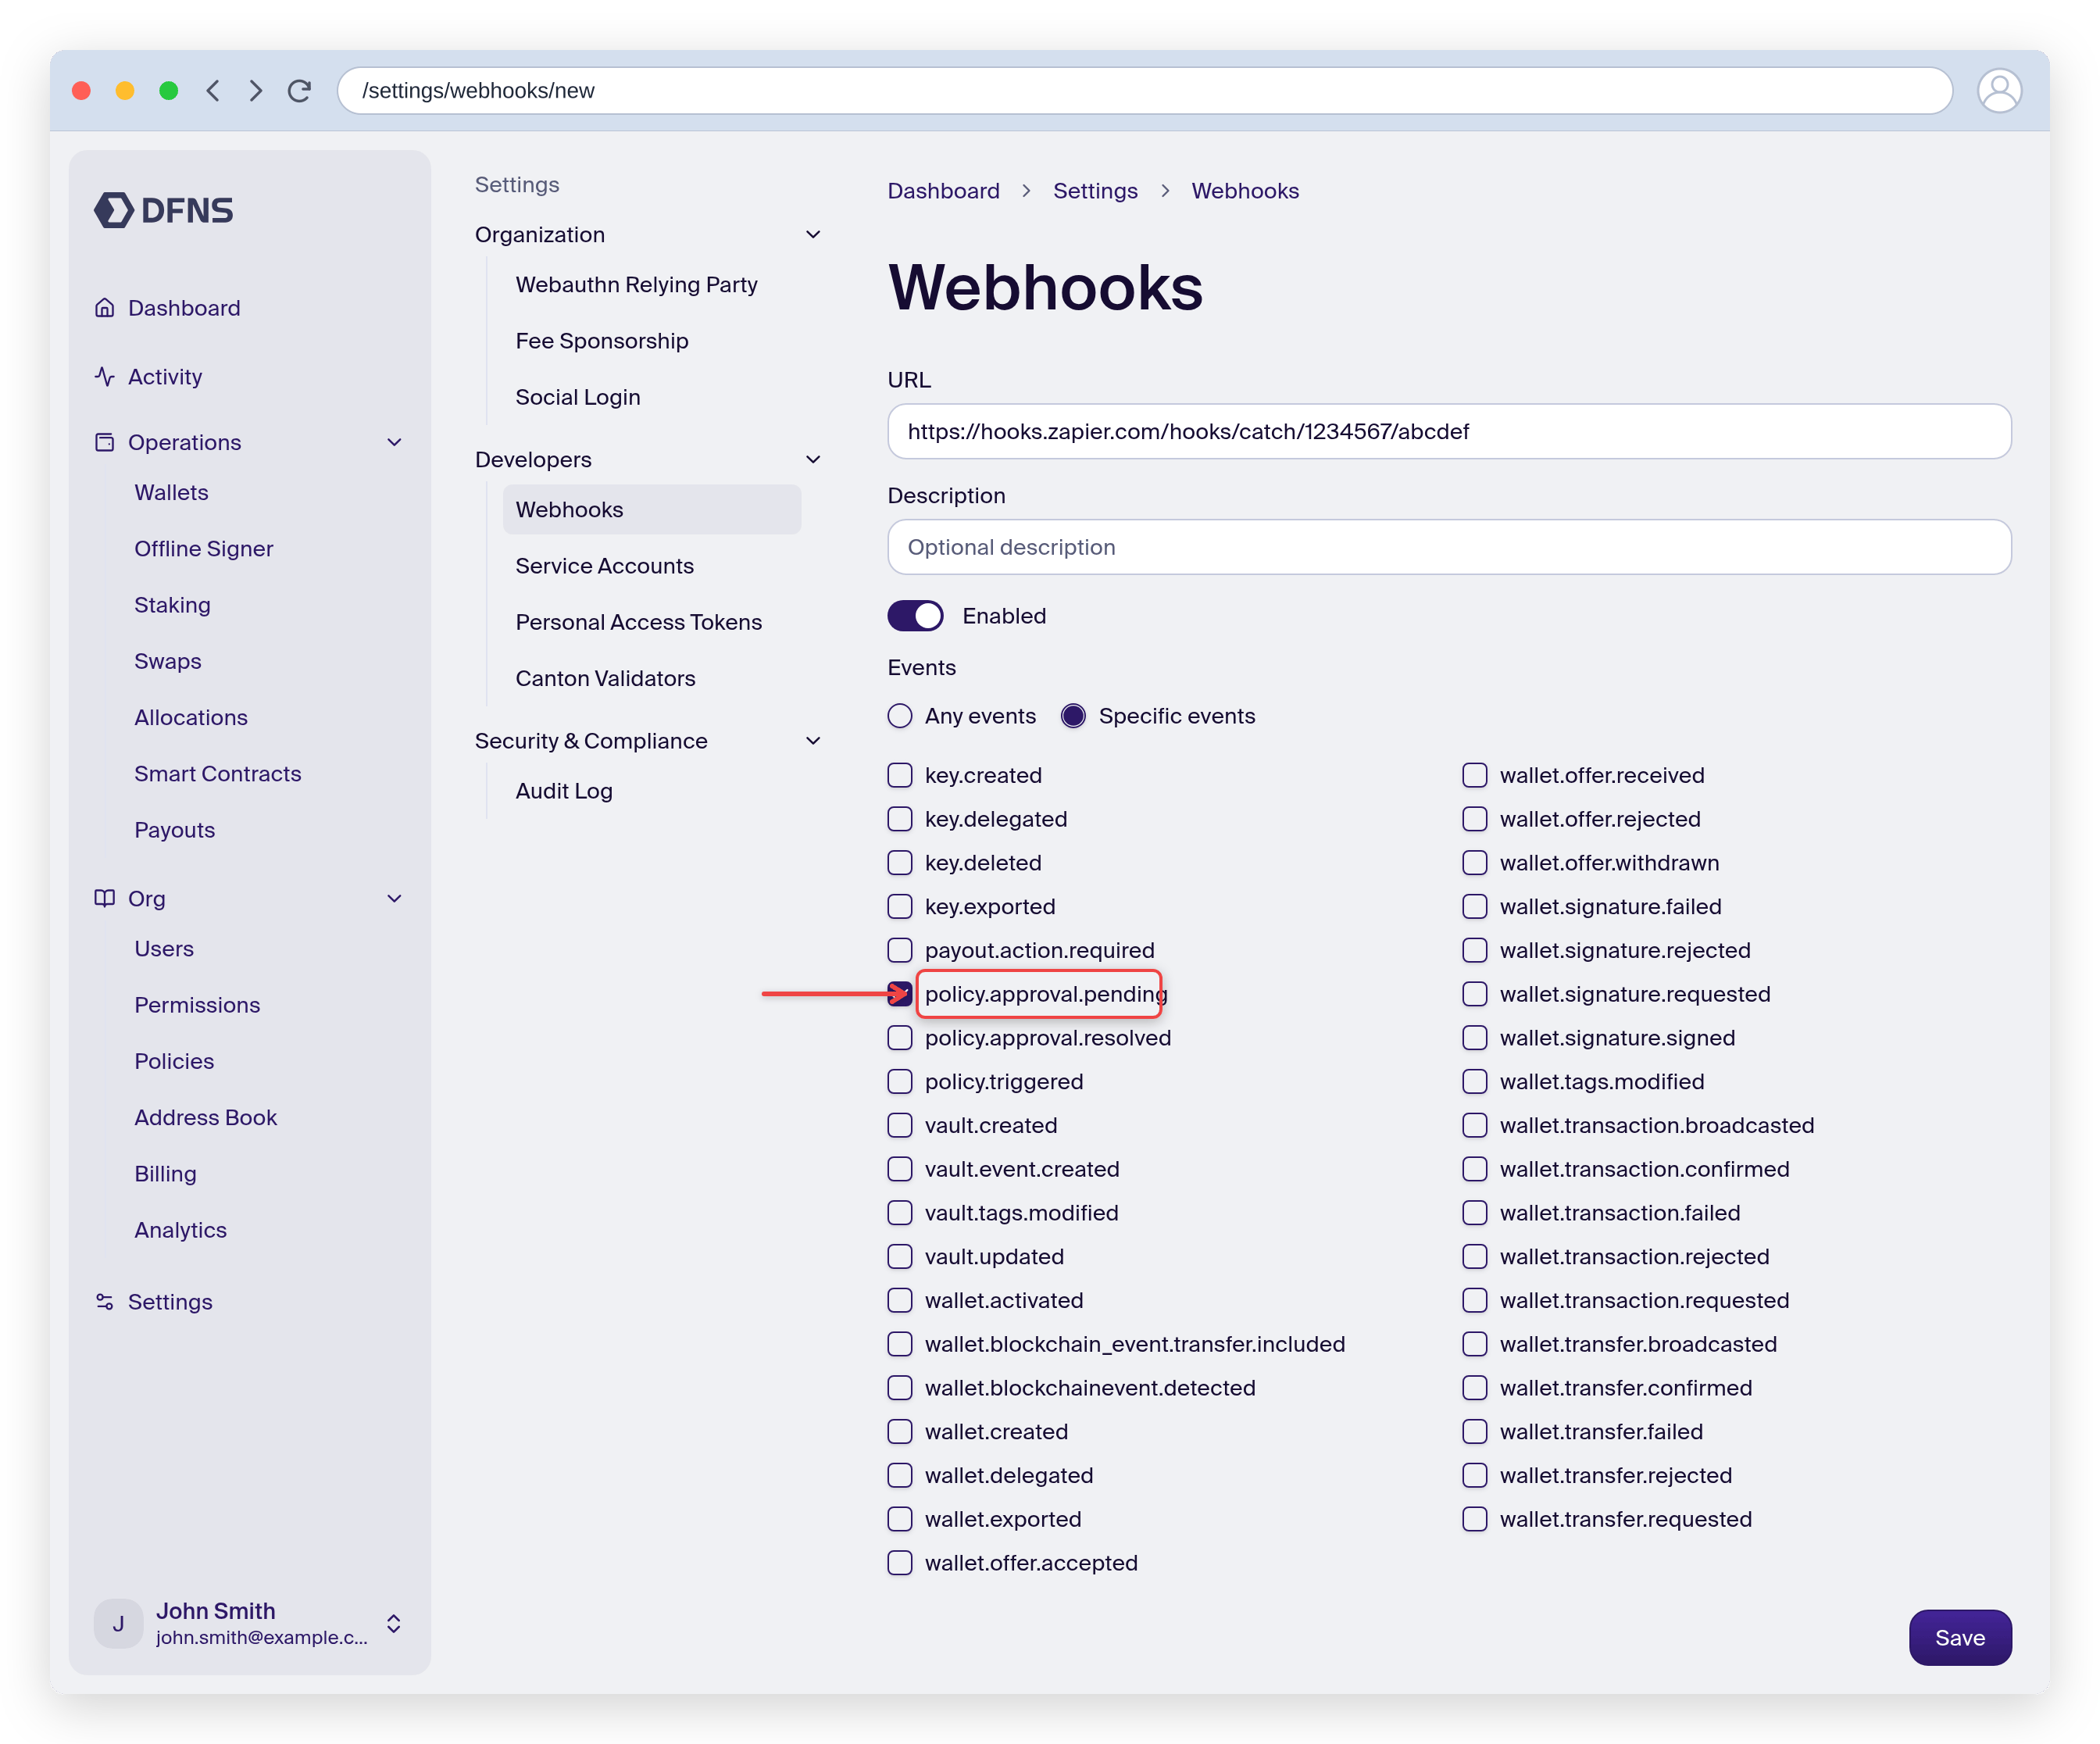
 On the DFNS dashboard, navigate to Settings > Webhooks (direct link: [https://app.dfns.io/settings/webhooks](https://app.dfns.io/settings/webhooks)) and click **New Webhook**.
Copy your Zapier webhook URL into the "url" field, give a description and select "Specific Events" with only "**policy.approval.pending**", then save. You will have to 🔑 sign the creation with your passkey.
On the DFNS dashboard, navigate to Settings > Webhooks (direct link: [https://app.dfns.io/settings/webhooks](https://app.dfns.io/settings/webhooks)) and click **New Webhook**.
Copy your Zapier webhook URL into the "url" field, give a description and select "Specific Events" with only "**policy.approval.pending**", then save. You will have to 🔑 sign the creation with your passkey.
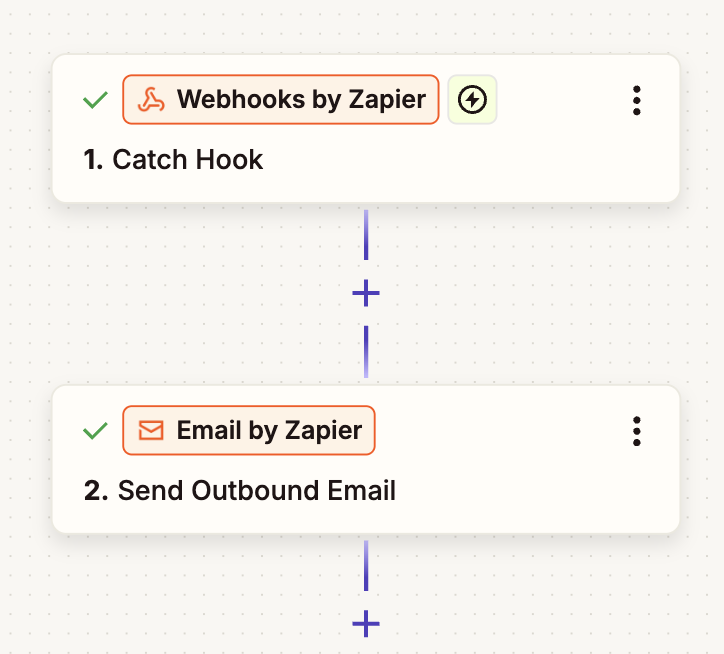
 The basic architecture is in place. Now configure the actions.
Make sure you have a policy to trigger. For example a policy that always trigger on transfer requests.
You can follow the following tutorial to create it: [Create policies](/guides/create-policies)
Trigger the policy (for example by requesting a transfer) so that Zapier receives the information and can help you use the data to write an email.
Add an action "Email by Zapier: Send Outbound Email" connected to your Webhook trigger.
The basic architecture is in place. Now configure the actions.
Make sure you have a policy to trigger. For example a policy that always trigger on transfer requests.
You can follow the following tutorial to create it: [Create policies](/guides/create-policies)
Trigger the policy (for example by requesting a transfer) so that Zapier receives the information and can help you use the data to write an email.
Add an action "Email by Zapier: Send Outbound Email" connected to your Webhook trigger.
 Configure the email by entering the list of recipients, a topic, and a message.
Example of message:
```
Hello!
Please review and approve the following transfer request:
[1. Kind] transfer of [1. Asset Symbol] to the wallet [1. To] on [1. Network].
Transfer id is: [1. TransferRequest Id]
Please login to https://app.dfns.io/policies/approvals to accept or refuse.
```
Save, Publish and trigger a transfer to test the automation!
You're now sending an email each time an approval is requested.
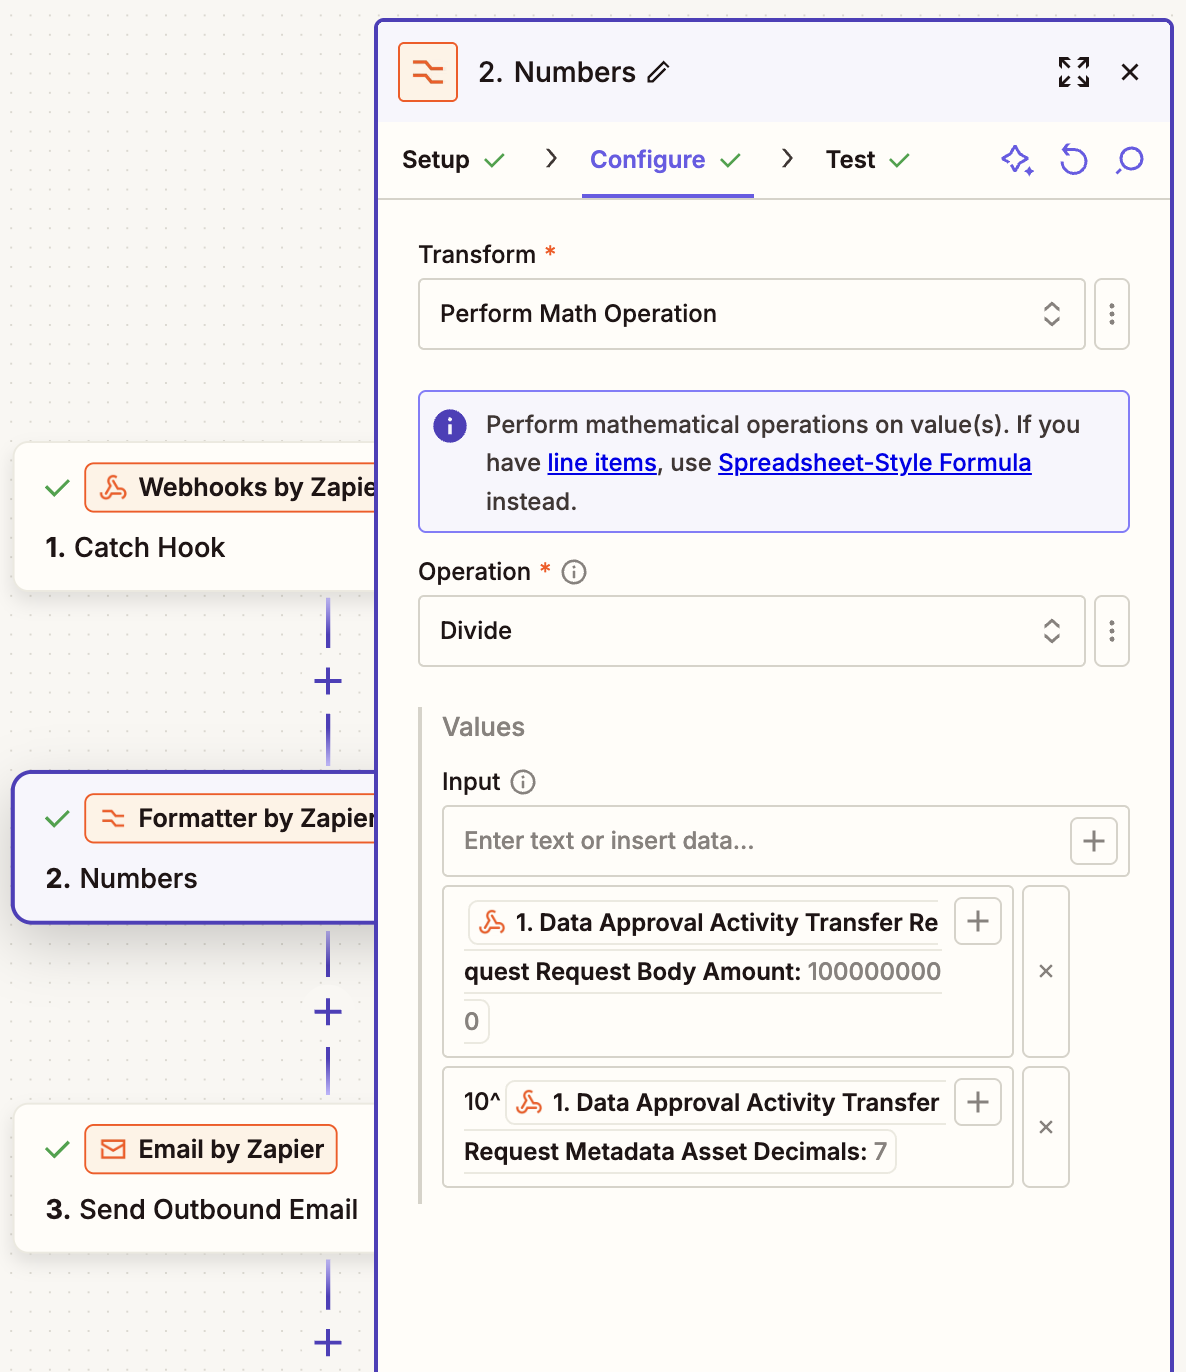
DFNS displays asset amounts with the network maximum precision, and provides a description of the number of decimals. So in order to display the amount properly, you need to divide $amount$ by $10^{decimals}$. In the example below: `1000000000` for `7` decimals so $1000 000 00 / 10^7 = 100$ units!
In Zapier, insert a block "Formatter by Zapier: Numbers" before the email block.
Configure the fields:
* Transform: Perform Math Operation
* Operation: Divide
* Input:
* \[1. Amount]
* 10^\[1. Asset Decimals]
Configure the email by entering the list of recipients, a topic, and a message.
Example of message:
```
Hello!
Please review and approve the following transfer request:
[1. Kind] transfer of [1. Asset Symbol] to the wallet [1. To] on [1. Network].
Transfer id is: [1. TransferRequest Id]
Please login to https://app.dfns.io/policies/approvals to accept or refuse.
```
Save, Publish and trigger a transfer to test the automation!
You're now sending an email each time an approval is requested.
DFNS displays asset amounts with the network maximum precision, and provides a description of the number of decimals. So in order to display the amount properly, you need to divide $amount$ by $10^{decimals}$. In the example below: `1000000000` for `7` decimals so $1000 000 00 / 10^7 = 100$ units!
In Zapier, insert a block "Formatter by Zapier: Numbers" before the email block.
Configure the fields:
* Transform: Perform Math Operation
* Operation: Divide
* Input:
* \[1. Amount]
* 10^\[1. Asset Decimals]
 You can now update the email body to display the output:
```
[1. Kind] transfer of [2. output] [1. Asset Symbol] to the wallet [1. To] on [1. Network].
```
Publish and trigger a policy to test again!
The amount now displays in human-readable units.
DFNS provides a wide-range catalog of APIs to refine your email.
For instance, the webhook sends the "Initiator Id" (`us-*****-*****-********`), which represents the user who triggered the policy. Let's get his information and include those in the email!
You need a token to access the API. The best way is to create a service account, follow the tutorial on the page: [DFNS API using a service account](/introduction/quickstart/6-non-custody-1-2-dfns-api-using-a-service-account) until you get a token. For rapid testing you can also copy your current session token from the dashboard (Settings > Personal Access Tokens > Copy the JWT token) but this token expires quickly so it's only good for temporary testing.
Copy your token
Keep your token secret (and disable it when you don't need it anymore)!
In Zapier, add a "Webhooks by Zapier: GET" after the formatter block, and configure the following fields:
* **URL:** `https://api.dfns.io/auth/users/[1. Requester User Id]`
* **Headers:** add one called Authorization, with value: "`Bearer `"
And finally, update the email body to use the new data you gathered. For example:
```
Please review and approve the following transfer request from [3. Name]:
```
Publish and trigger a policy to test again!
The email now includes details fetched from the DFNS API.
You can now go as far as required to get more data about the event, refine the mail. Use our [API reference](/api-reference/) to learn what you have access to!
### Video tutorial
You can now update the email body to display the output:
```
[1. Kind] transfer of [2. output] [1. Asset Symbol] to the wallet [1. To] on [1. Network].
```
Publish and trigger a policy to test again!
The amount now displays in human-readable units.
DFNS provides a wide-range catalog of APIs to refine your email.
For instance, the webhook sends the "Initiator Id" (`us-*****-*****-********`), which represents the user who triggered the policy. Let's get his information and include those in the email!
You need a token to access the API. The best way is to create a service account, follow the tutorial on the page: [DFNS API using a service account](/introduction/quickstart/6-non-custody-1-2-dfns-api-using-a-service-account) until you get a token. For rapid testing you can also copy your current session token from the dashboard (Settings > Personal Access Tokens > Copy the JWT token) but this token expires quickly so it's only good for temporary testing.
Copy your token
Keep your token secret (and disable it when you don't need it anymore)!
In Zapier, add a "Webhooks by Zapier: GET" after the formatter block, and configure the following fields:
* **URL:** `https://api.dfns.io/auth/users/[1. Requester User Id]`
* **Headers:** add one called Authorization, with value: "`Bearer `"
And finally, update the email body to use the new data you gathered. For example:
```
Please review and approve the following transfer request from [3. Name]:
```
Publish and trigger a policy to test again!
The email now includes details fetched from the DFNS API.
You can now go as far as required to get more data about the event, refine the mail. Use our [API reference](/api-reference/) to learn what you have access to!
### Video tutorial