> ## Documentation Index
> Fetch the complete documentation index at: https://docs.dfns.co/llms.txt
> Use this file to discover all available pages before exploring further.
# Set up Single Sign-On (SSO)
> Configure OIDC-based single sign-on so your team logs in to DFNS through your identity provider (Okta, Auth0, Azure AD, Google Workspace).
export const SupportLink = ({children}) => {
const url = "https://support.dfns.co";
return {children || url};
};
export const Youtube = props => {
return ;
};
DFNS SSO supports all OpenId Connect (OIDC) providers. You can configure your organization to use SSO and redirect your users automatically to your SSO when they are trying to log into DFNS.
Note that you still need to invite users using the user management page. Users coming from the SSO without being invited to your DFNS organization won't get access.
**Prerequisites**
Before you begin, ensure you have the following:
* Access to your DFNS account with sufficient permissions.
* Access to your organization's identity provider (e.g., Okta, Entra, Google Workspace) with sufficient permissions.
First, you'll need to start the SSO configuration process within your DFNS dashboard to obtain the necessary **Redirect URI**.
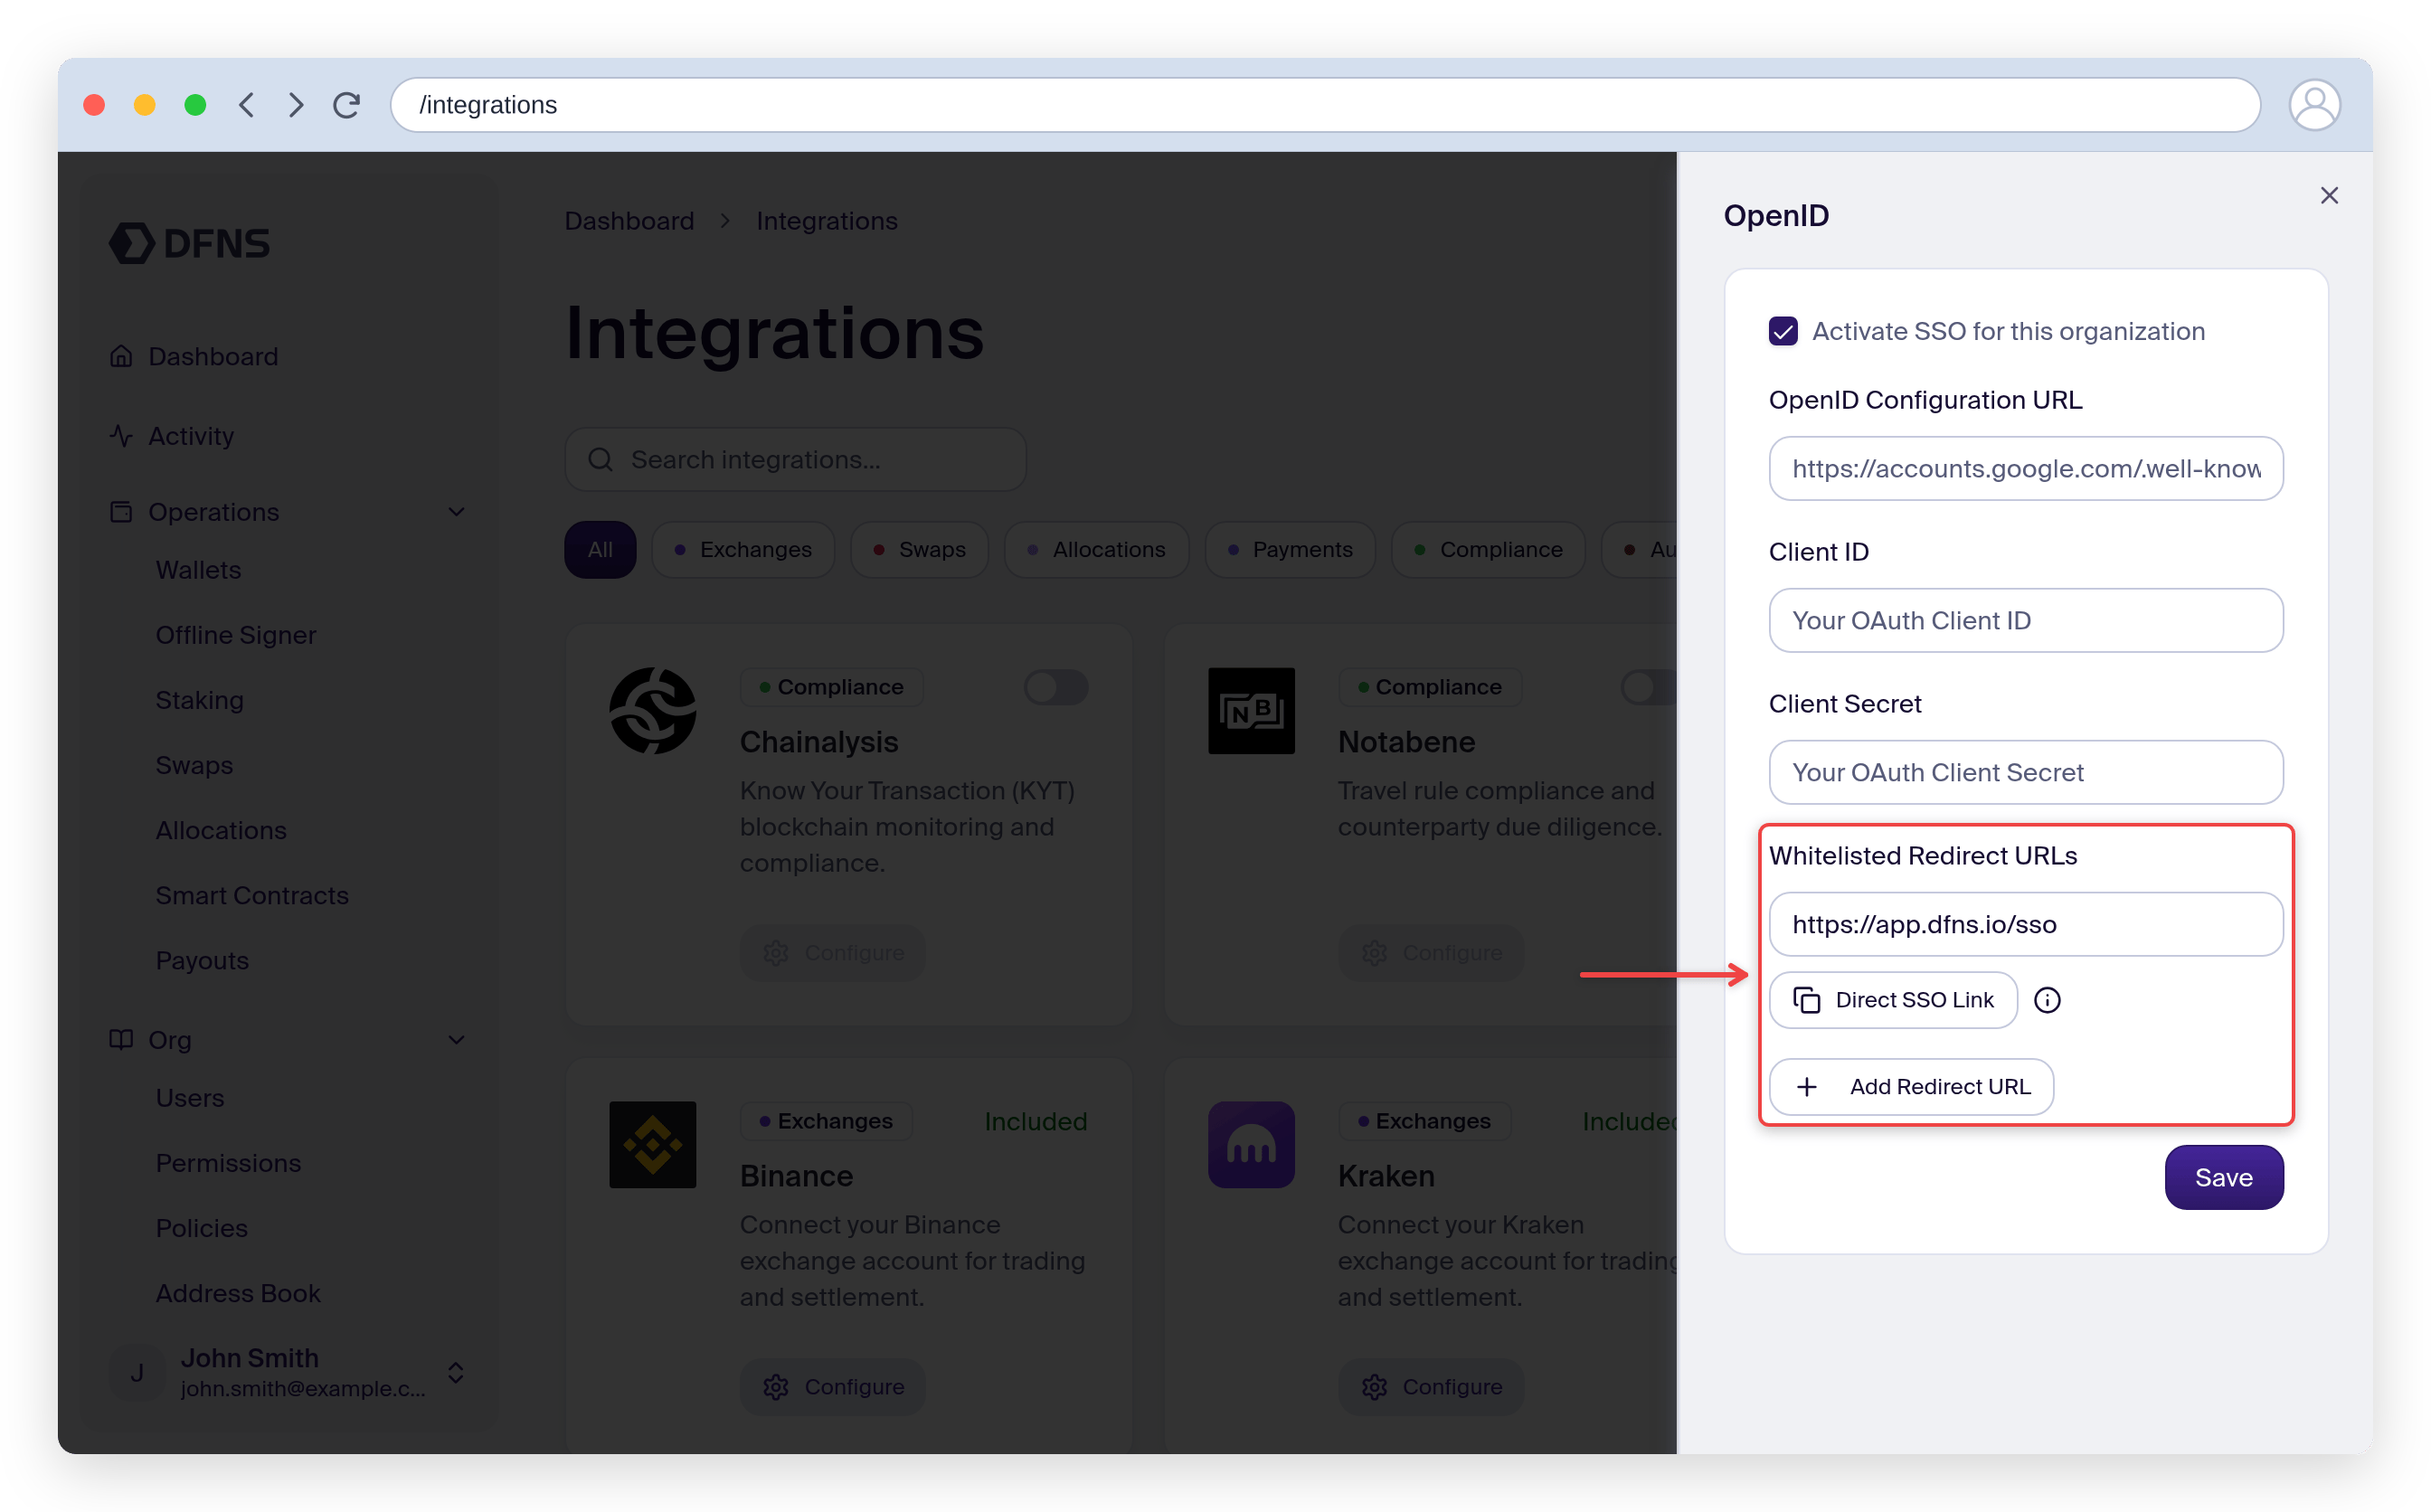
1. Log in to your DFNS dashboard and navigate to **Integrations**, find the OpenID card and click **Configure**.
2. Check the **Activate SSO for this organization** checkbox.
3. Copy the **Redirect URL**. You will need this to configure your identity provider. Note that if you are building another frontend for your customer then you can also add their redirect URLs here.
Next, you'll need to configure an application in your identity provider's dashboard. Below are instructions for our most common providers.
A detailed step-by-step tutorial is available in [Okta's documentation](https://help.okta.com/en-us/content/topics/apps/apps_app_integration_wizard_oidc.htm).
1. **Create a New App Integration:**
* Log in to your Okta admin dashboard.
* Navigate to **Applications > Applications** and click **Create App Integration**.
* Select **OIDC - OpenID Connect** as the sign-in method and **Web Application** as the application type. Click **Next**.
2. **Configure General Settings:**
* Give your application a descriptive name, like "DFNS dashboard".
* In the **Sign-in redirect URIs** field, paste the **Whitelisted Redirect URL** you copied from the DFNS dashboard.
* Under **Assignments**, choose to limit access to specific groups or allow everyone in your organization.
* Click **Save**.
3. **Obtain Client Credentials:**
* On the **Client Credentials** section, you will find the **Client ID** and **Client Secret** (under **Client Authentication**). Copy these values; you'll need them to finalize the setup in DFNS.
A detailed step-by-step tutorial is available in [Microsoft's documentation](https://learn.microsoft.com/en-us/entra/identity-platform/quickstart-register-app).
1. **Register a New Application:**
* Log in to the Microsoft Entra admin center.
* Navigate to **Entra ID > Applications > App registrations** and click **New registration**.
* Enter a name for your application, like "DFNS".
* Under **Redirect URI**, select **Web** and paste the **Whitelisted Redirect URL** from the DFNS dashboard.
* Click **Register**.
2. **Obtain Application (Client) ID:**
* From the application's **Overview** page, copy the **Application (client) ID**.
3. **Create a Client Secret:**
* Navigate to **Certificates & secrets**, in the **Client secrets** tab click **New client secret**.
* Add a description, choose an expiration period, and click **Add**.
* Copy the **Value** of the client secret immediately, as it will not be shown again.
4. **Obtain the Configuration URL:**
* From the application's **Overview** page, click the **Endpoints** tab.
* Copy the **OpenID Connect metadata document** URL. This is your OpenID Configuration URL.
A detailed step-by-step tutorial is available in [Google's documentation](https://developers.google.com/identity/openid-connect/openid-connect#appsetup).
1. **Create a New Project (or use an existing one):**
* Log in to the Google Cloud Console.
* Create a new project or select an existing one.
2. **Configure OAuth Consent Screen:**
* Navigate to **APIs & Services > OAuth consent screen**.
* Choose **Internal** as the user type and click **Create**.
* Fill in the required app information, such as the app name and user support email.
* Add the necessary scopes: `openid`, `email`, and `profile`.
3. **Create OAuth Client ID:**
* Go to **APIs & Services > Credentials** and click **Create Credentials > OAuth client ID**.
* Select **Web application** as the application type.
* Under **Authorized redirect URIs**, click **Add URI** and paste the **Whitelisted Redirect URL** from the DFNS dashboard.
* Click **Create**.
4. **Obtain Client ID and Client Secret:**
* A pop-up will appear with your **Client ID** and **Client Secret**. Copy these values.
Now that you have the required information from your identity provider, return to the DFNS dashboard to complete the setup.
1. Go back to the **Single Sign-On (SSO)** configuration page in DFNS.
2. Enter the following information you obtained from your identity provider:
* **OpenID Configuration URL:** the configuration URL (for Okta and Entra ID) or issuer URL (for other OIDC providers). For example:
* Okta: `https://{tenant-domain}/.well-known/openid-configuration`
* Google: `https://accounts.google.com/.well-known/openid-configuration`
* Entra: `https://login.microsoftonline.com/xxxx/v2.0/.well-known/openid-configuration`
* **Client ID**
* **Client Secret**
3. Click **Save**.
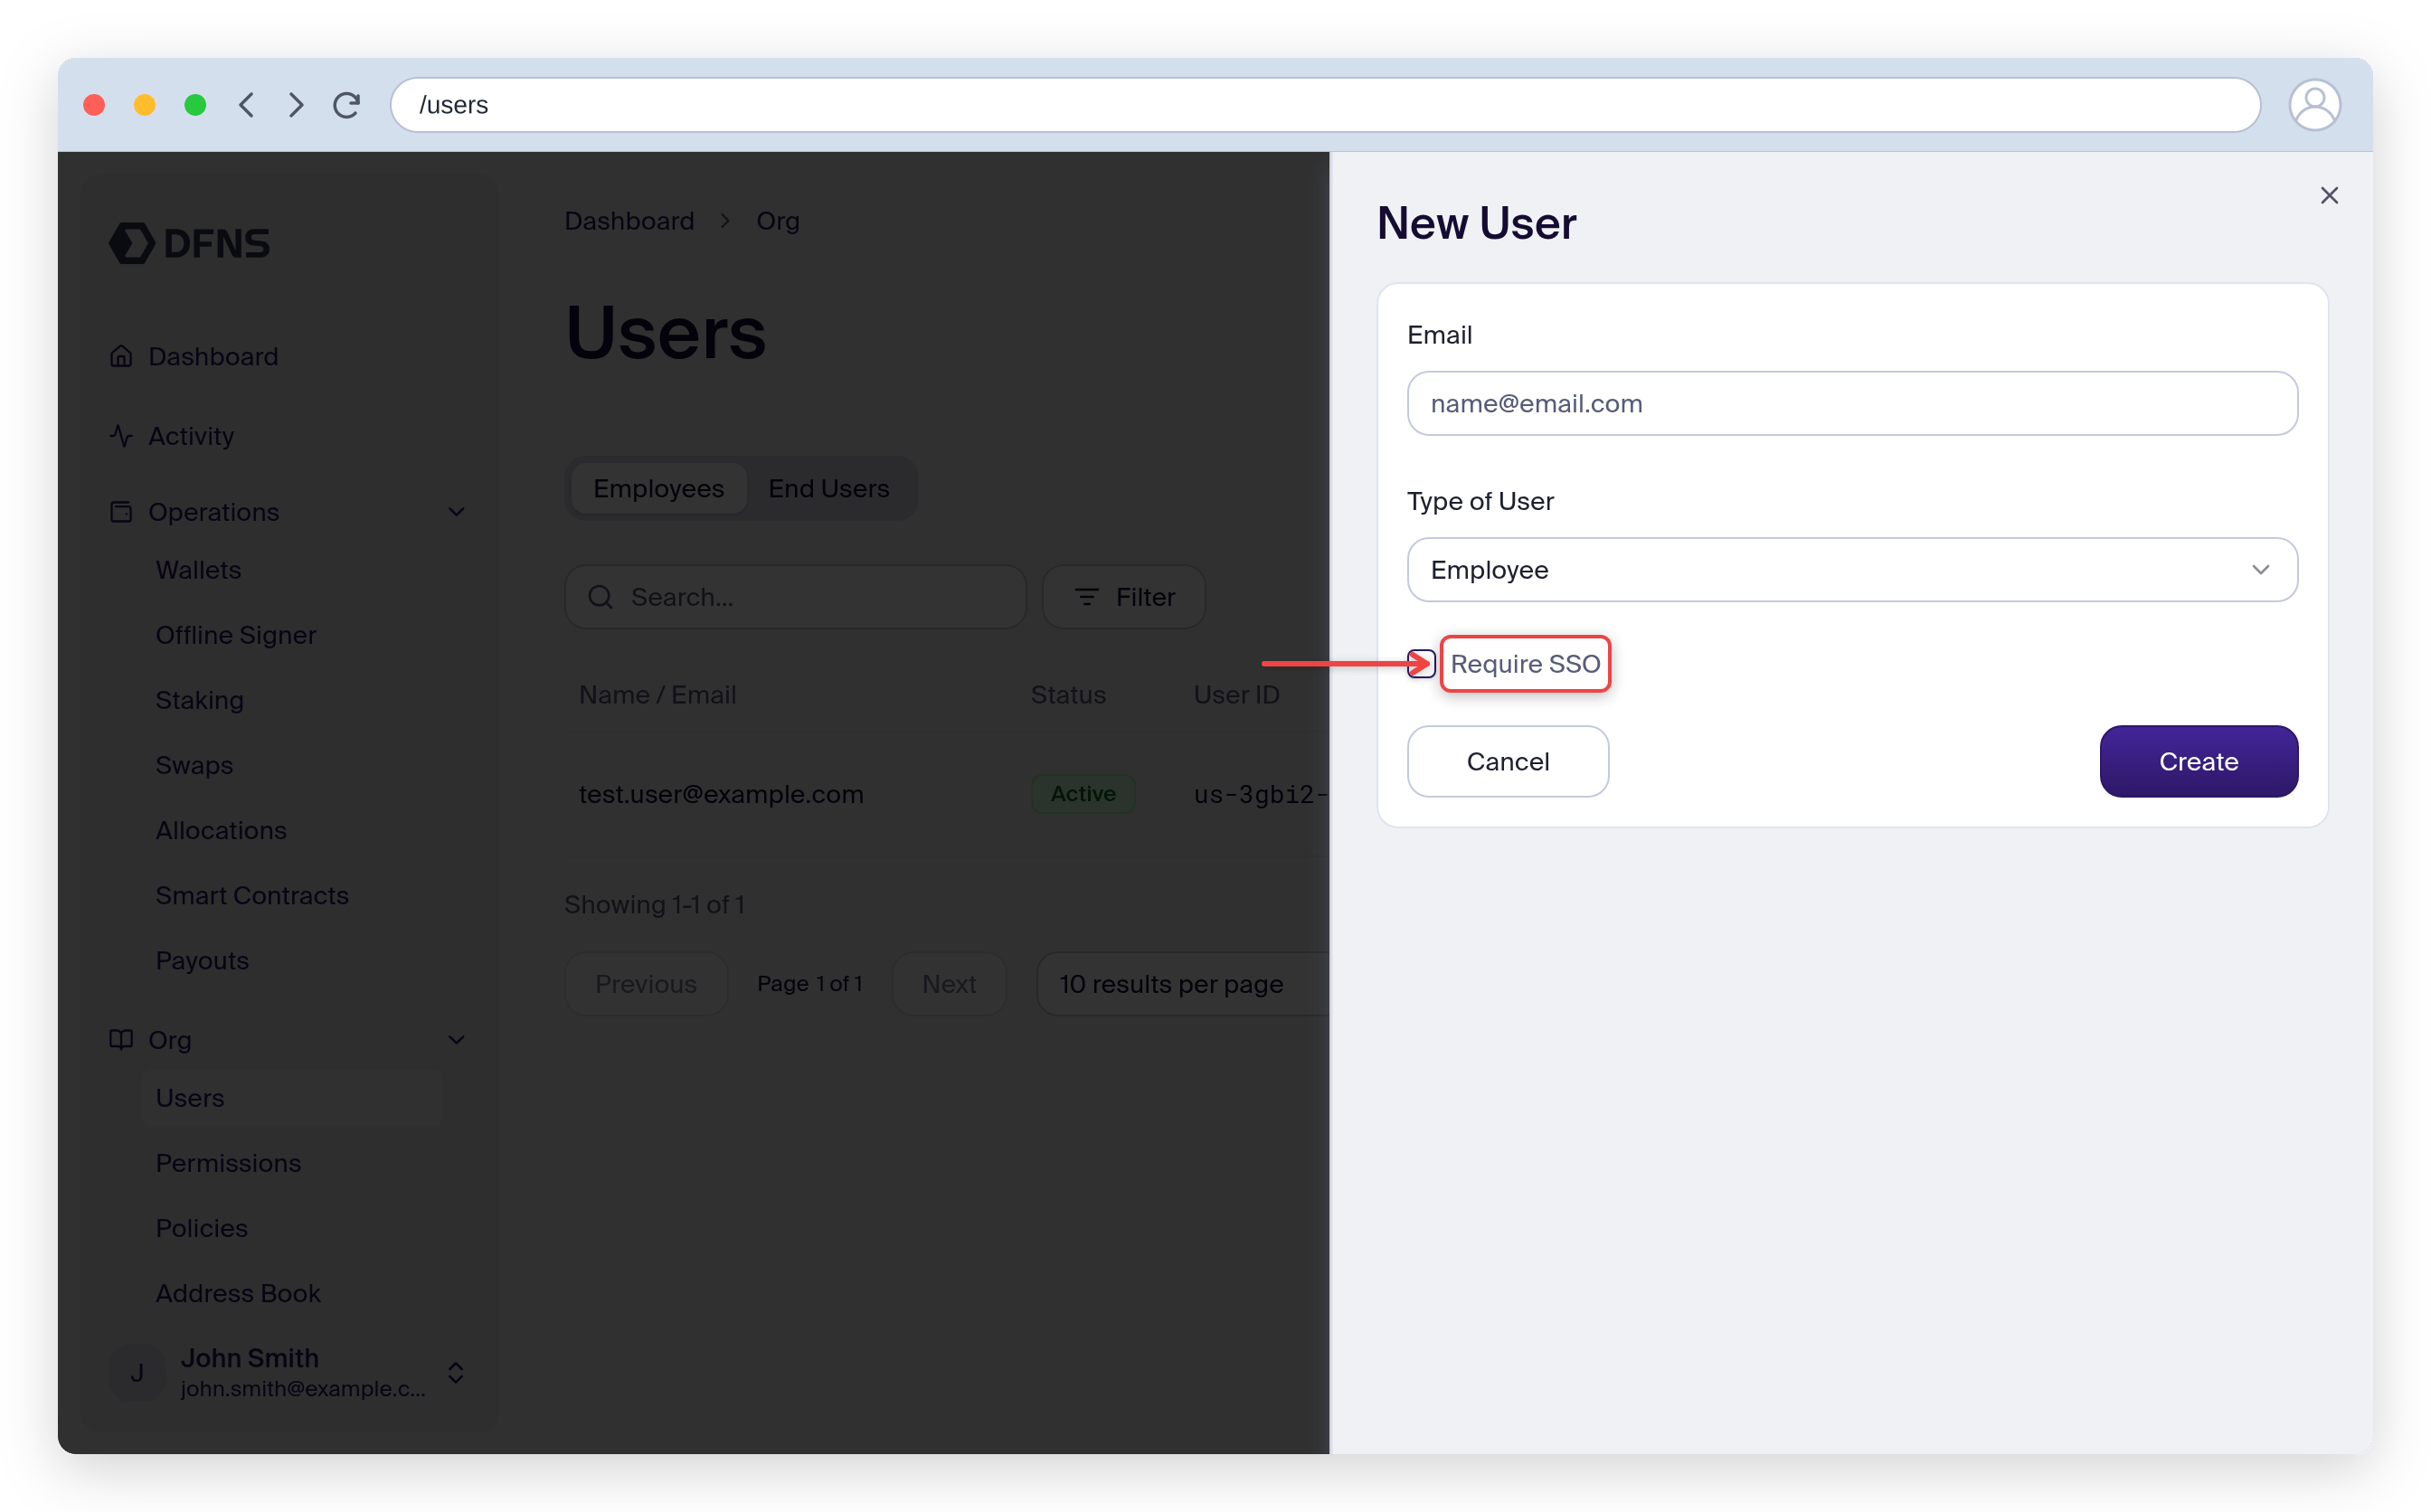
Now head to the Users page and **Invite a new user**. In the form you can check "require SSO" to force the user to go through the SSO to log into DFNS.
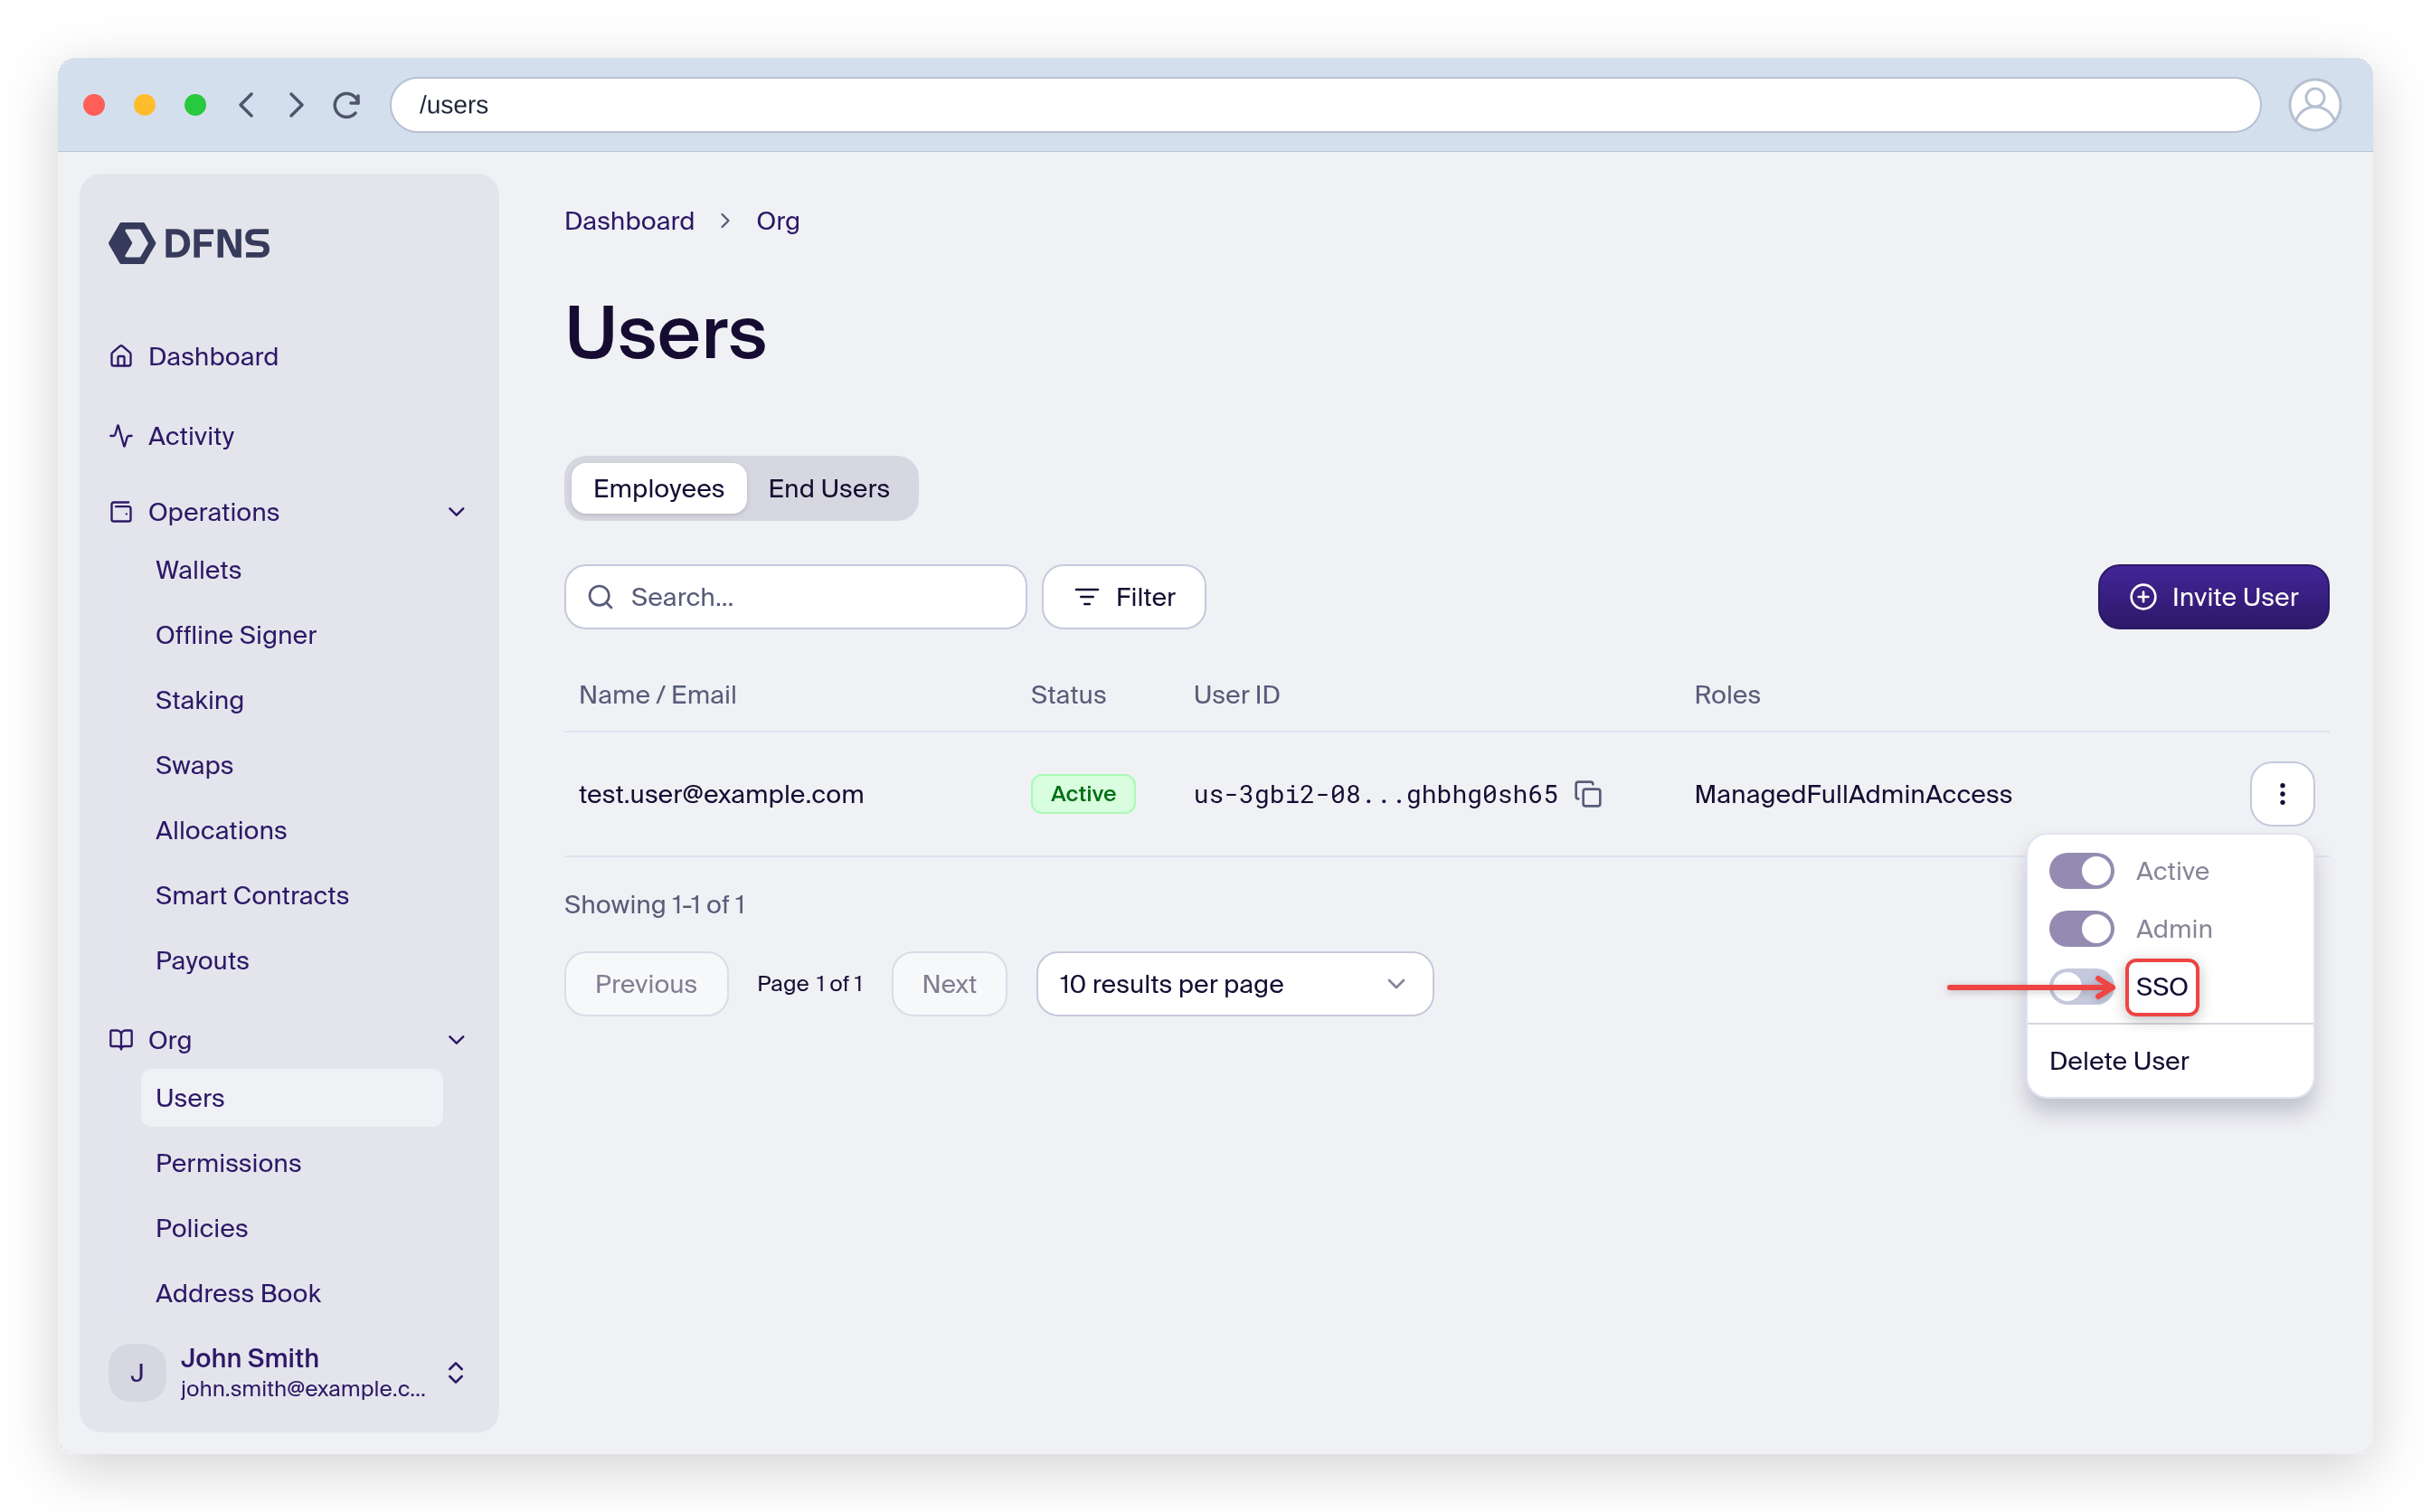
Now head to the Users page and click the menu behind a user, and enable SSO. Those users will have to go through the SSO in order to log into DFNS.
For this step you need the `Auth:Users:Update` [permission](/core-concepts/roles-and-permissions).
Once SSO is set up for a user, they will always be redirected to your identity log in page:
* **Default DFNS dashboard login `https://app.dfns.io`:** users will be required to sign in with their 🔑 passkey, then be redirected to the SSO page.
* **Direct URL to your SSO:** user will log in and will be redirected to the DFNS dashboard automatically. They won't need to use their passkey.
* **DFNS SSO redirection URL `https://app.dfns.io/sso?orgId=or-*****&clientId=yourSSOclientId`:** users will be redirected to your SSO automatically, without requiring to use their passkey.
Your SSO integration is now complete! Your team members can now log in to DFNS using their credentials from your identity provider.
For issues, contact our Support Team.