> ## Documentation Index
> Fetch the complete documentation index at: https://docs.dfns.co/llms.txt
> Use this file to discover all available pages before exploring further.

# Create your organization and invite employees

> Create your organization with you as the first user, then invite coworkers to join you.

export const Youtube = props => {
  return <iframe className="w-full aspect-video rounded-xl" src={`https://www.youtube.com/embed/${props.videoId}`} title="YouTube video player" frameBorder="0" allow="accelerometer; autoplay; clipboard-write; encrypted-media; gyroscope; picture-in-picture" allowFullScreen>
      </iframe>;
};

<Youtube videoId="43PtjaTa4NM" />

An organization ("org") represents your company or project. It holds your wallets, policies and user credentials.

## Create your organization

<Steps>
  <Step title="Create your account and organization">
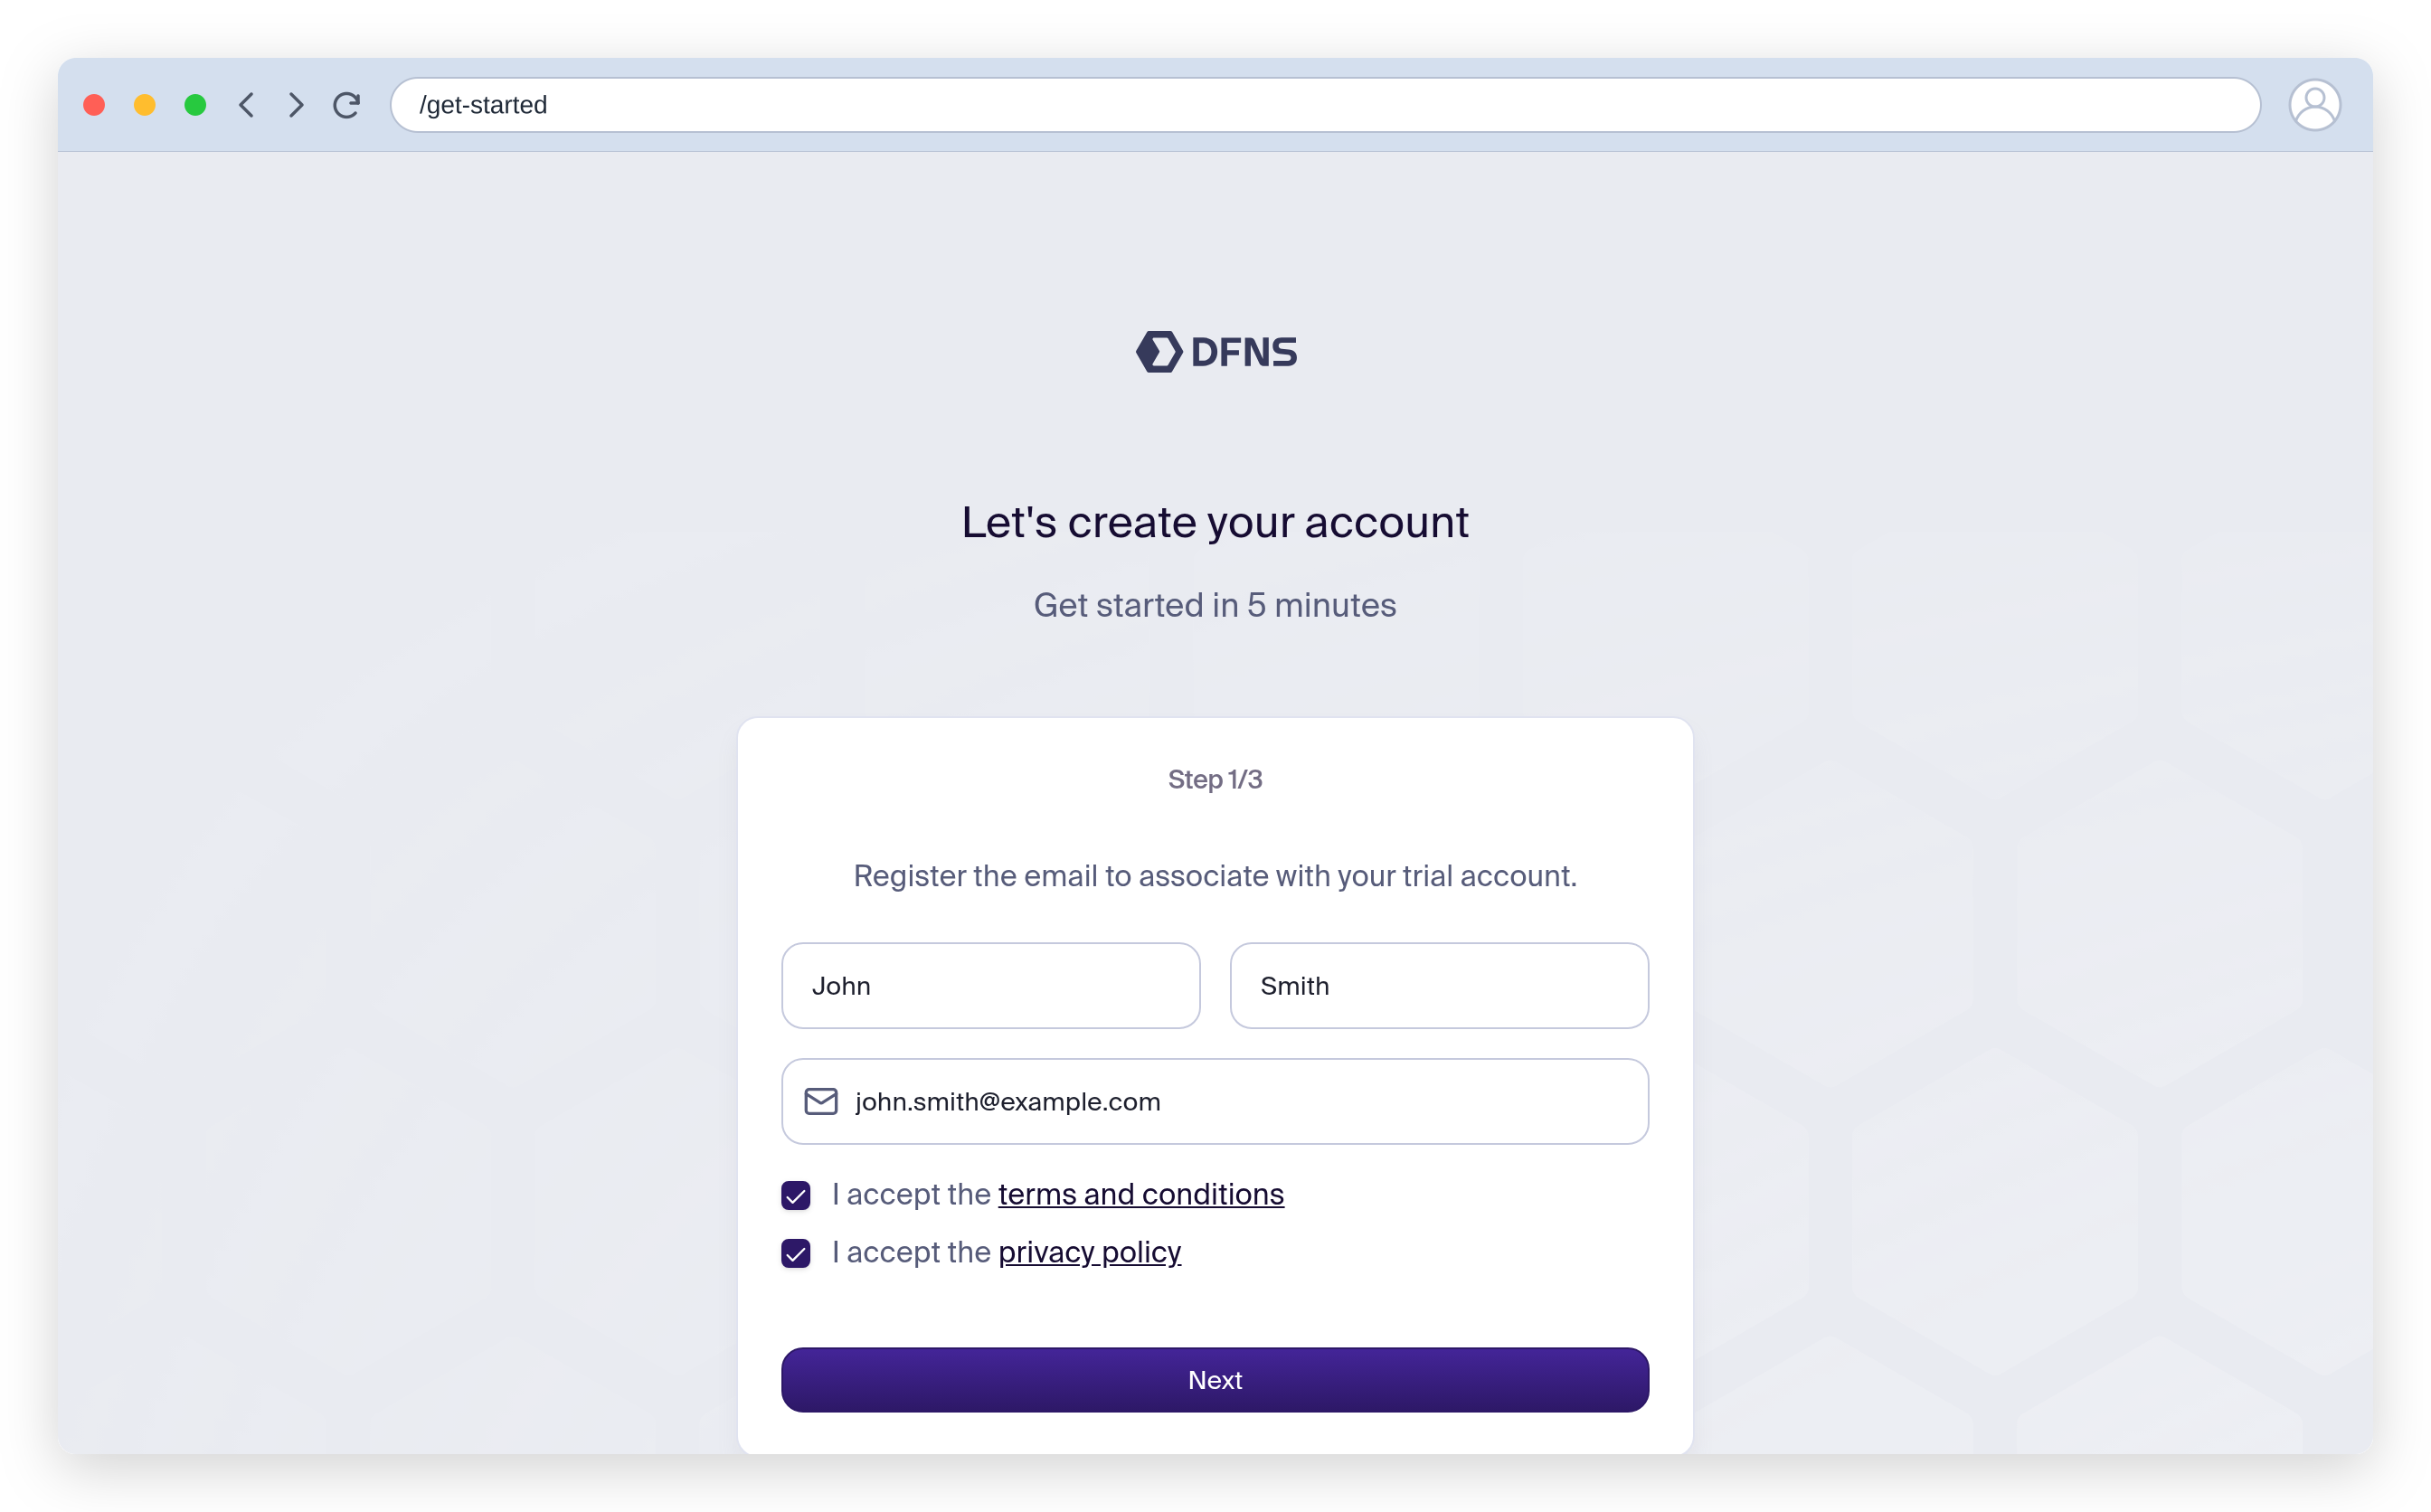
    Navigate to [app.dfns.io/get-started](https://app.dfns.io/get-started) to create a new organization with you as the first Employee, you will be registered as the first admin.

    <Frame>
      <img src="https://mintcdn.com/dfns-6d8c7466/C-QxugfNcolBADI3/images/CreateOrg01.png?fit=max&auto=format&n=C-QxugfNcolBADI3&q=85&s=107322b1a91fa47d272d426da098d70a" alt="" width="1110" height="960" data-path="images/CreateOrg01.png" />
    </Frame>
  </Step>

  <Step title="Get your registration code">
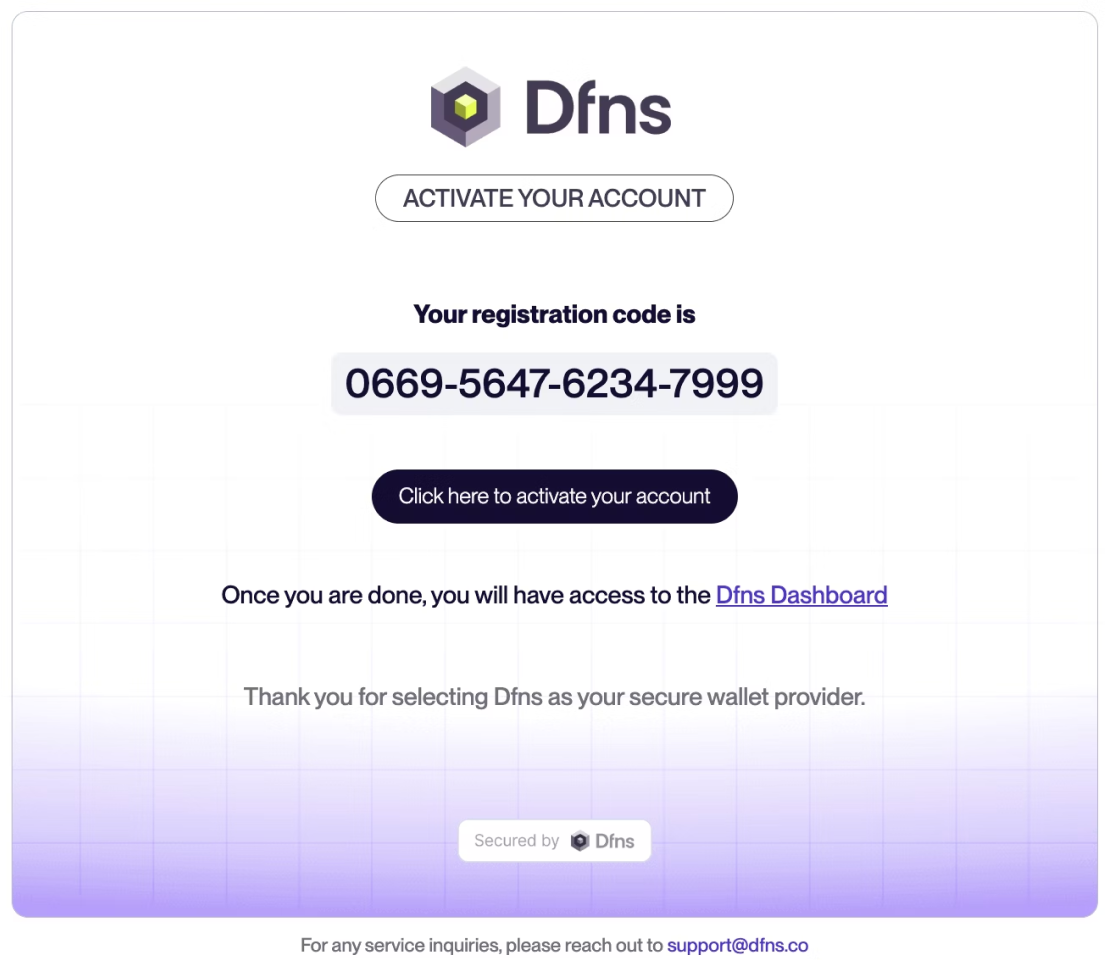
    You should have received an email with a link and a code to register in our system.

    <Frame>
      <img src="https://mintcdn.com/dfns-6d8c7466/C-QxugfNcolBADI3/images/CreateOrg02.png?fit=max&auto=format&n=C-QxugfNcolBADI3&q=85&s=5d101dff2ab287886485000e00804eda" alt="" width="1110" height="960" data-path="images/CreateOrg02.png" />
    </Frame>
  </Step>

  <Step title="Activate your account">
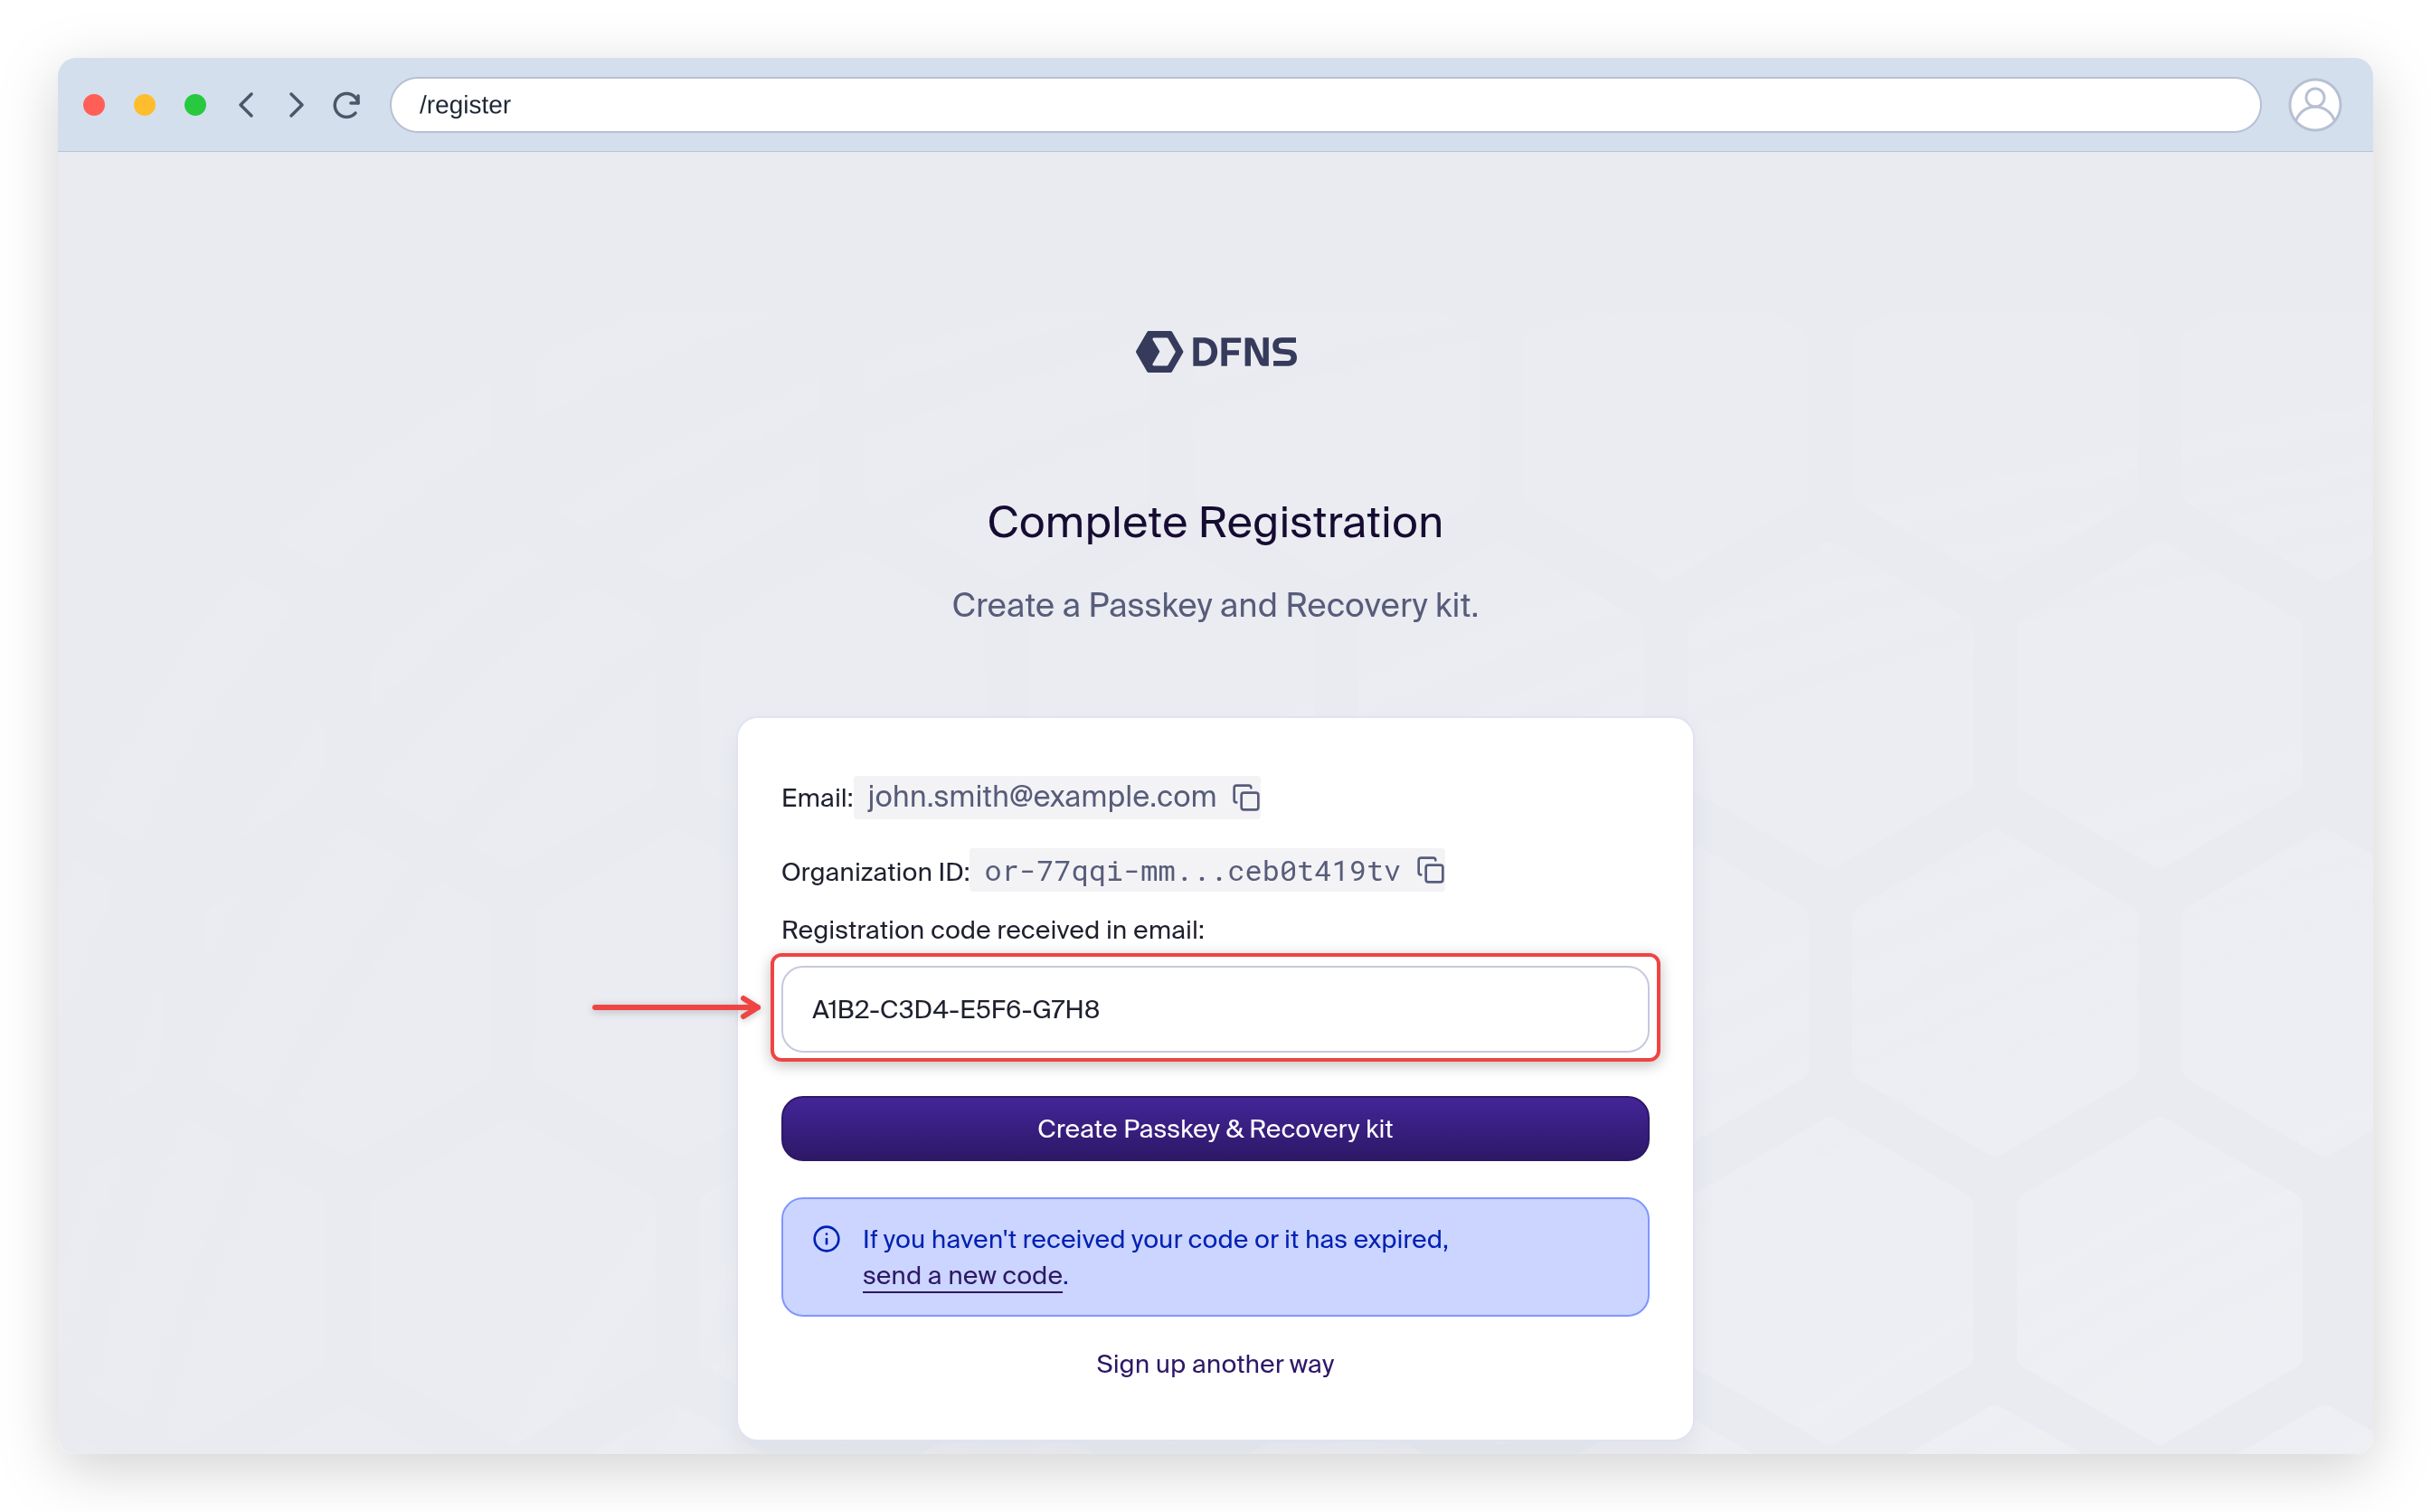
    Click on the link in the Email and enter the registration code. You can already see your organization id.

    <Frame>
      <img src="https://mintcdn.com/dfns-6d8c7466/C-QxugfNcolBADI3/images/CreateOrg03.png?fit=max&auto=format&n=C-QxugfNcolBADI3&q=85&s=f77b23f9405acc8084cd755b0996141c" alt="" width="1110" height="960" data-path="images/CreateOrg03.png" />
    </Frame>
  </Step>

  <Step title="Create a passkey">
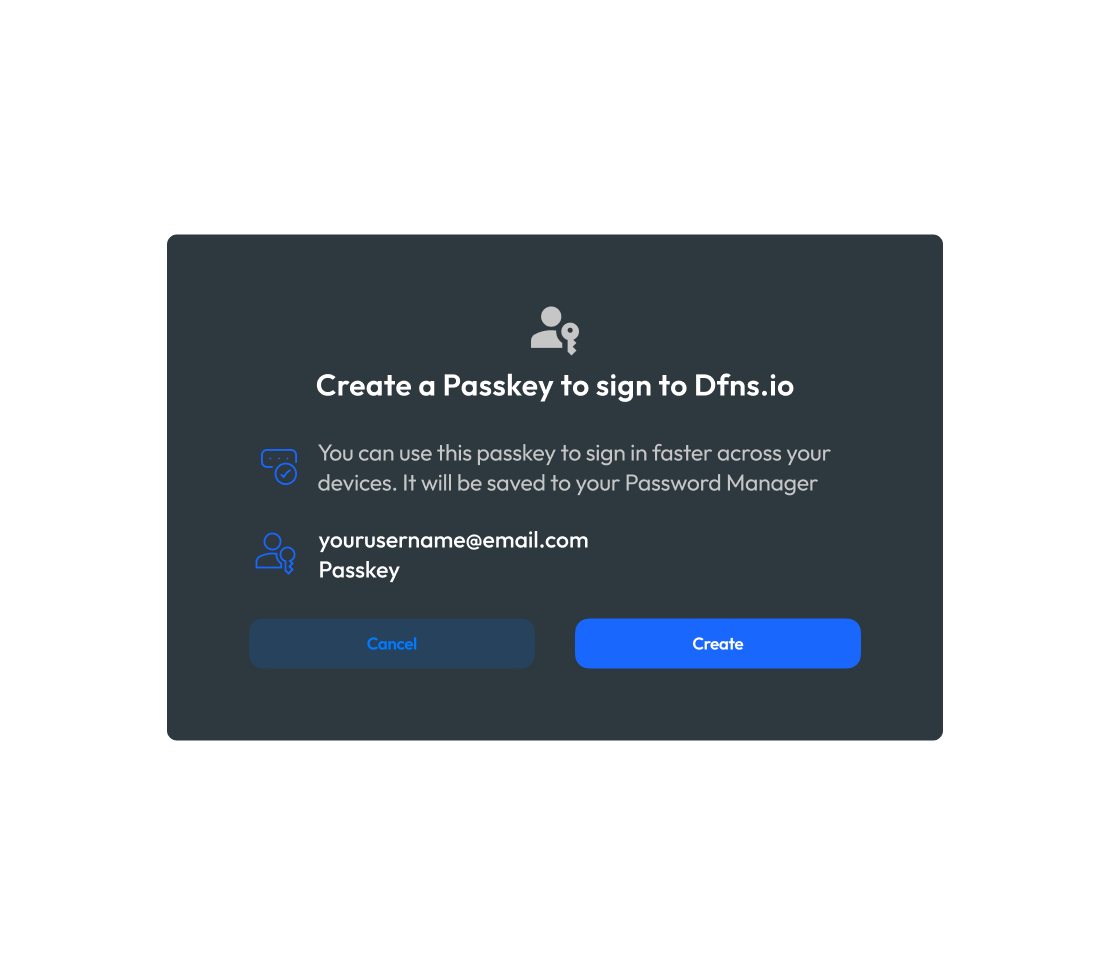
    You will be asked to register your 🔑 passkey. Your browser should offer the available options on your device. If there is none, then you can consider buying a WebAuthn-compatible device (Yubikeys are a common example) or install a password manager to take care of it for you.

    <Info>
      Passkeys eliminate the need for passwords and use your device’s built-in security features, like Face ID, Touch ID, or a PIN.
    </Info>

    <Frame>
      <img src="https://mintcdn.com/dfns-6d8c7466/C-QxugfNcolBADI3/images/CreateOrg04.png?fit=max&auto=format&n=C-QxugfNcolBADI3&q=85&s=955f3c6e3c5dc105afe12ded136703be" alt="" width="1110" height="960" data-path="images/CreateOrg04.png" />
    </Frame>
  </Step>

  <Step title="Save your recovery keys">
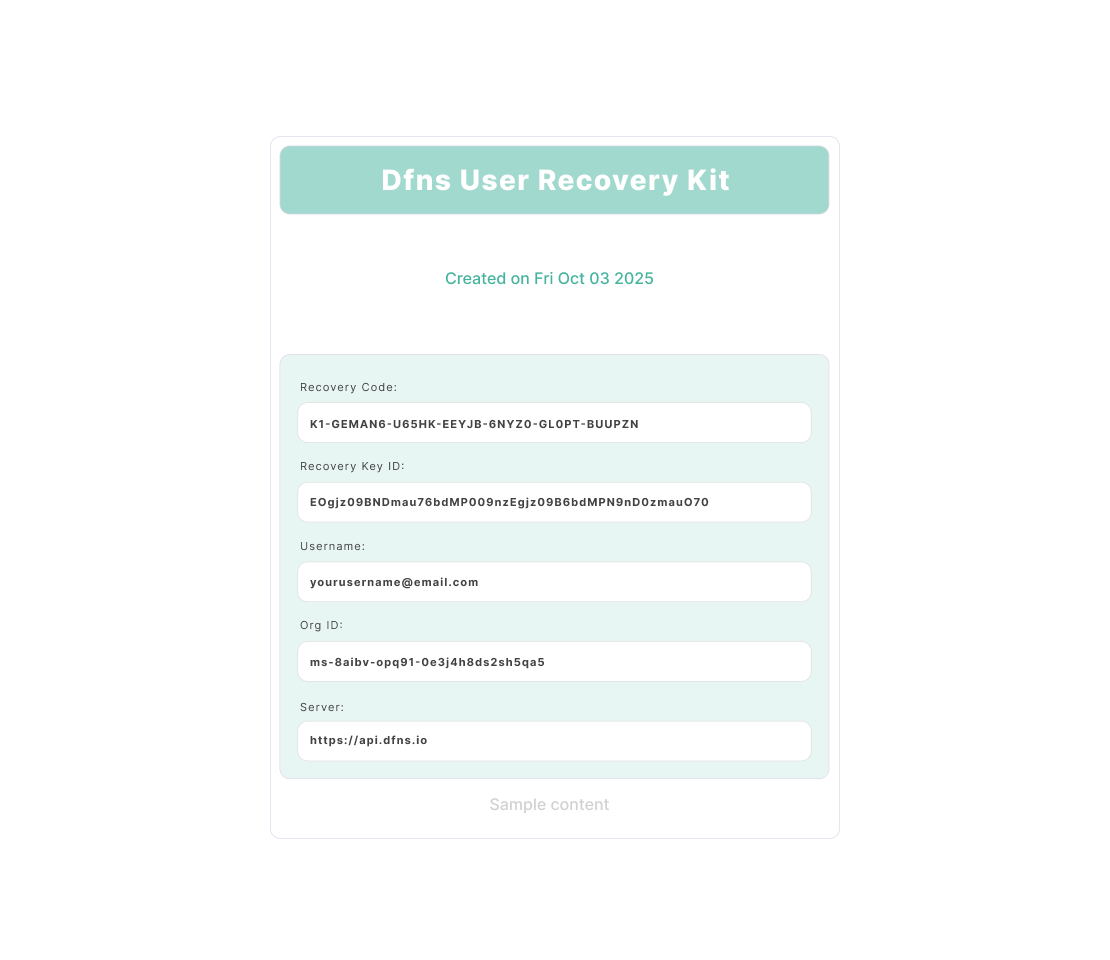
    Last step is to print or save your recovery details in a safe place.

    <Info>
      Some characters may be difficult to differentiate depending on the font used (uppercase 'I' vs lowercase 'l', etc). Make sure you store or print them with a font that clearly shows the difference!
    </Info>

    <Frame>
      <img src="https://mintcdn.com/dfns-6d8c7466/C-QxugfNcolBADI3/images/CreateOrg05.png?fit=max&auto=format&n=C-QxugfNcolBADI3&q=85&s=8026f279b95757f84ca4d7f83c1c4335" alt="" width="1110" height="960" data-path="images/CreateOrg05.png" />
    </Frame>
  </Step>
</Steps>

<Check>
  Congratulations! You are now registered are able to log in to the dashboard!
</Check>

## Invite other employees

<Steps>
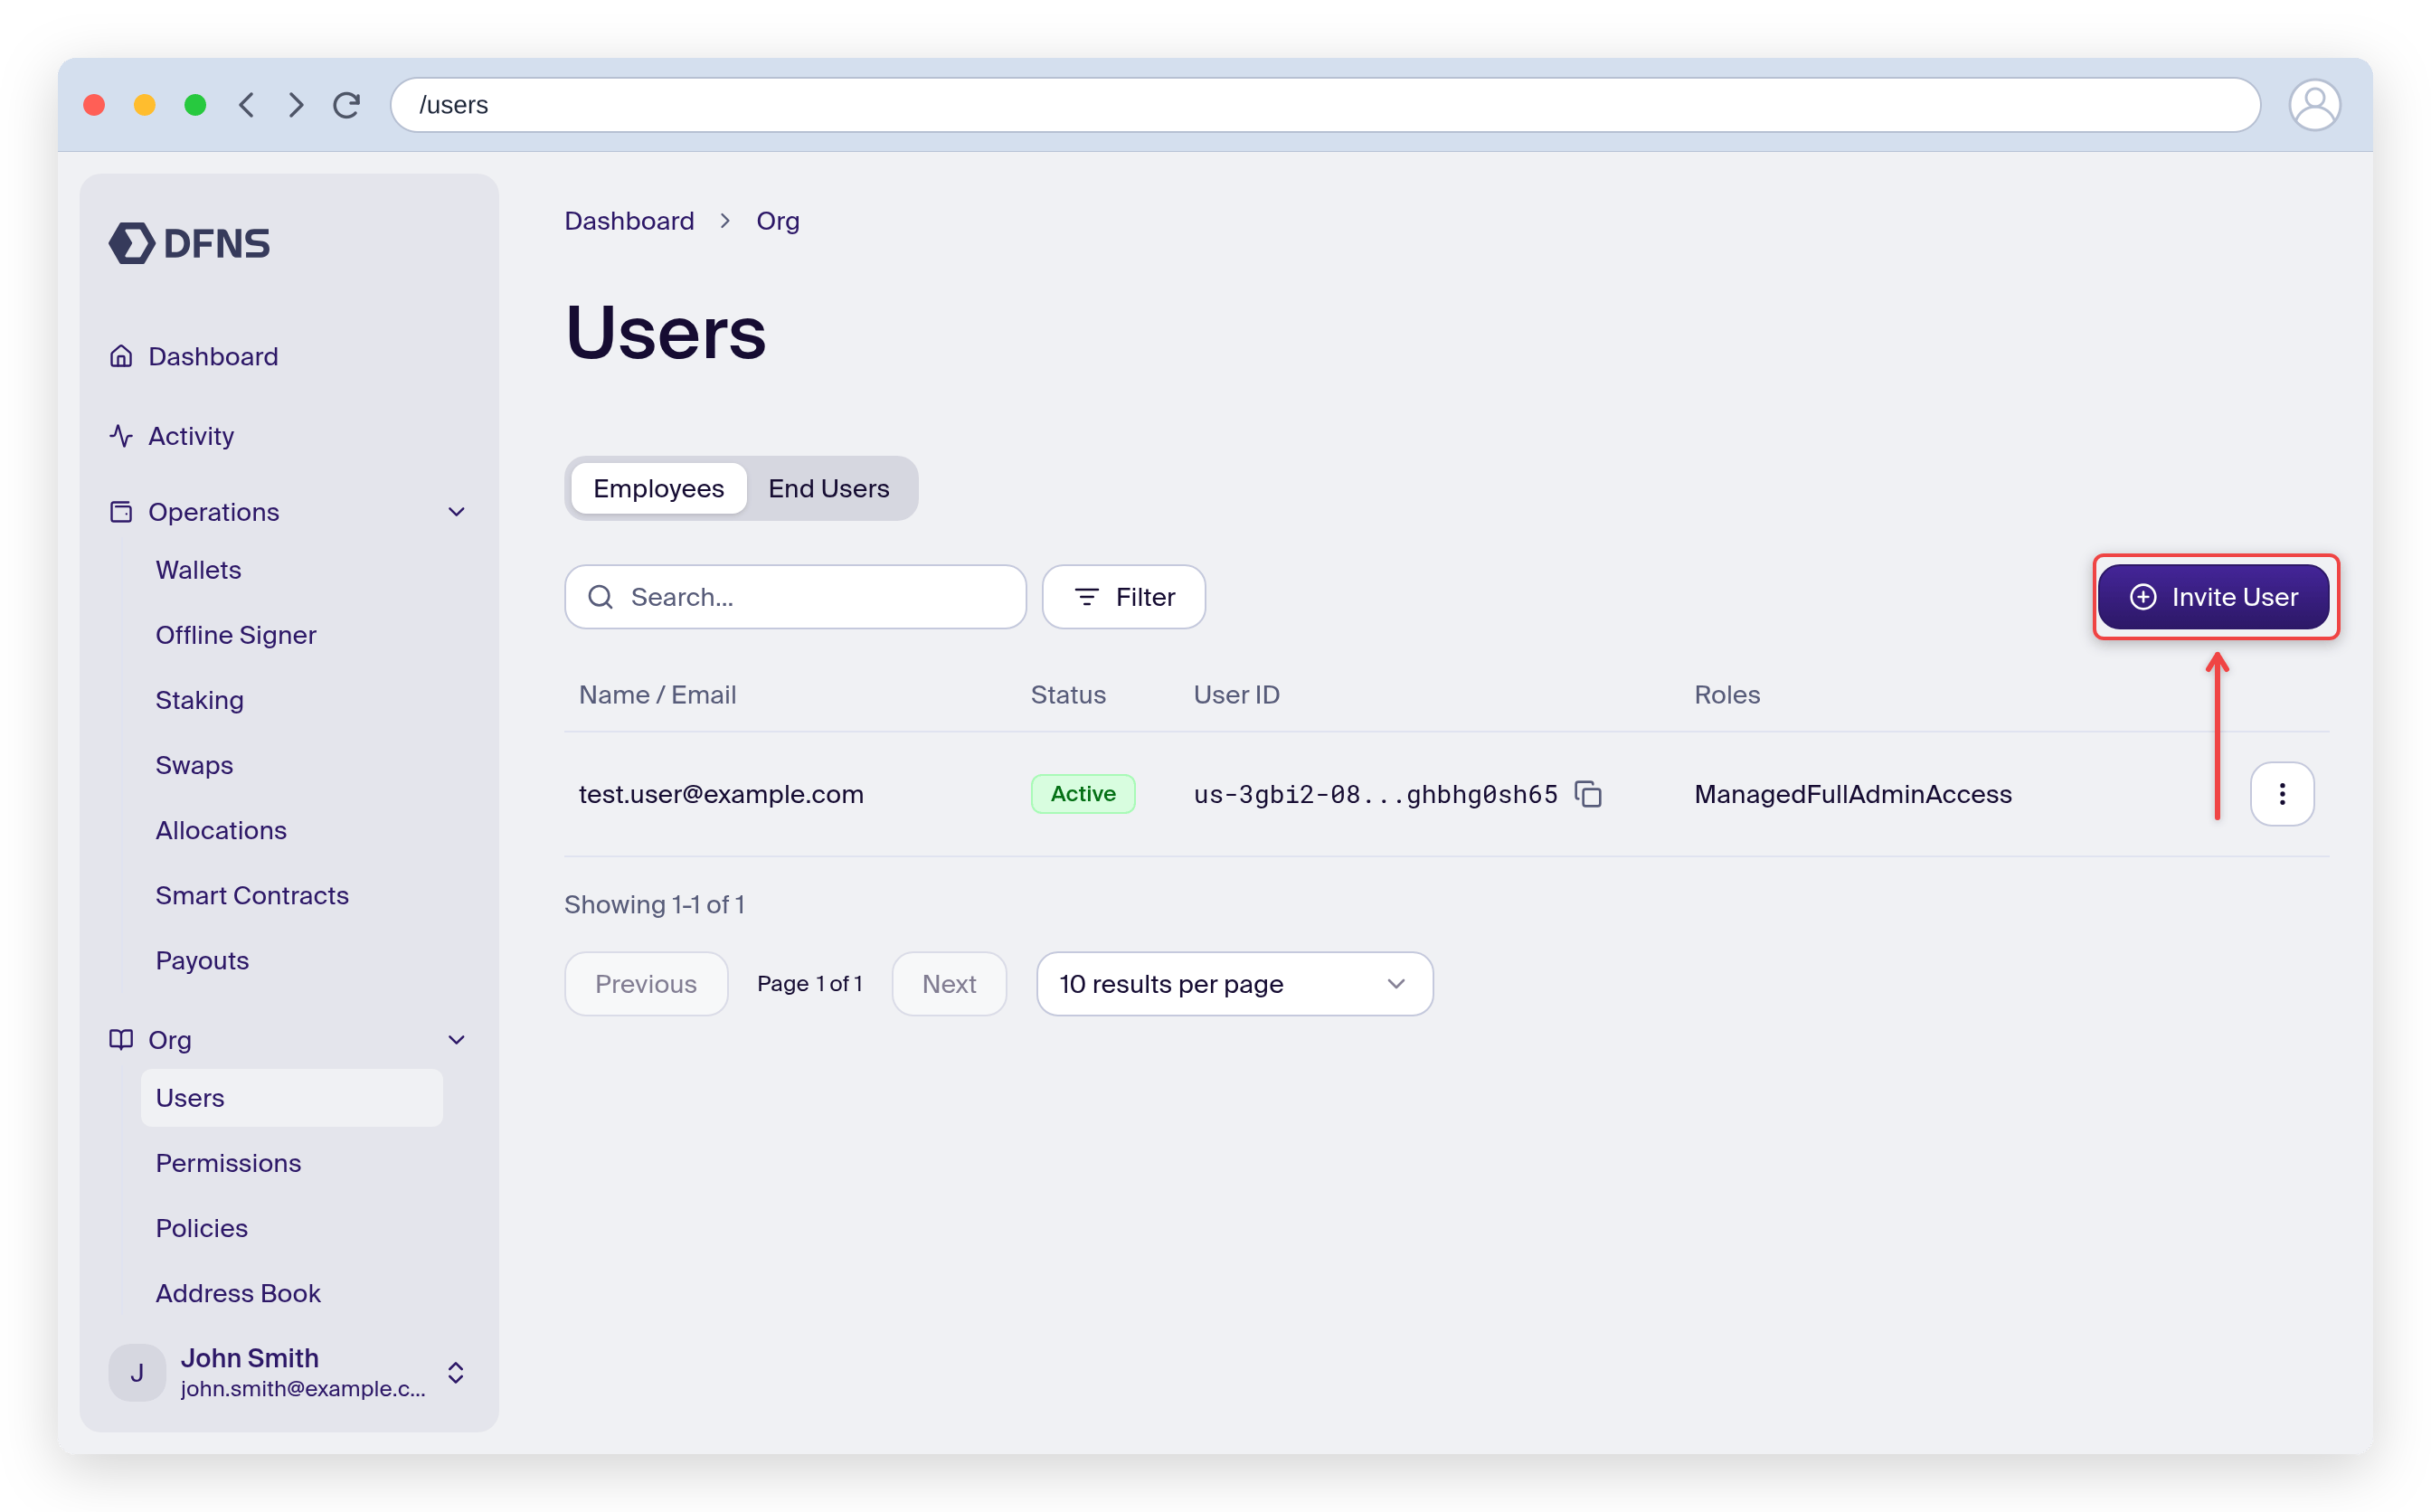
  <Step title="Open the Users page">
    On the dashboard, head to `Org > Users` (direct link: [https://app.dfns.io/users](https://app.dfns.io/users)).

    Notice that you are on your own right now, and you are an Admin 🎉

    The new users will be allowed to connect to the dashboard and use the API following the permissions you will grant them (they will have no permission when you will create them).

    <Frame>
      <img src="https://mintcdn.com/dfns-6d8c7466/C-QxugfNcolBADI3/images/01.png?fit=max&auto=format&n=C-QxugfNcolBADI3&q=85&s=3be9f72aee46fae1e2130181bc47de0d" alt="" width="2220" height="1630" data-path="images/01.png" />
    </Frame>
  </Step>

  <Step title="Create a new user">
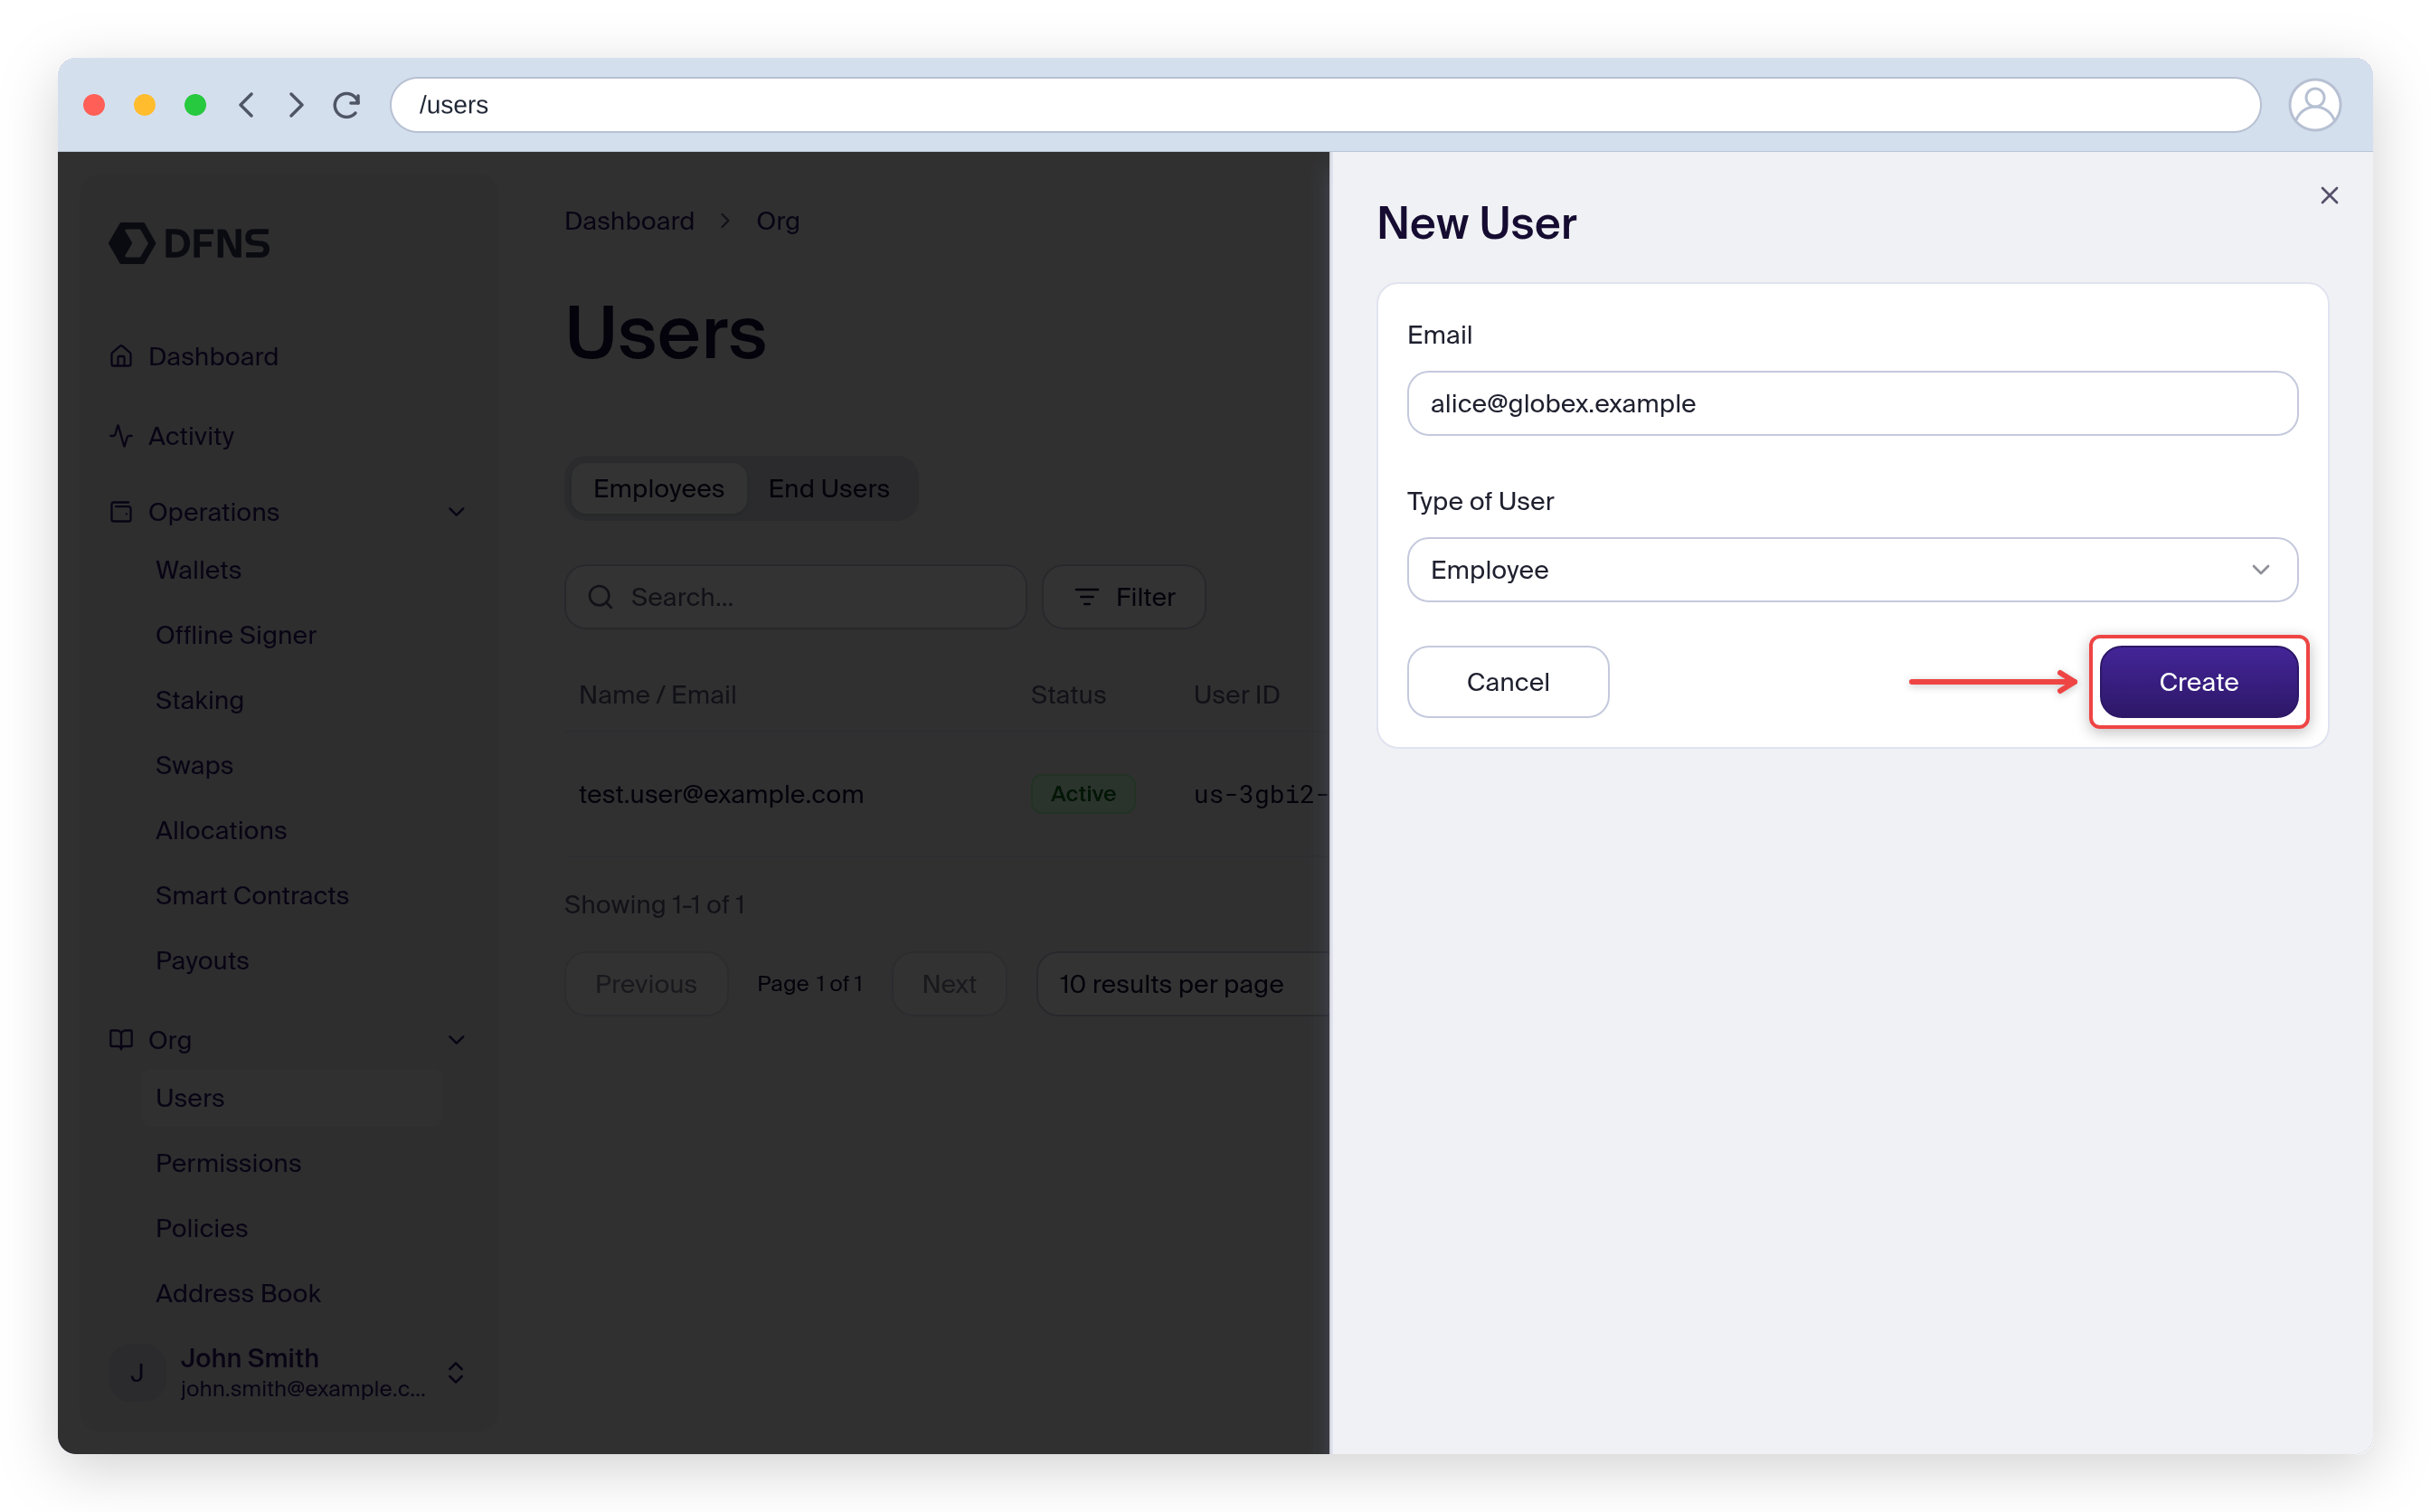
    Add Users to the organization by clicking "Invite User". The type of user is always Employee here, as those are your colleagues aiming at using Dfns dashboard and APIs. If you want to onboard your customers as user, then head to [delegated wallets](/advanced/delegated-wallets).

    Note: External id is optional.

    When you have filled in the information, hit Create. As this is a modification in your org, you will be requested to 🔑 sign the action with your passkey before it's actually executed.

    <Info>
      The new user will receive an email with the same registration flow as you did. Make sure he follows the instructions to register his credentials to be able to use Dfns.
    </Info>

    <Frame>
      <img src="https://mintcdn.com/dfns-6d8c7466/aH8Z4RyoX4Vg4edY/images/spaces_2FtnSPOZGQ2hBmgoVWX5H6_2Fuploads_2Fgd9wAh2koCdeXUtQifHo_2FCapture_20d_E2_80_99e_CC_81cran_202025-07-15_20a_CC_80_2016.24.55.png?fit=max&auto=format&n=aH8Z4RyoX4Vg4edY&q=85&s=3a348a1801ae3ec3ccdecea473caae40" alt="" width="3450" height="1800" data-path="images/spaces_2FtnSPOZGQ2hBmgoVWX5H6_2Fuploads_2Fgd9wAh2koCdeXUtQifHo_2FCapture_20d_E2_80_99e_CC_81cran_202025-07-15_20a_CC_80_2016.24.55.png" />
    </Frame>

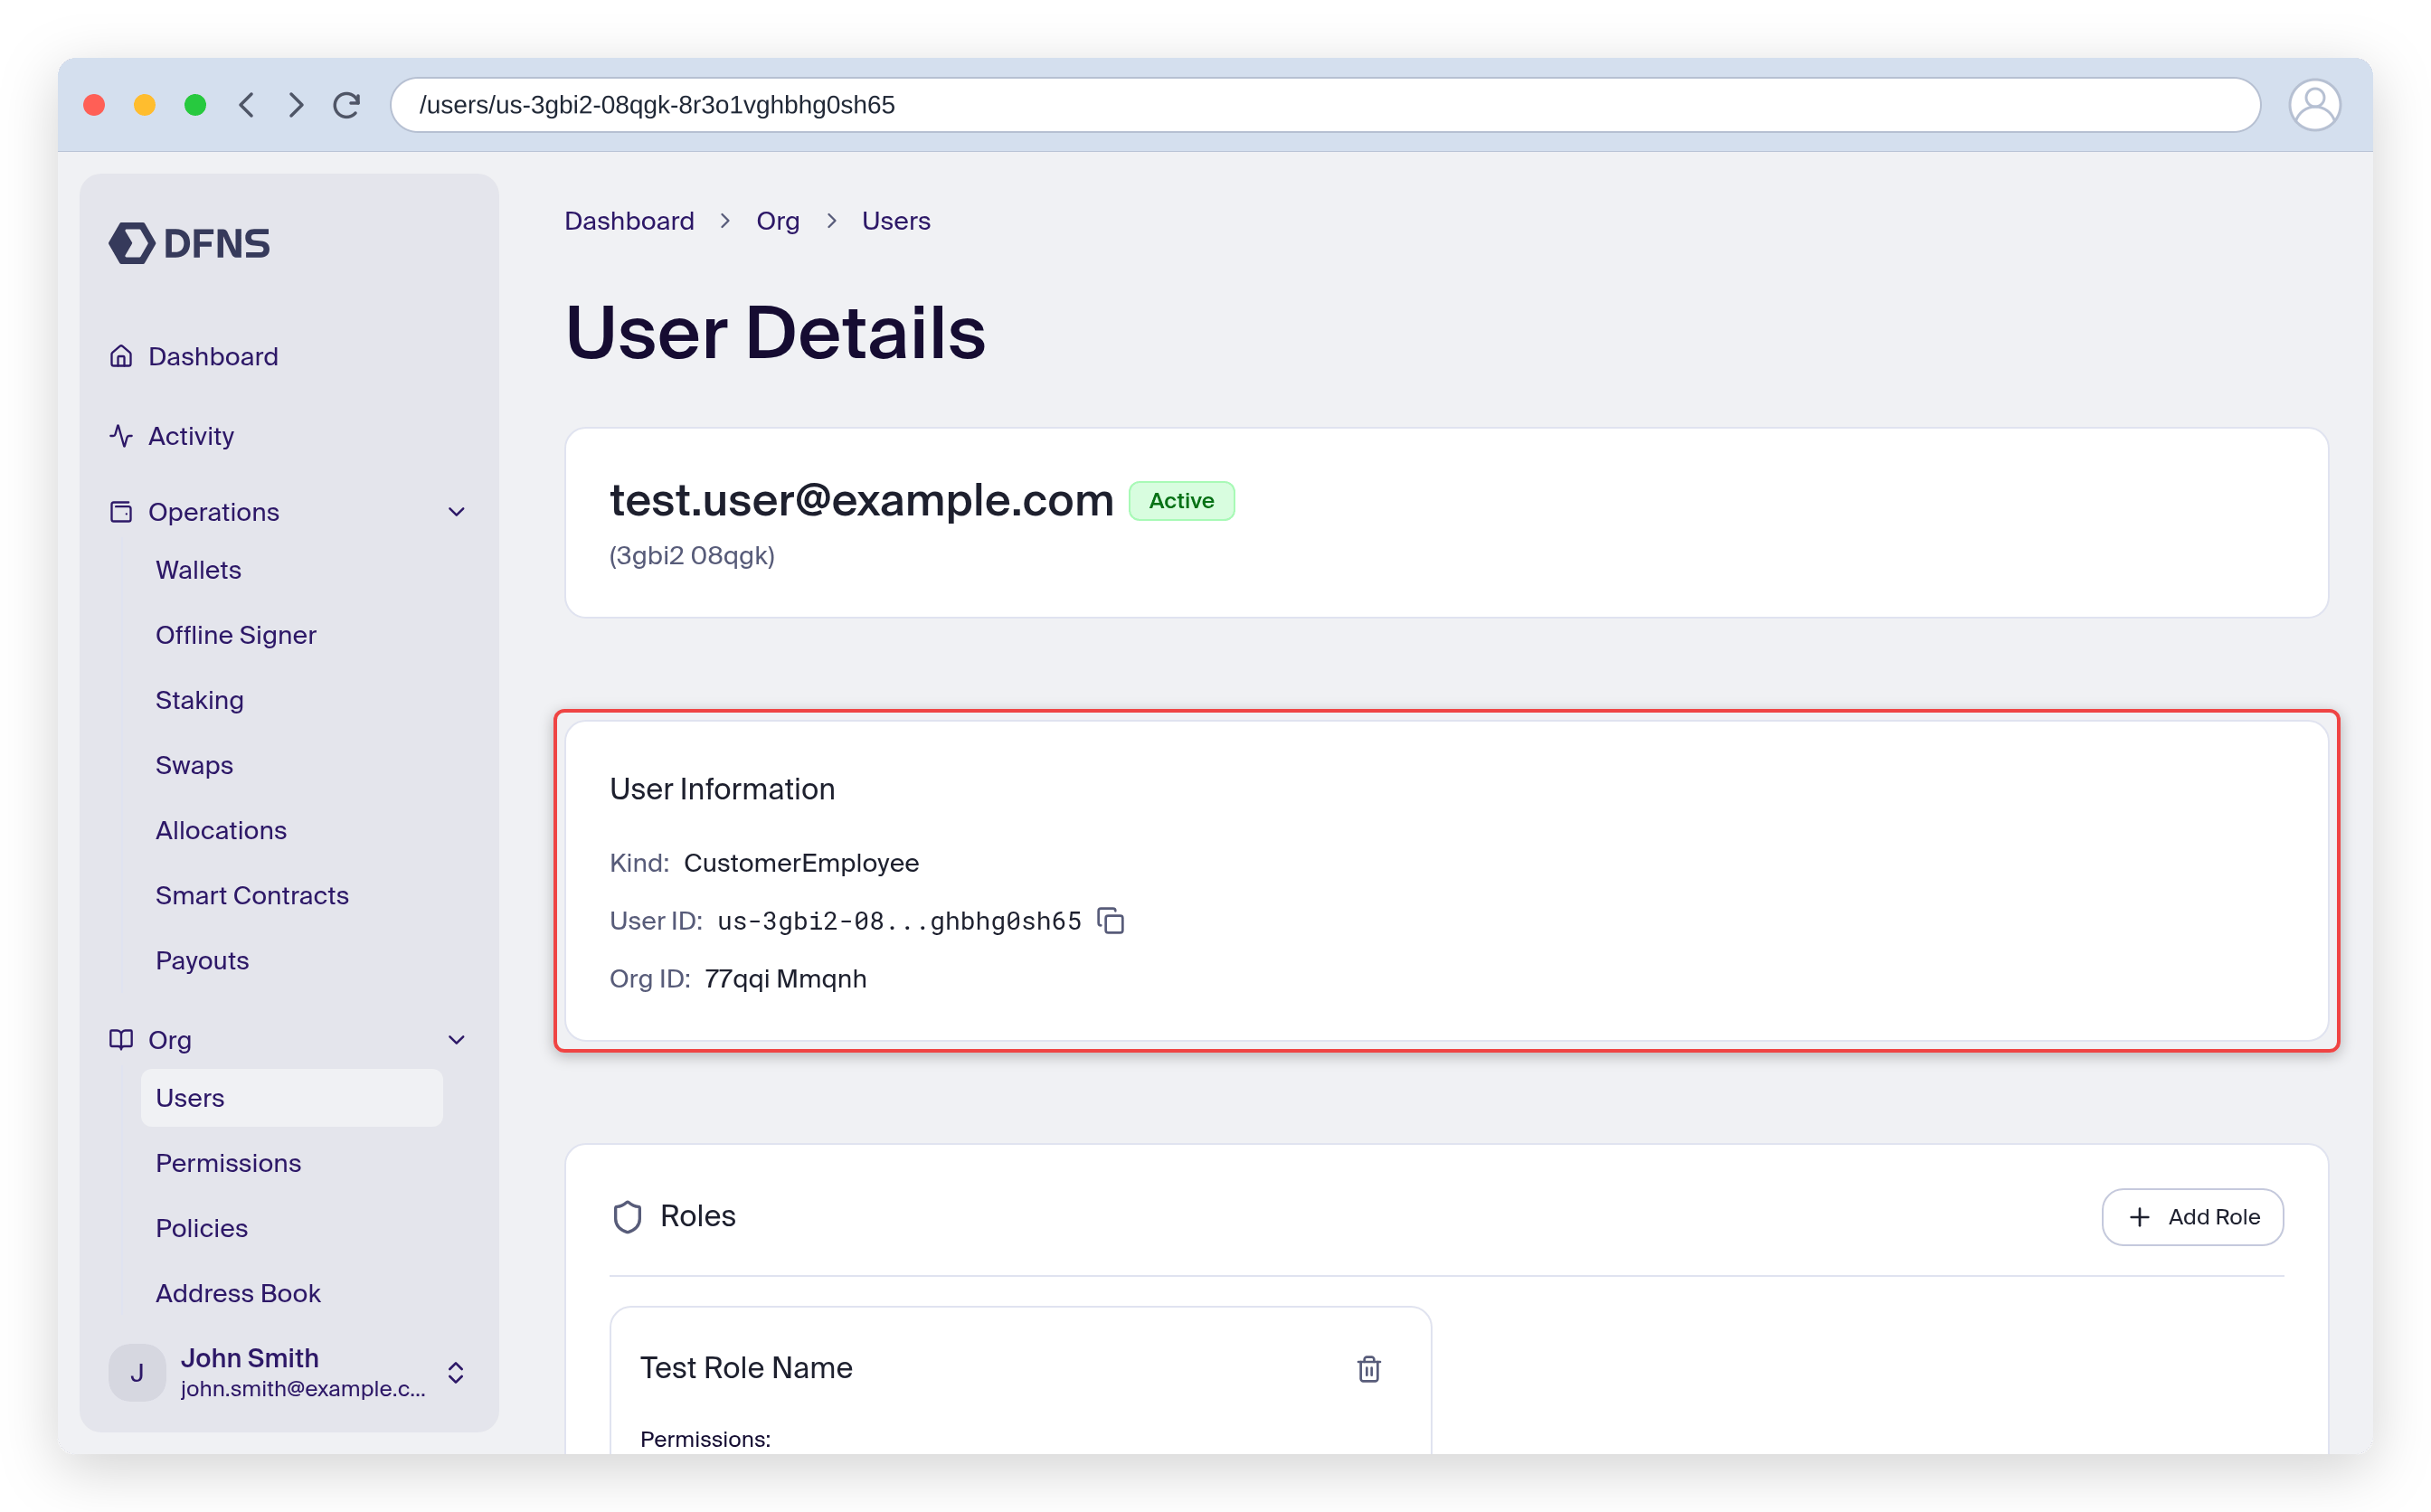
    Once done, you are given an overview of this new user:

    <Frame>
      <img src="https://mintcdn.com/dfns-6d8c7466/aH8Z4RyoX4Vg4edY/images/spaces_2FtnSPOZGQ2hBmgoVWX5H6_2Fuploads_2FkNLK2aakVqxc8vfCZBsb_2FCapture_20d_E2_80_99e_CC_81cran_202025-07-15_20a_CC_80_2017.12.10.png?fit=max&auto=format&n=aH8Z4RyoX4Vg4edY&q=85&s=bb12933570e6d4be971e98c8520a4db3" alt="" width="3450" height="1806" data-path="images/spaces_2FtnSPOZGQ2hBmgoVWX5H6_2Fuploads_2FkNLK2aakVqxc8vfCZBsb_2FCapture_20d_E2_80_99e_CC_81cran_202025-07-15_20a_CC_80_2017.12.10.png" />
    </Frame>
  </Step>

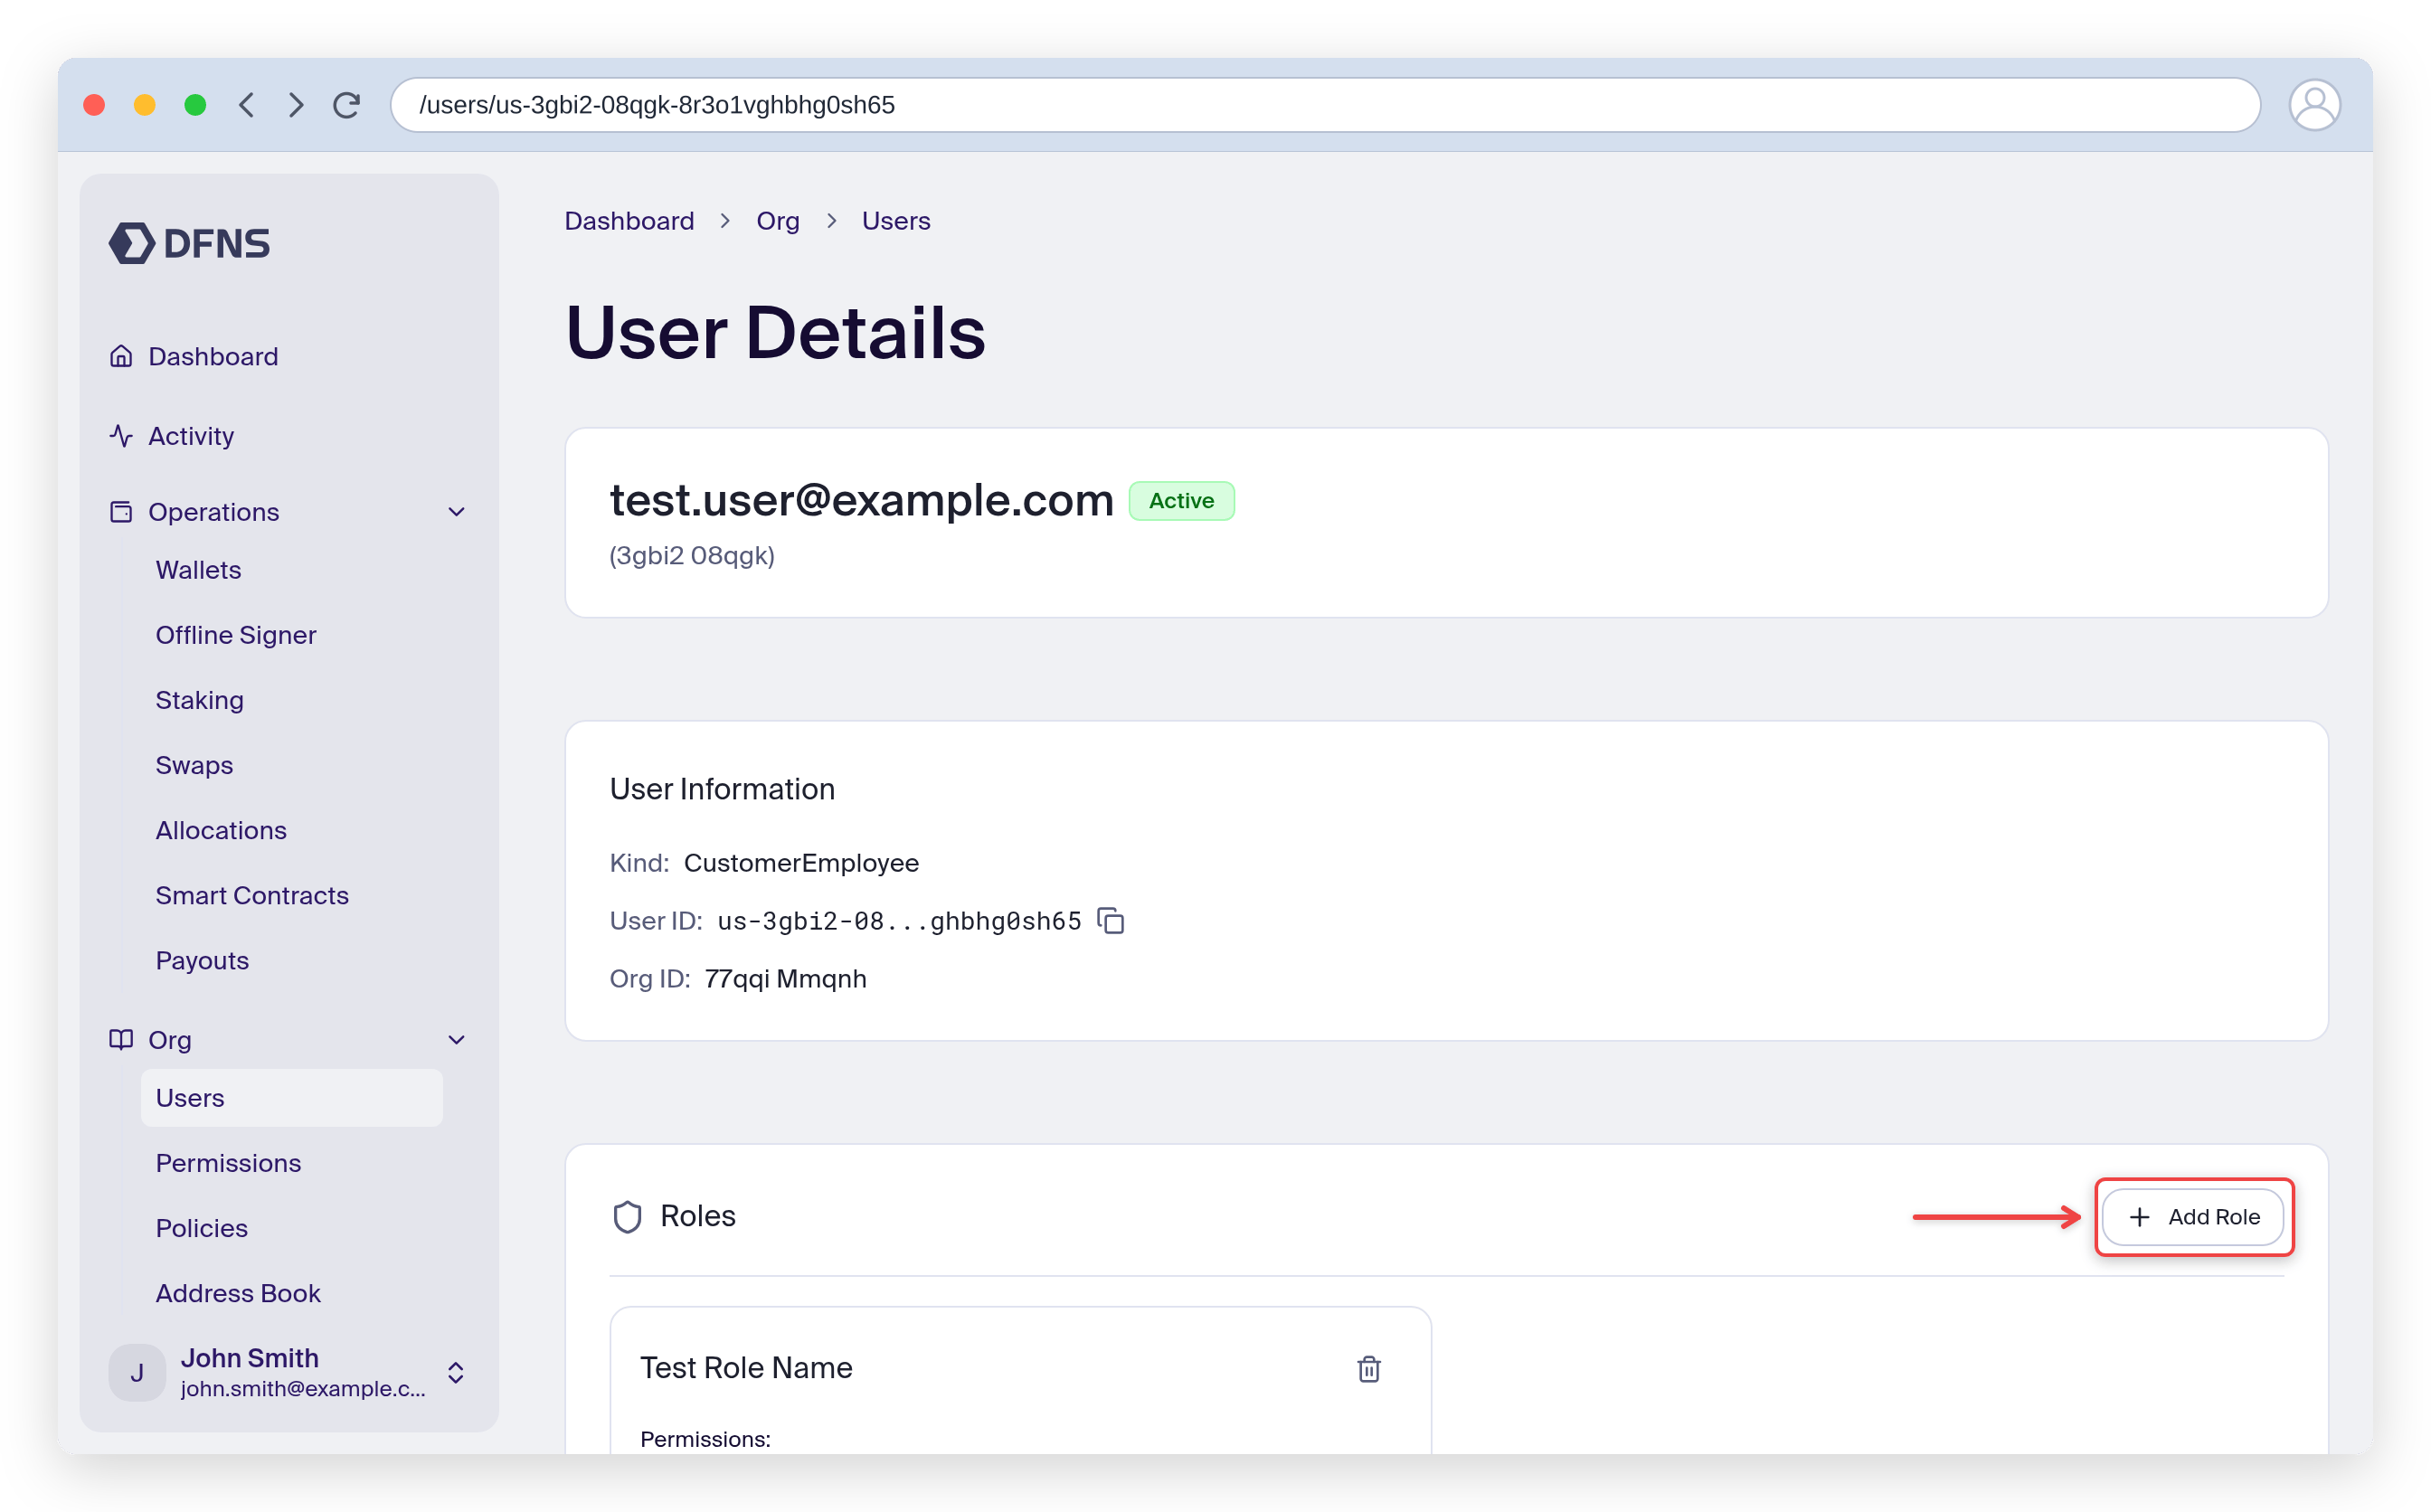
  <Step title="(Optional) Assign a Permission">
    The Org Owner creates and assigns the necessary permissions to allow users access the parts of the system required for their job responsibilities.

    Once the user details page, click "Add Permission" and select the one most relevant. Confirm the Permission Assignment and 🔑 sign the action with your passkey.

    <Info>
      Two permissions are already created for you with the most common needs: full admins can do everything while end users can simply make transactions.

      This is for convenience mostly, but we strongly encourage implementing the principle of least privilege by setting up your own permissions in the dashboard.
    </Info>

    <Frame>
      <img src="https://mintcdn.com/dfns-6d8c7466/2kpqVE6bPN0ElHJ8/images/spaces_2FtnSPOZGQ2hBmgoVWX5H6_2Fuploads_2Fu4jZHFIotnP4OpO2iibV_2FCapture_20d_E2_80_99e_CC_81cran_202025-07-15_20a_CC_80_2017.17.51.png?fit=max&auto=format&n=2kpqVE6bPN0ElHJ8&q=85&s=02953019d93e9d942e33e2a4405fa82e" alt="" width="3428" height="1800" data-path="images/spaces_2FtnSPOZGQ2hBmgoVWX5H6_2Fuploads_2Fu4jZHFIotnP4OpO2iibV_2FCapture_20d_E2_80_99e_CC_81cran_202025-07-15_20a_CC_80_2017.17.51.png" />
    </Frame>
  </Step>
</Steps>

You can now head to the next step: <Icon icon="2" />
[Define and Assign Permissions](/introduction/quickstart/2-define-and-assign-permissions)