> ## Documentation Index
> Fetch the complete documentation index at: https://docs.dfns.co/llms.txt
> Use this file to discover all available pages before exploring further.
# Canton
> Network-specific features, supported assets, and integration requirements for Canton Network wallets and validator workflows on the DFNS platform.
export const SupportLink = ({children}) => {
const url = "https://support.dfns.co";
return {children || url};
};
export const Youtube = props => {
return ;
};
export const Delete = props => {
return DEL{props.children};
};
export const Get = props => {
return GET{props.children};
};
export const Put = props => {
return
        PUT

      {props.children}
;
};
export const Post = props => {
return POST{props.children};
};
DFNS supports the Canton network, including self-hosted validators. For more information, you can read our announcement [on our blog](https://www.dfns.co/article/canton-tier-1-support).
The Canton Network is a speciality chain that requires a dedicated activation by DFNS teams.
Please reach out to our Support Team indicating your organization id so we can activate it for you.
## 1/ Setup a Canton validator
DFNS offers two options for interacting with the Canton Network:
This is the easiest way to start quickly broadcasting transactions with Canton wallets.
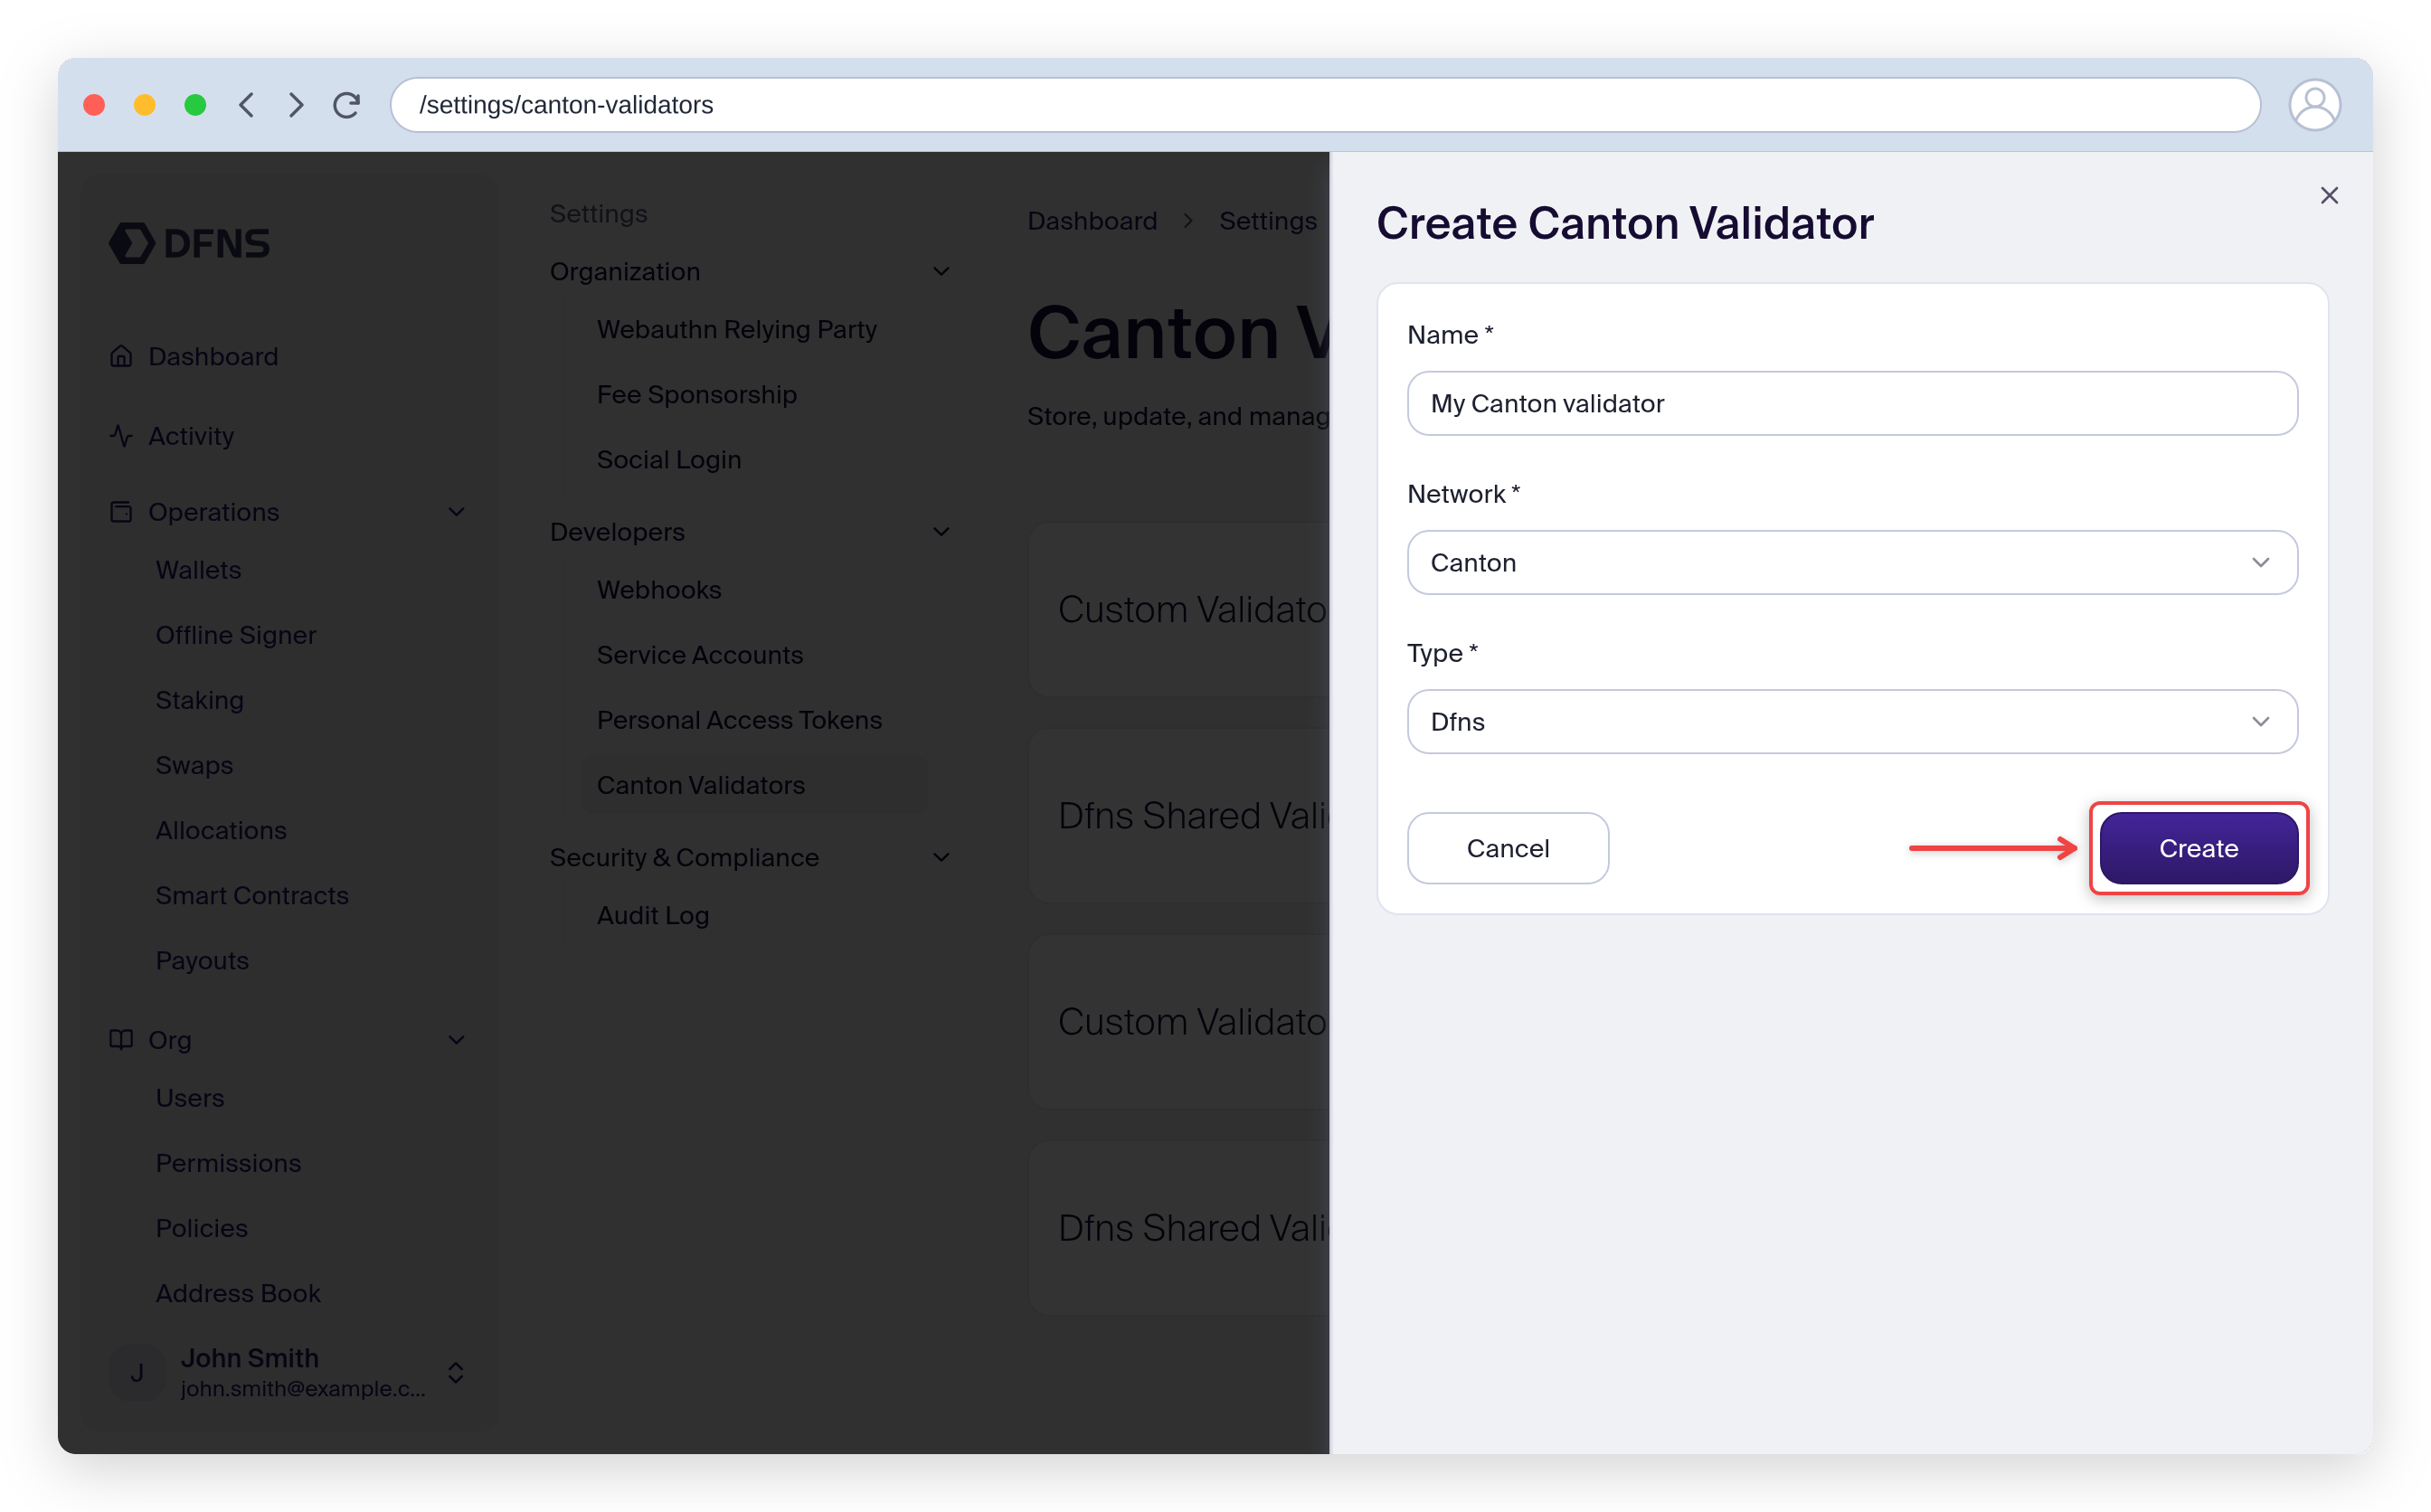
Create a new validator, name it and select kind "DFNS" (or `Shared` with the API) when requested and you are done.
**Via API:** see the [Create Canton Validator endpoint](/api-reference/networks/create-canton-validator).
**Via the Dashboard:** head to the dashboard: Settings > Developers > Canton validators ([direct link](https://app.dfns.io/settings/canton-validators)) and click ➕ New Validator to access the creation form. Once you are done you will be requested to 🔑 sign the creation with your passkey. Then you are done!
Check out the video tutorial on our Youtube Channel:
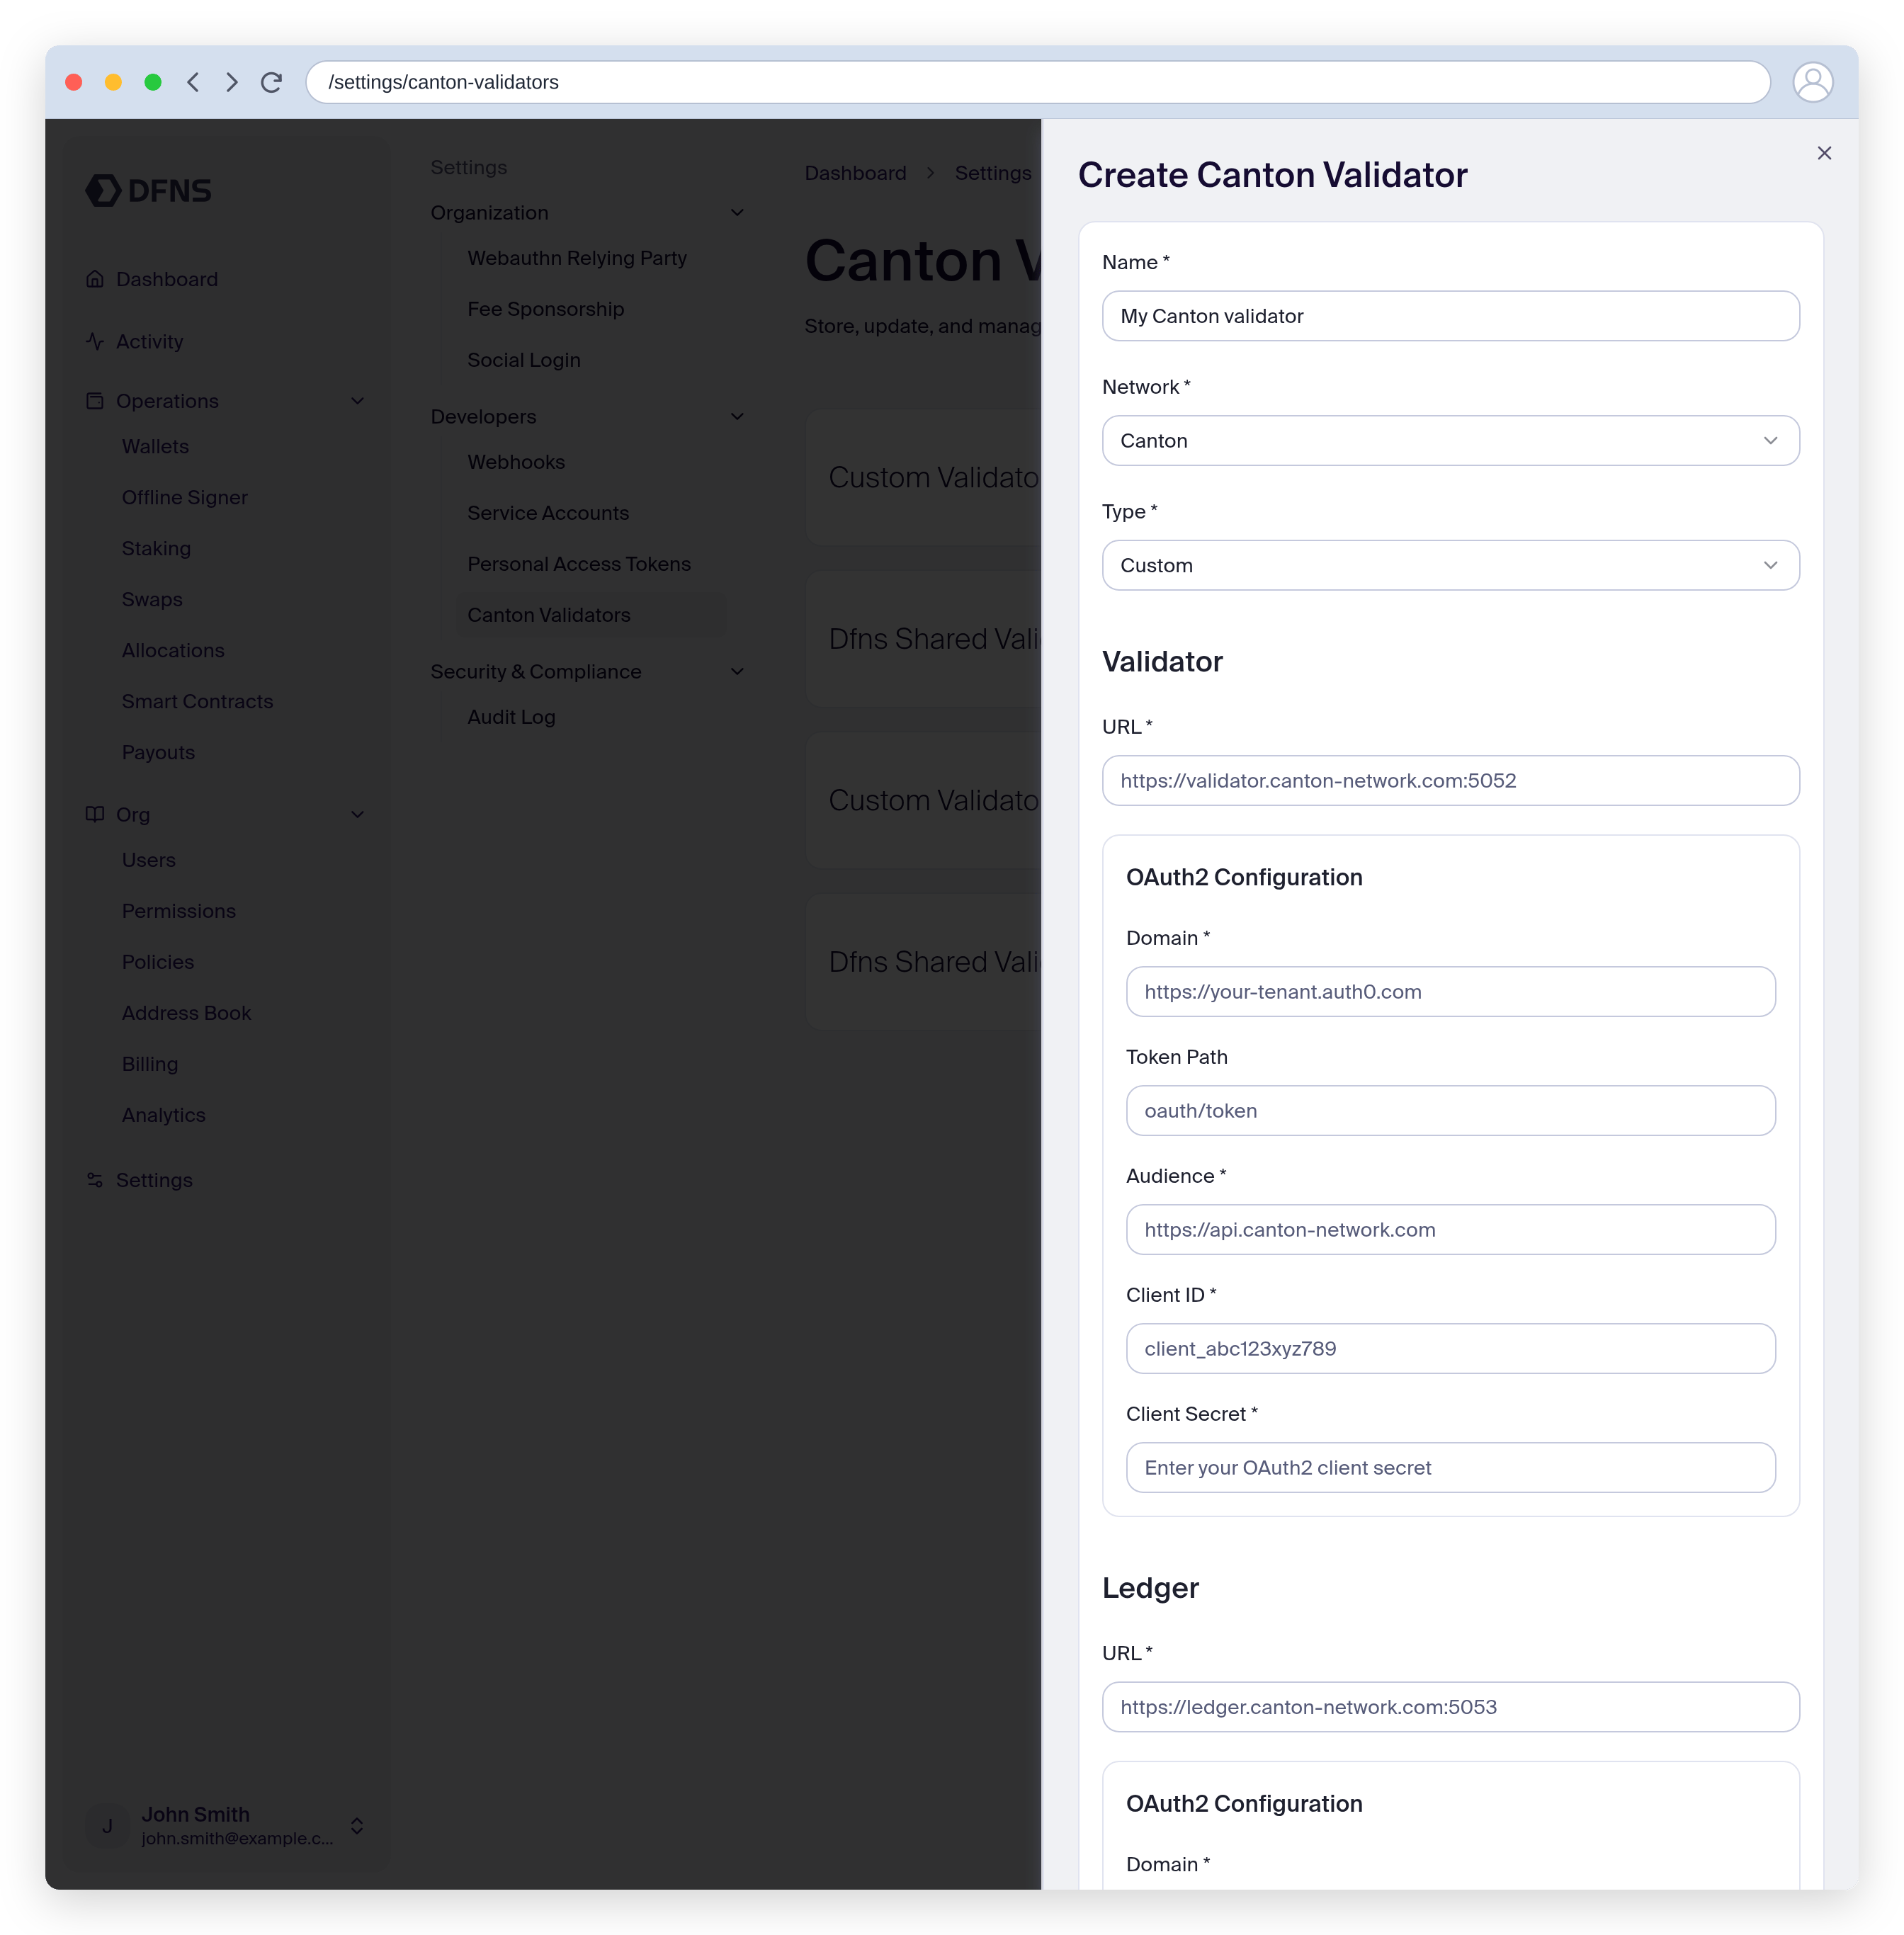
If you are running your own validator, then you can connect it to DFNS over API (see the [Create Canton Validator endpoint](/api-reference/networks/create-canton-validator)) or via the Dashboard. Once connected, you can create secure wallets linked to your validator. There is no extra setup needed on your validator side.
You will always earn the rewards associated with the validator in the native wallet on that validator.
We recommend configuring a automated sweep into a separate DFNS-secured Canton wallet to ensure your coins are safe. See an example configuration [here](https://docs.dev.sync.global/validator_operator/validator_helm.html#configuring-sweeps-and-auto-accepts-of-transfer-offers).
We need several information to be able to connect to your validator:
* **The validator URL:** we expect to be able to call the validator External Signing API, for instance `$URL/api/validator/v0/admin/external-party/topology/generate`. See the underlying calls details [here](https://docs.dev.sync.global/app_dev/validator_api/index.html#validator-api-external-signing). The calls will be originating from our IP addresses (see [dfns-environments](/api-reference/regions))
* **The validator's OAuth2 authentication parameters:** this is how we will authenticate into your validator. You should have setup authentication already (see details [here](https://docs.dev.sync.global/validator_operator/validator_helm.html#helm-validator-auth)), you can reuse the same Application details. For convenience you can find some examples with some common providers on [the API page](/api-reference/networks/create-canton-validator)
* **Domain:** your OAuth2 tenant domain. Provided by your auth provider.
* **Token Path:** token endpoint from your authorization provider. We will call this endpoint on your tenant domain (i.e.: `/`)
* **Audience:** the audience your configured on your auth provider. It is suggested to start with `https://canton.network.global`.
* **Client ID:** The client id from your auth provider for this application.
* **Client Secret:** The client secret from your auth provider for this application.
* **The Ledger API URL:** URL to access the Ledger JSON API. DFNS requires access to the full Ledger JSON API — see the [complete endpoint list](https://github.com/hyperledger-labs/splice/blob/main/canton/community/ledger/ledger-json-api/src/test/resources/json-api-docs/openapi.yaml) for reference. The calls will be originating from our IP addresses (see [DFNS Environments](/api-reference/regions))
* **The Ledger OAuth2 authentication parameters:** this is how we will authenticate to your ledger API. This will usually use the same parameters as for the validator.
Once you have gathered these information, you can start setting up the custom validator on DFNS.
**Via API:** see the [Create Canton Validator endpoint](/api-reference/networks/create-canton-validator).
**Via the Dashboard:** head to the dashboard: Settings > Developers > Canton validators ([direct link](https://app.dfns.io/settings/canton-validators)) and click ➕ New Validator to access the creation form. Once you are done you will be requested to 🔑 sign the creation with your passkey, then you are done!
Canton validators support a limited number of wallets. You can connect several validators to your DFNS account.
## 2/ Setup a Canton Wallet
Create a Canton wallet via the dashboard Wallets page or via the [Create Wallet](/api-reference/wallets/create-wallet) API endpoint.
At this stage, the wallet has a key but is not yet registered on any validator. The wallet address will not have a prefix and the wallet cannot be used for transactions yet.
Activate the wallet by registering it on a validator using the [Activate Wallet](/api-reference/wallets/activate-wallet) endpoint, specifying the `validatorId` of the validator you want to use.
**Via API:**
```bash theme={null}
POST /wallets/{walletId}/activate
{
"validatorId": "cv-xxxxx-xxxxx-xxxxxxxxxxxxxx"
}
```
**Via the Dashboard:** After creating a Canton wallet, the dashboard will prompt you to select a validator and activate the wallet.
Once activated, the wallet address will have its full prefix and can be used for transactions.
The Canton network has two ways of receiving funds:
1. **Transfer offers**: the sender creates an offer, and the recipient explicitly accepts or rejects it via the [Accept Offer](/api-reference/wallets/accept-offer) / [Reject Offer](/api-reference/wallets/reject-offer) endpoints or the Dashboard. See [Managing offers](#managing-offers) below.
2. **Auto-approved transfers**: pre-approve an asset so incoming transfers of that asset are accepted automatically, with no manual action needed. This works for both Canton Coin and CIP-56 tokens (see [CIP-56 tokens](#cip-56-tokens-transfers-and-offers) for how their pre-approval is set up).
We recommend pre-approving the assets you expect to receive so you can accept transfers without having to act on each one individually.
Unaccepted transfer offers expire after 24 hours. The funds remain locked until the recipient rejects or the sender withdraws the offer.
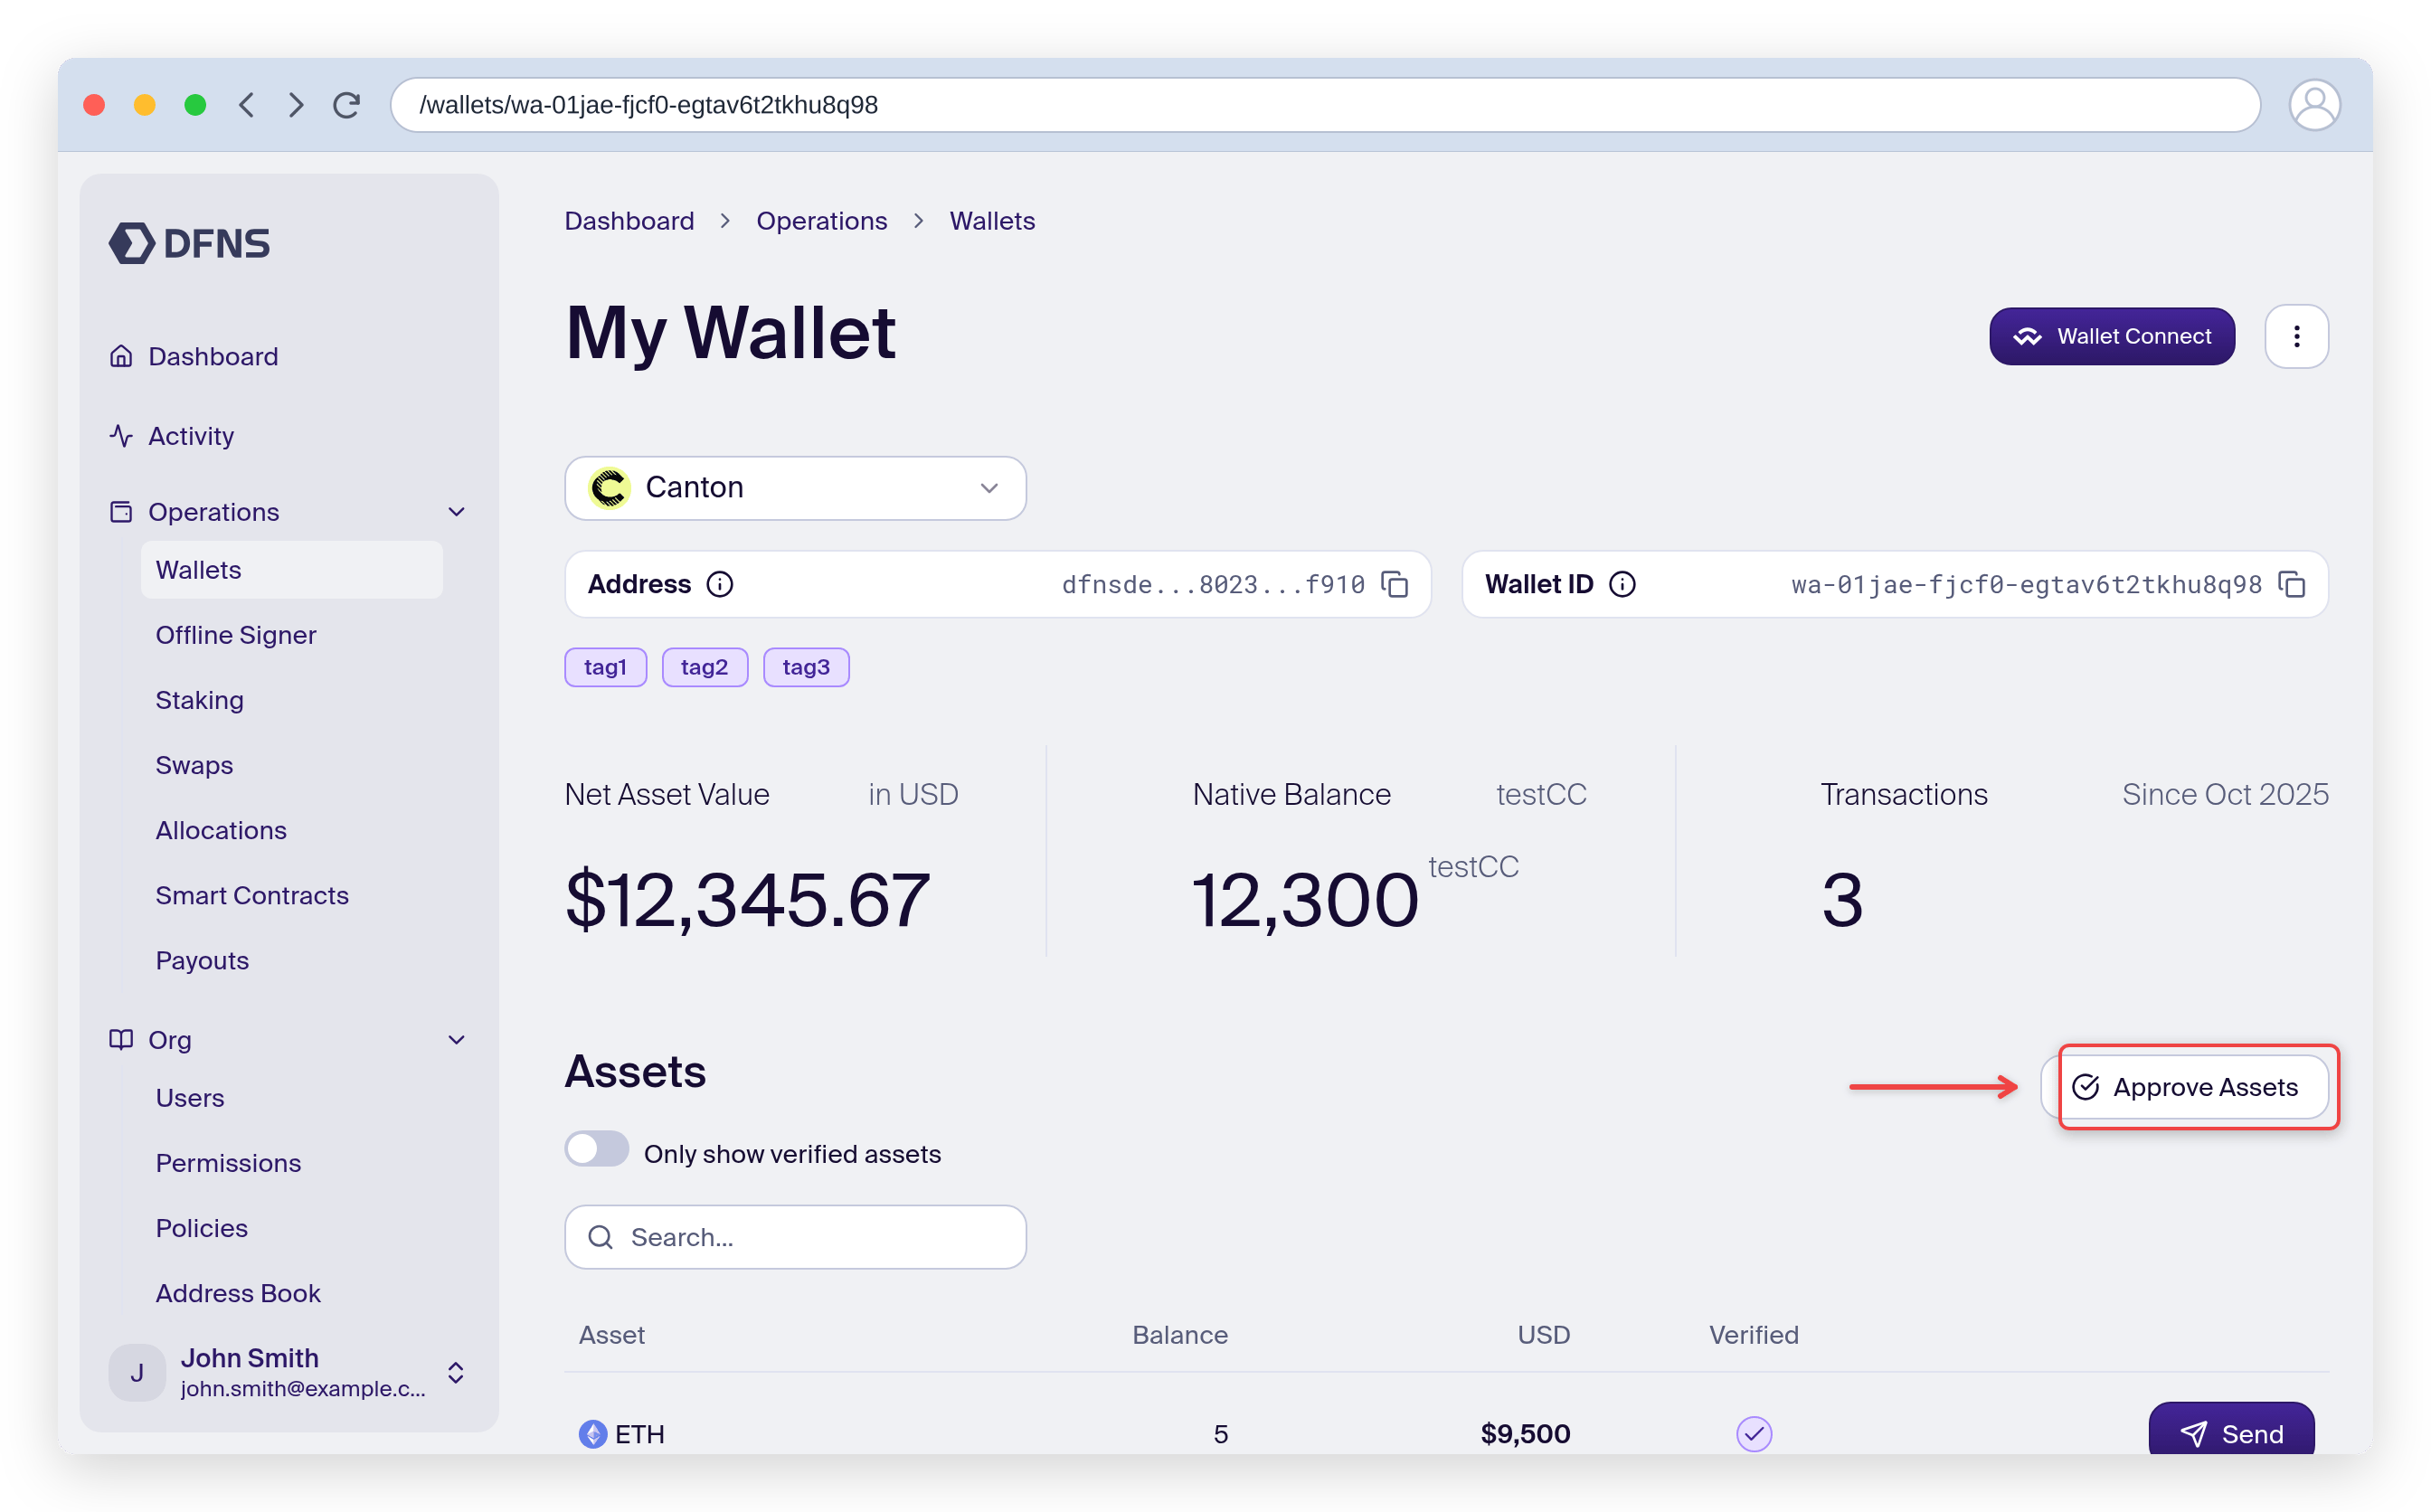
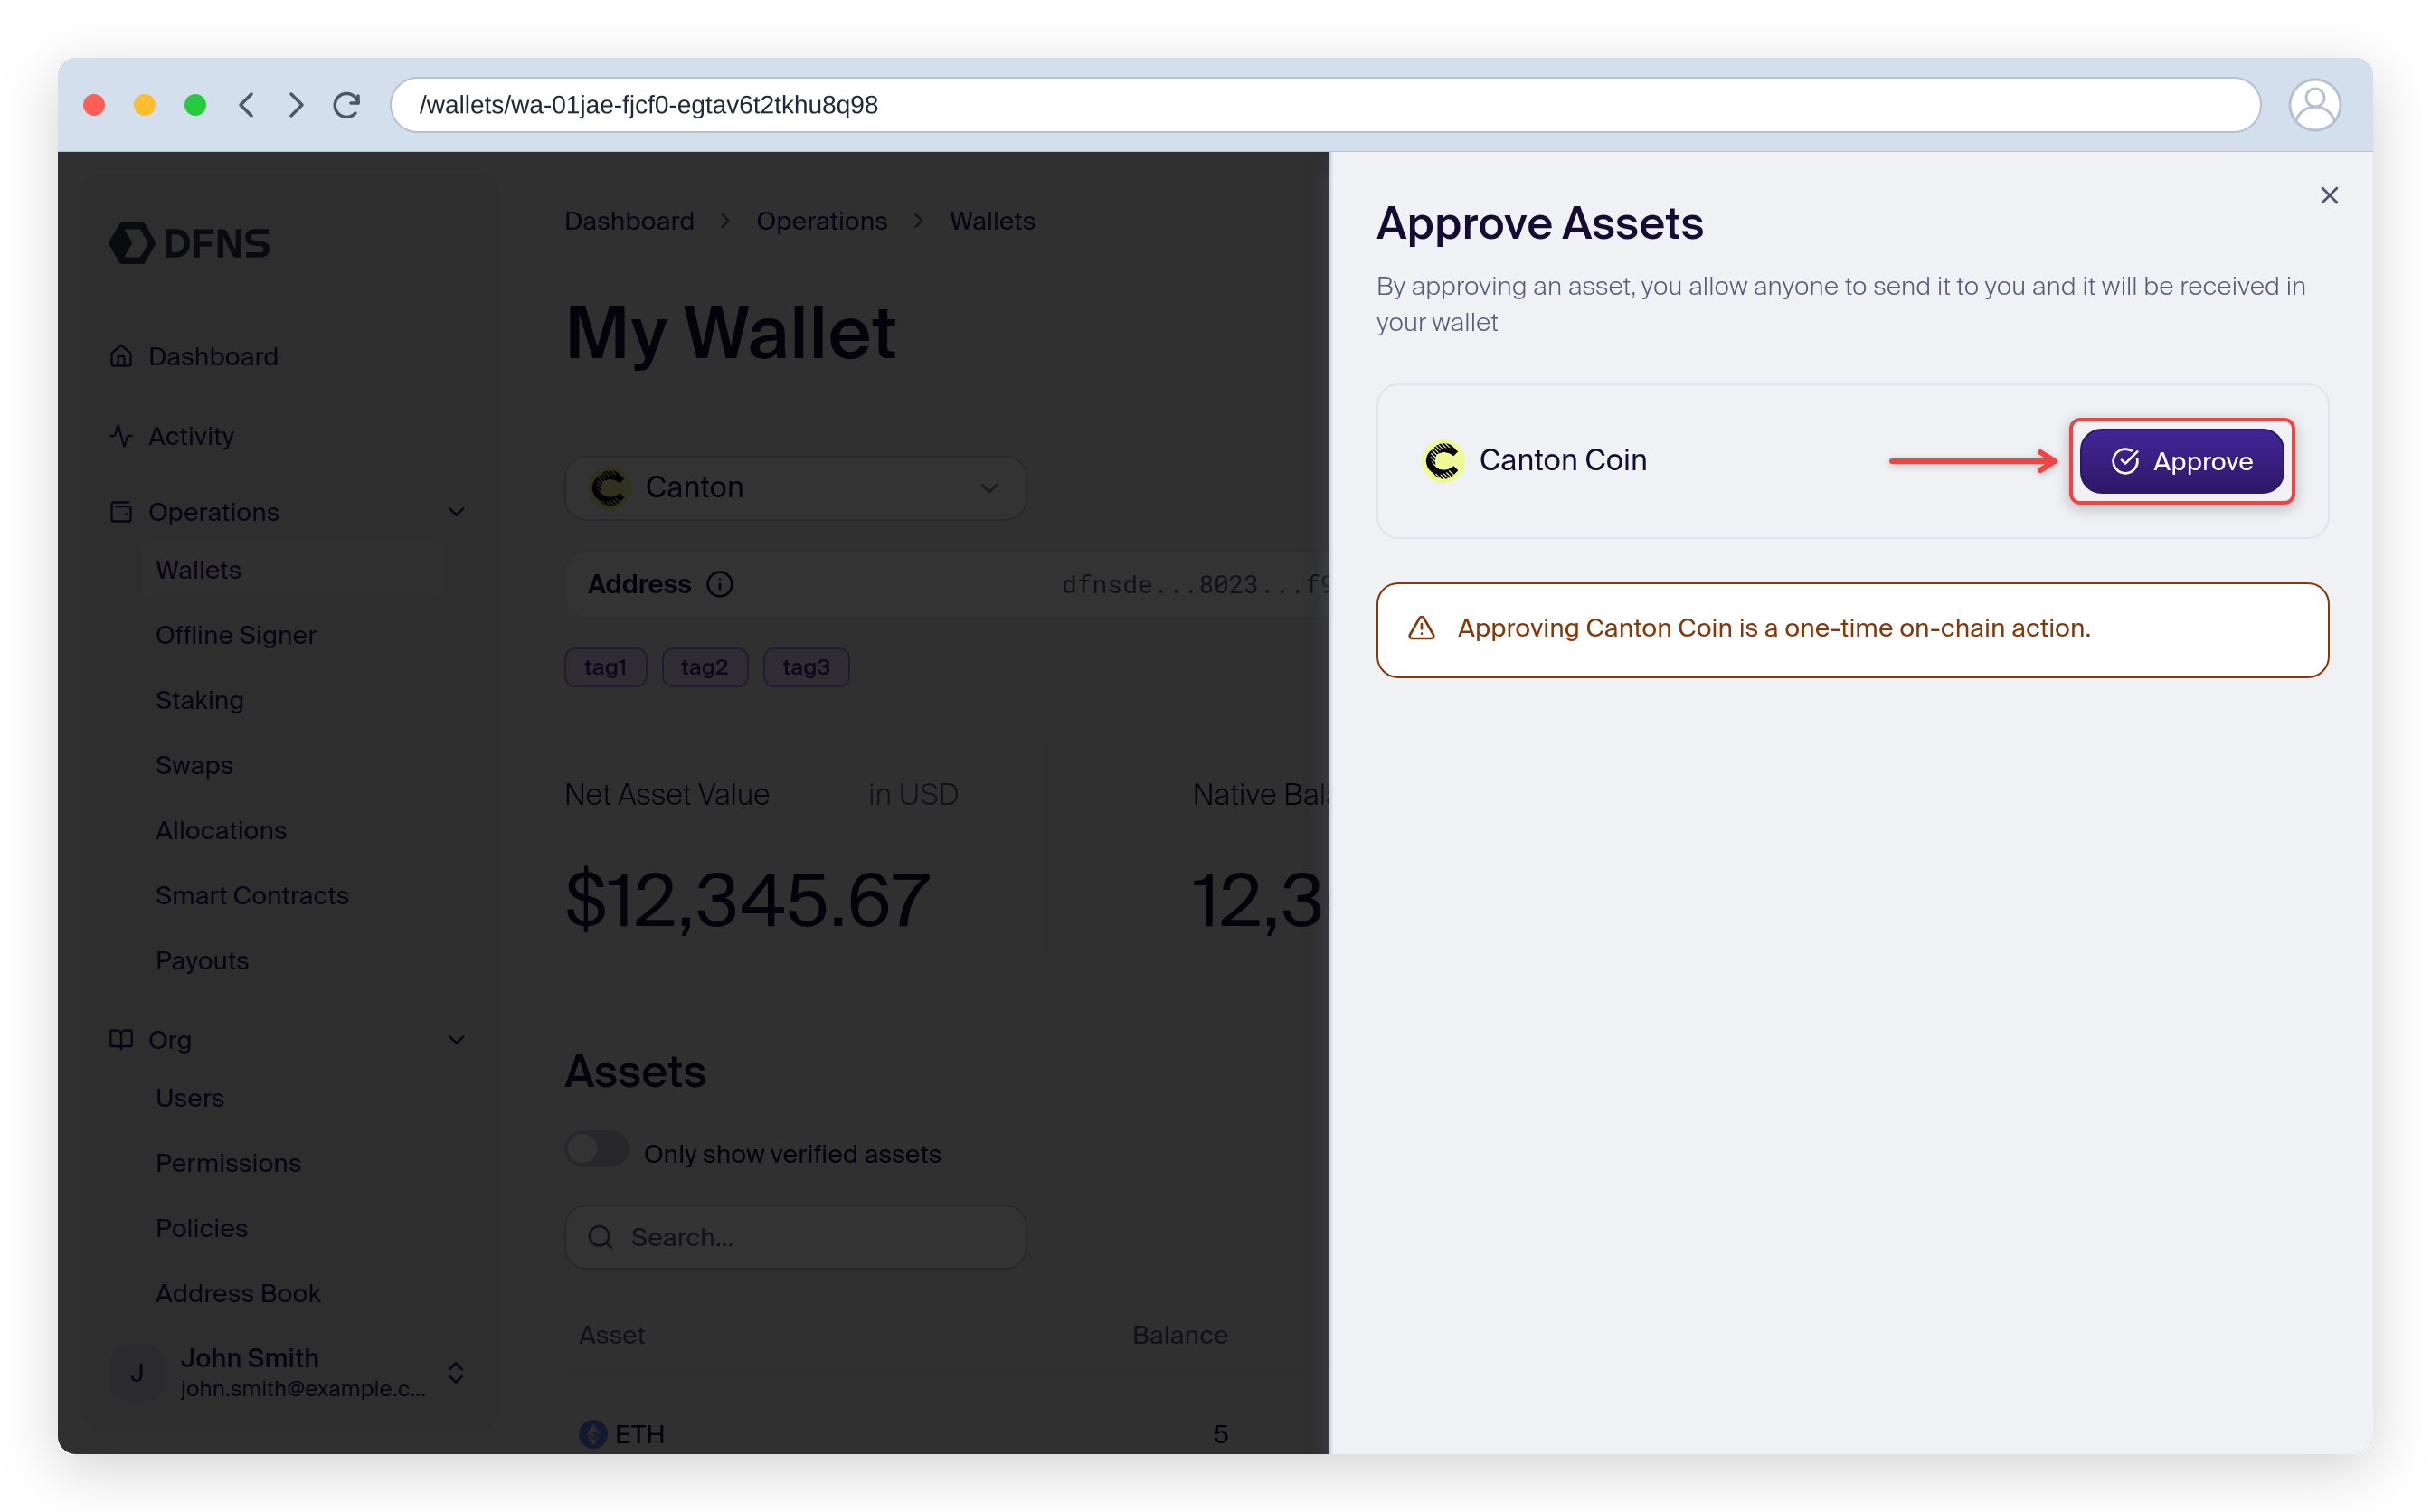
Pre-approve receiving assets into your Canton Wallet from the Dashboard Wallet page.
Click " Approve Assets" button on the dashboard, then " Approve" for the assets needed.
## Transfers
Use the [Transfer Asset](/api-reference/wallets/transfer-asset) endpoint for Canton transfers:
* **Native Canton Coin**: Use `kind: Native`
* **CIP-56 tokens**: Use `kind: Cip56` (see below)
### CIP-56 tokens (transfers and offers)
CIP-56 tokens (utility tokens on Canton) can be received in two ways, controlled by the `offer` flag on a `kind: Cip56` transfer:
* **Direct transfer (`offer: false`, the default)**: settles immediately with no acceptance step, but only if the recipient has a transfer pre-approval for that token. If they do not, the request is rejected with a message to create an offer instead.
* **Transfer offer (`offer: true`)**: the recipient explicitly accepts the offer. Use this when the recipient has not pre-approved the token.
Transferring to yourself does not require a pre-approval or an offer.
For an offer, the recipient accepts via the Dashboard or the [Accept Offer](/api-reference/wallets/accept-offer) endpoint.
#### Pre-approving a CIP-56 token
The high-level pre-approval (`kind: TransferPreapproval` broadcast, and the dashboard **Approve Assets** button) applies to **Canton Coin only**. To pre-approve a CIP-56 utility token (for example USDCx) so its transfers are auto-accepted, broadcast a custom Canton transaction on the **receiver** wallet that creates the Utility Registry `TransferPreapproval` contract for that token:
```typescript theme={null}
// Run on the RECEIVER wallet (the one that will receive the CIP-56 token).
const wallet = await dfnsClient.wallets.getWallet({ walletId: receiverWalletId })
const result = await dfnsClient.wallets.broadcastTransaction({
walletId: receiverWalletId,
body: {
kind: 'Transaction',
transaction: {
commands: [
{
CreateCommand: {
// The prefix is the Registry Utility package ID deployed on your network.
templateId:
':Utility.Registry.App.V0.Model.TransferPreapproval:TransferPreapproval',
createArguments: {
receiver: wallet.address, // the receiver wallet's Canton party ID
operator: operatorPartyId, // your validator operator party ID
instrumentAdmin: instrumentAdminPartyId, // the token issuer's party ID (e.g. the USDCx admin)
instrumentAllowances: [{ id: 'USDCx' }], // up to 10 instrument IDs, or [] for all
},
},
},
],
disclosedContracts: [],
},
},
})
```
Once this transaction reaches `Confirmed` on the Canton ledger, `kind: Cip56` transfers to that wallet settle directly with `offer: false`. A full runnable example is in the SDK [Canton examples](https://github.com/dfns/dfns-sdk-ts/tree/m/examples/libs/canton).
**Finding the `operator` party:** it is your validator's operator party, which is the same `provider` party that appears on your wallet's Canton Coin pre-approval. Pre-approve Canton Coin first (dashboard **Approve Assets**), then read that `provider` party from a Canton scan explorer such as [ccview.io](https://ccview.io) and reuse it here. Bring-your-own-validator customers operate this party themselves. Using the wrong operator makes the pre-approval confirm but not take effect.
The `TransferPreapproval` template, its package-ID prefix, and the `operator` / `instrumentAdmin` party IDs are defined by the token's registry (the Digital Assets Registry Utility), not by DFNS, and are specific to your Canton environment and the token. Pre-approval support depends on the registry version (Registry Utility v0.11.0 or later for assets such as USDCx). Confirm the template and field names against the [Digital Assets documentation](https://docs.digitalasset.com/).
Broadcasting a pre-approval is a wallet activity, so it is subject to your [policies](/core-concepts/policies). Because the transaction carries no transfer value, an amount-based policy rule cannot infer a value and will trigger.
### Managing offers
| Endpoint | Description |
| --------------------------------------------------- | ----------------------------------------- |
| [List offers](/api-reference/wallets/list-offers) | View pending transfer offers for a wallet |
| [Get offer](/api-reference/wallets/get-offer) | Get details of a specific offer |
| [Accept offer](/api-reference/wallets/accept-offer) | Accept an incoming transfer offer |
| [Reject offer](/api-reference/wallets/reject-offer) | Reject an incoming transfer offer |
### Expired offers
Transfer offers expire after 24 hours by default. However, **expired offers do not automatically transition to Failed** - the funds remain locked until either party takes action to unlock them (recipient rejects, or sender withdraws).
## Transaction expiration
DFNS builds Canton transactions with a **24-hour** expiration: the transaction must be broadcast within 24 hours of being built, otherwise it expires and must be rebuilt and re-signed. This applies to all transactions, including transfers, and gives this much time to sign and broadcast even if the signing infrastructure is temporarily unavailable (for example an unreachable on-prem signer).
## Canton limitations
| Limitation | Value |
| -------------------------- | -------- |
| Maximum UTXOs per wallet | 200 |
| Offer expiration (default) | 24 hours |
Canton wallets do not appear on block explorers until they receive their first transaction.
 Check out the video tutorial on our Youtube Channel: