

Prerequisites
Before starting the integration, ensure the following are in place:- DFNS account: An active DFNS organization with the HSM deployment model enabled. Contact our if this has not been configured.
- HSM hardware or service: A supported HSM, either physical (e.g. Thales Luna 7, Securosys Primus) or cloud-based (e.g. Thales Luna Cloud HSM, Securosys Primus CloudHSM, IBM HPCS, AWS CloudHSM). If using a physical HSM, it should be mounted and network-accessible.
- Host server: A server (physical or virtual) that can run the HSM Driver:
- Network connectivity to the HSM (e.g. TCP port 1792 for Thales Luna).
- Outbound HTTPS connectivity to the internet (to reach DFNS APIs).
- A supported OS: Linux (x86_64) or Windows Server (x64).
- Sufficient resources to run the HSM Driver process and a database instance.
- Database: A PostgreSQL instance (or equivalent supported database) accessible from the host server. This can be co-located on the same host or run separately. The database is required in the default
sealedkey-storage mode; inpersistentmode keys live on the HSM partition and no database is used (see configuration).
Implementation steps
1
Provision the HSM
This step is your responsibility. To maintain clear separation of concerns, DFNS does not participate in HSM procurement, setup, key ceremony, or administration.For Cloud HSM, ensure you can perform key export (i.e. for Thales Cloud HSM select “Luna Cloud HSM with Key Export”).
- Provision the HSM: For a physical HSM, get the appliance ready. For a cloud-based HSM (e.g. AWS CloudHSM, Azure Dedicated HSM), provision the cluster in your cloud account.
- Initialize the HSM: Set Security Officer credentials, create an application partition, initialize it for PKCS#11, and set the Crypto Officer PIN.
-
Perform the key ceremony: What this involves depends on the HSM backend:
- Most backends (Thales Luna standard partitions, Securosys Primus, IBM HPCS, AWS CloudHSM): you do not generate the wrapping key yourself. The HSM Driver automatically provisions an AES wrapping key inside the partition the first time it connects. Your ceremony consists of initializing the partition and setting the Security Officer and Crypto Officer credentials (for Thales, this includes the cloning domain used for replication).
- Thales Luna with Scalable Key Storage (SKS) and on-prem IBM EP11: wallet keys are sealed to the partition’s internal master key, which is created when you initialize the partition.
- Connect the host server to the HSM: Establish a secure connection, including any required certificate exchange (e.g. NTLS for Thales Luna). For cloud-based HSMs, this typically involves VPC networking and the vendor’s client agent.
2
Provision the host server
Each HSM requires a dedicated host server running the HSM Driver. If you deploy multiple HSMs for redundancy, provision one host server per HSM.The HSM and its host server should be deployed in a physically secure, access-controlled environment (e.g. a private data center, a secured server room, or an equivalent cloud environment with strict network isolation).
-
Network connectivity:
- The host must reach its paired HSM over the network via PKCS#11 (e.g. TCP 1792 for Thales Luna NTLS).
- The host must have outbound HTTPS (TCP 443) access to the internet to reach DFNS APIs.
- If your security policy requires it, configure firewall rules to restrict outbound traffic to DFNS API endpoints only.
- Operating system: Install a supported Linux distribution (e.g. Ubuntu 22.04+, RHEL 8+) or Windows Server.
-
Database (
sealedkey-storage mode, the default): Set up a PostgreSQL instance accessible from all host servers. This can run on one of the hosts or on a dedicated database server. Ensure the database is backed up regularly. Skip this step if you deploy inpersistentmode.
3
Obtain the HSM Driver from DFNS
Contact our to obtain the HSM Driver. It is available in the following formats:
- Docker container image: for containerized environments (Kubernetes, Docker Compose, ECS, etc.)
- Standalone binary: for bare-metal or VM deployments without container orchestration
4
Obtain PKCS#11 library and configuration
HSM Driver needs to use HSM PKCS#11 library and its associated configuration file to communicate with the HSM.Contact HSM’s vendor to obtain the PKCS#11 library:
- PKCS#11 library: download the PKCS#11 library from vendor’s support website
- Generate configuration file: use vendor’s HSM tooling to generate configuration file (e.g.
clientConfigfor Thales Luna). The configuration file points to the right HSM and partition.
5
Set up mTLS certificates
Communication between the HSM Driver and DFNS APIs is secured with mutual TLS (mTLS). The certificate setup is a collaborative process between you and DFNS.Detailed procedure:
- DFNS provides a CSR template: DFNS sends you a Certificate Signing Request template specifying the required fields (subject, extensions, key usage, etc.).
- You generate an intermediate certificate signing request: Using the CSR template, you generate a private key and create a signing request for an intermediate certificate.
- You send the intermediate CSR to DFNS: DFNS reviews and signs the intermediate certificate, chaining it to the DFNS trust root.
- DFNS returns the signed intermediate certificate: You now have a signed intermediate certificate that is trusted by the DFNS API.
- You generate leaf certificates: For each HSM Driver instance, you generate a leaf certificate signed by your intermediate certificate. This allows you to independently add or rotate HSM Driver instances without involving DFNS each time.
- Configure the HSM Driver: Install the leaf certificate, its private key, and the certificate chain on each HSM Driver host.
6
Configure and deploy the HSM Driver
1. ConfigurationThe HSM Driver is configured via environment variables or command line arguments. The following options are available:HSM backend settingsThe HSM Driver embeds the IBM, Thales, Securosys and AWS CloudHSM PKCS#11 libraries, so Database settings (2. Deployment
--vendor-target is usually not needed.Earlier driver versions were configured with per-vendor options (
PKCS11_IBM_MODULE, PKCS11_THALES_MODULE, PKCS11_SECUROSYS_MODULE, EP11_IBM_TARGET_HSM). They still work but are deprecated and log a warning at startup — use --vendor and --vendor-target instead.sealed mode only)To store wrapped private keys, the database can be either a PostgreSQL or a SQLite. Do not configure a database in persistent mode — the driver refuses to start.mTLS settings
DFNS API settings
The full option reference for your driver version is provided with the HSM Driver delivery.
- Container: Pull the Docker image and run it with the configuration and user pin mounted as file.
Docker compose files are provided with the HSM Driver delivery
- Binary: Place the binary on the host, provide the configuration, and run it (directly or as a systemd service).
7
Set up redundancy (recommended)
For production deployments, deploy at least two HSM Driver instances, each paired with an HSM (or connecting to an HSM cluster):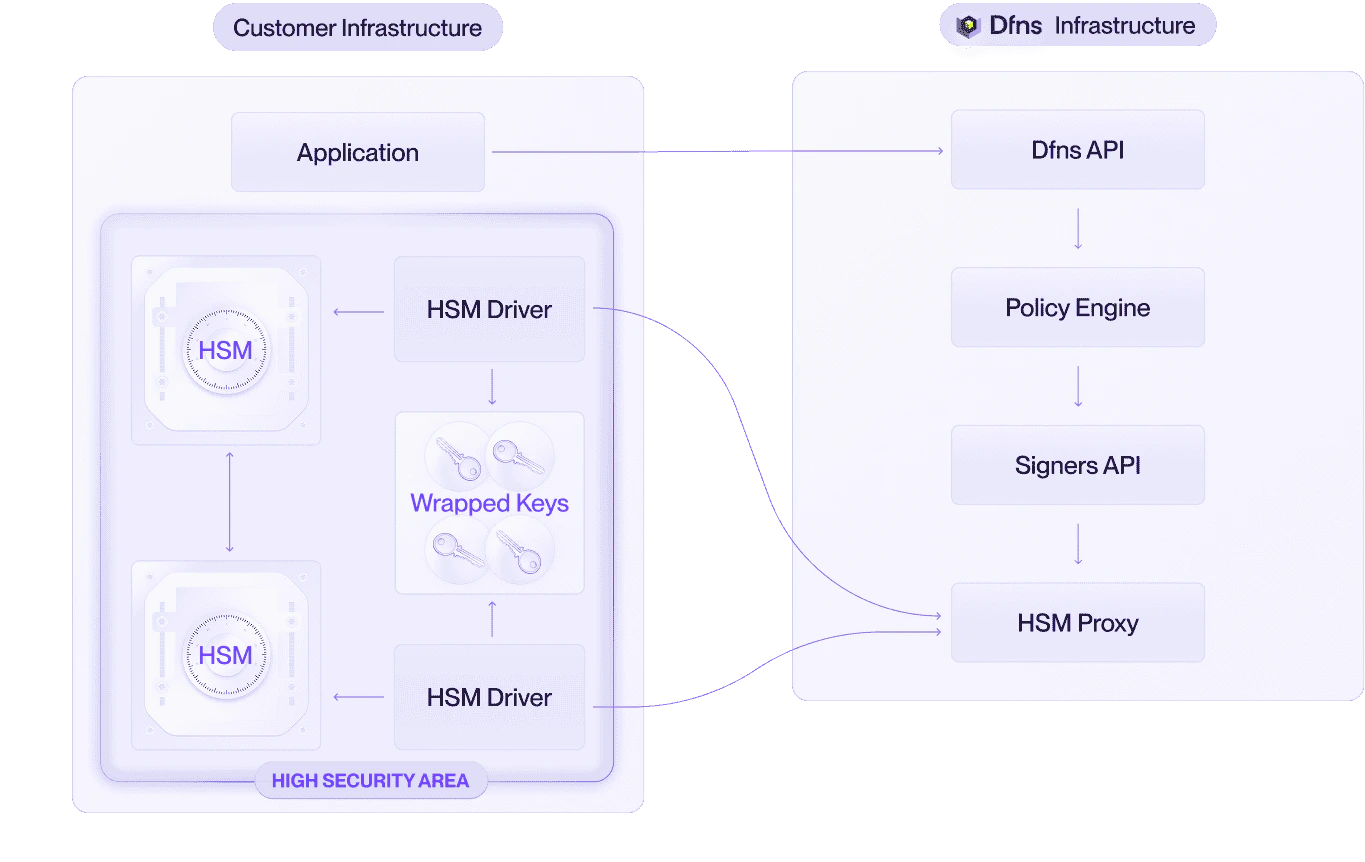
- Ensure all HSMs share the same master key.
- Ensure all HSM Drivers connect to the same database.
- Generate a separate leaf mTLS certificate for each HSM Driver instance (signed by your intermediate certificate from step 4).
- Start all HSM Driver instances. They will independently poll the DFNS API and automatically distribute the workload.
Key wrapping requirements
In the defaultsealed mode, the HSM Driver wraps (encrypts) each wallet private key inside the HSM before storing it in the database. The wrapping key and mechanism depend on the backend, and your partition must permit them:
For backends with an application wrapping key, the partition policy must allow AES key generation (
CKM_AES_KEY_GEN) and key wrap / unwrap (C_WrapKey / C_UnwrapKey) with the listed mechanism. The --wrapping-cbc option forces CKM_AES_CBC_PAD on backends where AES-GCM is not supported.
Responsibility matrix (RACI)
- R = Responsible (does the work)
- A = Accountable (owns the outcome)
- C = Consulted (provides input)
- I = Informed (kept up to date)
Key takeaway: DFNS provides the HSM Driver software, signs the intermediate mTLS certificate, and maintains the API. Everything else is your responsibility.
Backup and disaster recovery
For a complete overview of what to back up and recovery scenarios, see the disaster recovery page. Key takeaways:- HSM master key is the most critical asset. Loss is unrecoverable.
- Wrapped-key database should be backed up regularly. Wallets created after the last backup are lost if the database fails.
- mTLS intermediate certificate private key is especially critical. Without it, you cannot generate new leaf certificates for additional or replacement HSM Drivers.
Security considerations
- mTLS authentication: All communication between the HSM Driver and DFNS APIs is encrypted and mutually authenticated. Only HSM Drivers with valid leaf certificates (chained to the DFNS-signed intermediate) can connect.
- Wrapped key encryption: Private keys stored in the database are encrypted with the HSM’s master key. They are unusable without access to an HSM holding that master key.
- No DFNS access to keys: DFNS never has access to the HSM, the master key, the wrapped keys, or the database. DFNS only sees public keys and signed payloads.
- Stateless HSM usage: Private keys exist in plaintext only inside the HSM during cryptographic operations, and are never persisted in the clear.
- Customer-controlled infrastructure: You retain full control over the HSM, host server, database, and network configuration.