What is rpId?
The relying party ID (rpId) is a domain identifier that ties passkey credentials to your application. It determines which domain(s) can use a passkey credential.rpId rules
- Must be a valid domain - e.g.,
example.com, nothttps://example.com - Must match or be a parent of the current origin - A passkey for
example.comworks onapp.example.com, but not vice versa - Cannot be a public suffix - e.g.,
com,co.ukare not allowed
| Your domain | Valid rpId values |
|---|---|
app.example.com | app.example.com, example.com |
example.com | example.com only |
sub.app.example.com | sub.app.example.com, app.example.com, example.com |
When to specify rpId
Registration
When registering users via Delegated Registration:Frontend
Login
When logging in via Delegated Login:Frontend
User action signing
When signing user actions:Frontend
Recovery
When recovering an account:Frontend
Development vs production
Local development
For local development, uselocalhost:
Passkeys created on
localhost only work on localhost. You’ll need to create new passkeys when moving to production.Staging environments
For staging, use a subdomain of your production domain:Production
Use your root domain for maximum flexibility:Dashboard configuration
Whitelist your domains in the Dfns dashboard:- Navigate to Settings > Passkeys
- Add your relying party domain (e.g.,
example.com) - Choose origin settings:
- All origins (
*): Allows all subdomains and associated mobile apps - Specific origins: Restrict to specific URLs if needed
- All origins (
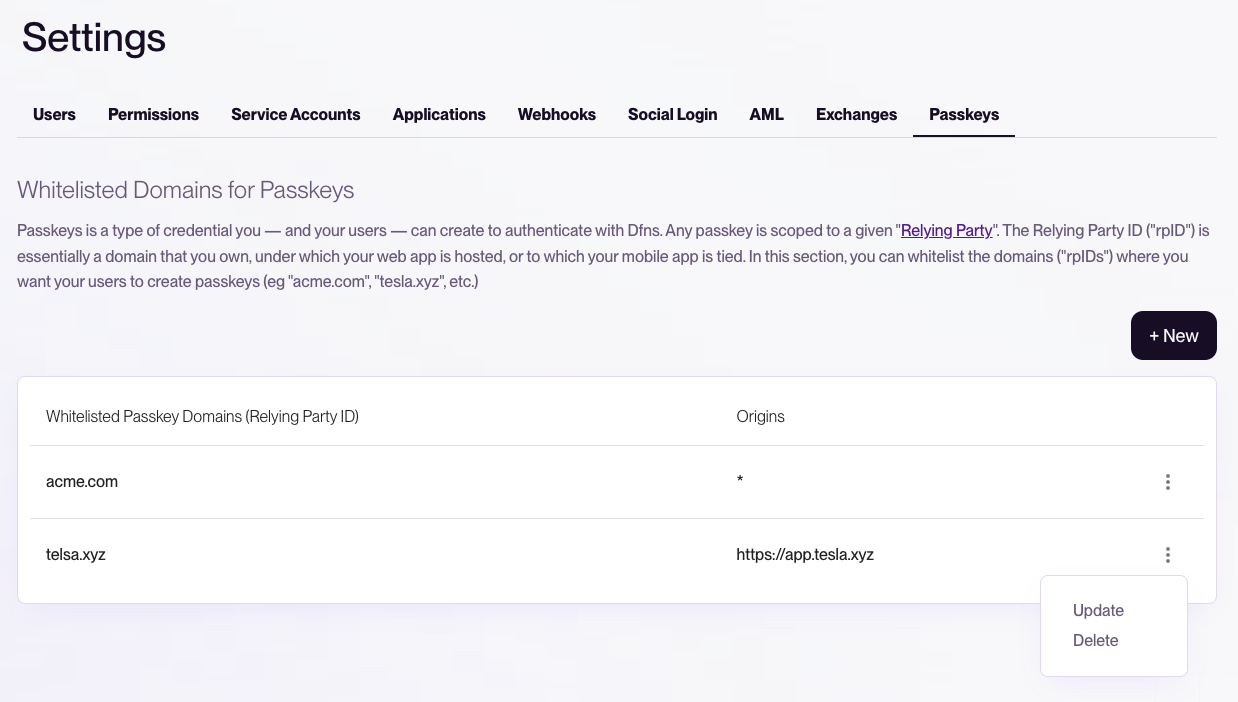
Using the root domain (e.g.,
example.com) as rpId allows passkeys to work across all subdomains (app.example.com, staging.example.com) and associated mobile apps.Mobile apps
For mobile apps (iOS, Android, React Native, Flutter), the rpId must match a domain you control, and you must host association files.1. Whitelist your domain in Dfns
Before configuring your app, add your domain to Dfns:- Go to Settings > Passkeys in the dashboard
- Add your domain (e.g.,
example.com)
2. Host domain association files
iOS and Android fetch these files to verify your app is associated with the domain. Passkeys won’t work if these files are unavailable.- iOS
- Android
Host at Replace:
https://example.com/.well-known/apple-app-site-association:TEAM_IDwith your Apple Developer Team IDcom.example.appwith your app’s bundle identifier
The file must be served with
Content-Type: application/json and no redirects.3. Configure your app
- iOS
- Android
- React Native
- Flutter
Add Associated Domains entitlement:In Xcode, go to your target’s Signing & Capabilities and add:Or in your Configure the signer:
.entitlements file:Testing mobile passkeys
| Platform | Simulator/Emulator | Real device |
|---|---|---|
| iOS | Requires macOS Sonoma+, Xcode 15+ | Full support |
| Android | Requires Google account signed in | Full support |
Troubleshooting
”The relying party ID is not a registrable domain suffix”
Your rpId is invalid. Ensure it’s:- A valid domain (not a URL)
- Not a public suffix
- A parent or exact match of your current origin
”Credential not found” during login
The passkey was created with a different rpId. Users need to re-register with the correct rpId.Cross-origin issues
If your frontend and backend are on different domains:- rpId should match your frontend domain
- Backend API calls don’t use rpId (they use the auth token)
Complete example
Frontend - webauthn-config.ts